Panasonic WV-NS202 Network Camera - Page 77
Upgrade the firmware [Upgrade], How to upgrade the firmware - software download
 |
UPC - 791871505458
View all Panasonic WV-NS202 manuals
Add to My Manuals
Save this manual to your list of manuals |
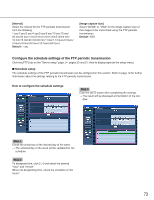
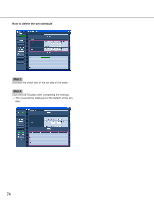
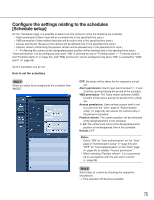
Page 77 highlights
Upgrade the firmware [Upgrade] Click the [Upgrade] tab of the "Maintenance" page. ( pages 20 and 21: How to display/operate the setup menu) The current firmware can be checked and upgraded to the latest version on this page. Contact the dealer for further information about the firmware upgrade. [Model No.], [MAC address], [Serial number], [Firmware version], [IPL version], [Viewer software installation counter] Information of each item will be displayed. How to upgrade the firmware Step 1 Contact the dealer and download the latest firmware onto a PC. Important: A blank (space) cannot be used for the name of the directory where the downloaded firmware to be saved. Step 2 Click the [Browse...] button and designate the downloaded firmware. Step 4 Click the [Upgrade] button. → The confirmation window will be displayed. When "Do not default settings after completing the upgrade." is selected, the confirmation window will not be displayed. After completing the upgrade, delete temporary internet files. ( page 87) Important: • Upgrade the firmware using a PC in the same sub- net as the camera. • Follow the instructions from the dealer when upgrad- ing the firmware. • Use the designated file (extension:img) for the firmware upgrade. • The name of the firmware to be used for the upgrade should be "ns202a_xxxxx.img". ("xxxxx" indicates the version of the firmware.) • Do not turn off the power of the camera during the upgrade process. • Do not operate the web browser (including adjusting the window size) during the upgrade process. • The following network settings will not be initialized when upgrading the firmware after selecting "Resets to default setting after completing the upgrade. (Except network settings)". ON/OFF for DHCP, IP address, net mask, default gateway, HTTP port, line speed, total bit rate, time & date • The viewer software used on each PC should be licensed individually. Refer to your dealer for the software licensing. Step 3 Click the radio button respective to the desired option to determine whether or not to initialize the settings after completing the firmware upgrade. Note: Read the "Readme" file provided with the firmware first and determine whether or not to initialize the settings after the firmware upgrade. 77
-
 1
1 -
2
-
3
-
4
-
5
-
6
-
7
-
8
-
9
-
10
-
11
-
12
-
13
-
14
-
15
-
16
-
17
-
18
-
19
-
20
-
21
-
22
-
23
-
24
-
25
-
26
-
27
-
28
-
29
-
30
-
31
-
32
-
33
-
34
-
35
-
36
-
37
-
38
-
39
-
40
-
41
-
42
-
43
-
44
-
45
-
46
-
47
-
48
-
49
-
50
-
51
-
52
-
53
-
54
-
55
-
56
-
57
-
58
-
59
-
60
-
61
-
62
-
63
-
64
-
65
-
66
-
67
-
68
-
69
-
70
-
71
-
 72
72 -
 73
73 -
 74
74 -
 75
75 -
 76
76 -
 77
77 -
 78
78 -
 79
79 -
 80
80 -
 81
81 -
 82
82 -
83
-
84
-
85
-
86
-
87
-
88
-
89
-
90
 |
 |
