Panasonic fv05vf2 FV05VK1 User Guide - Page 12
Maintenance, Practical, Guide, Installation, Product, Service
 |
View all Panasonic fv05vf2 manuals
Add to My Manuals
Save this manual to your list of manuals |
Page 12 highlights
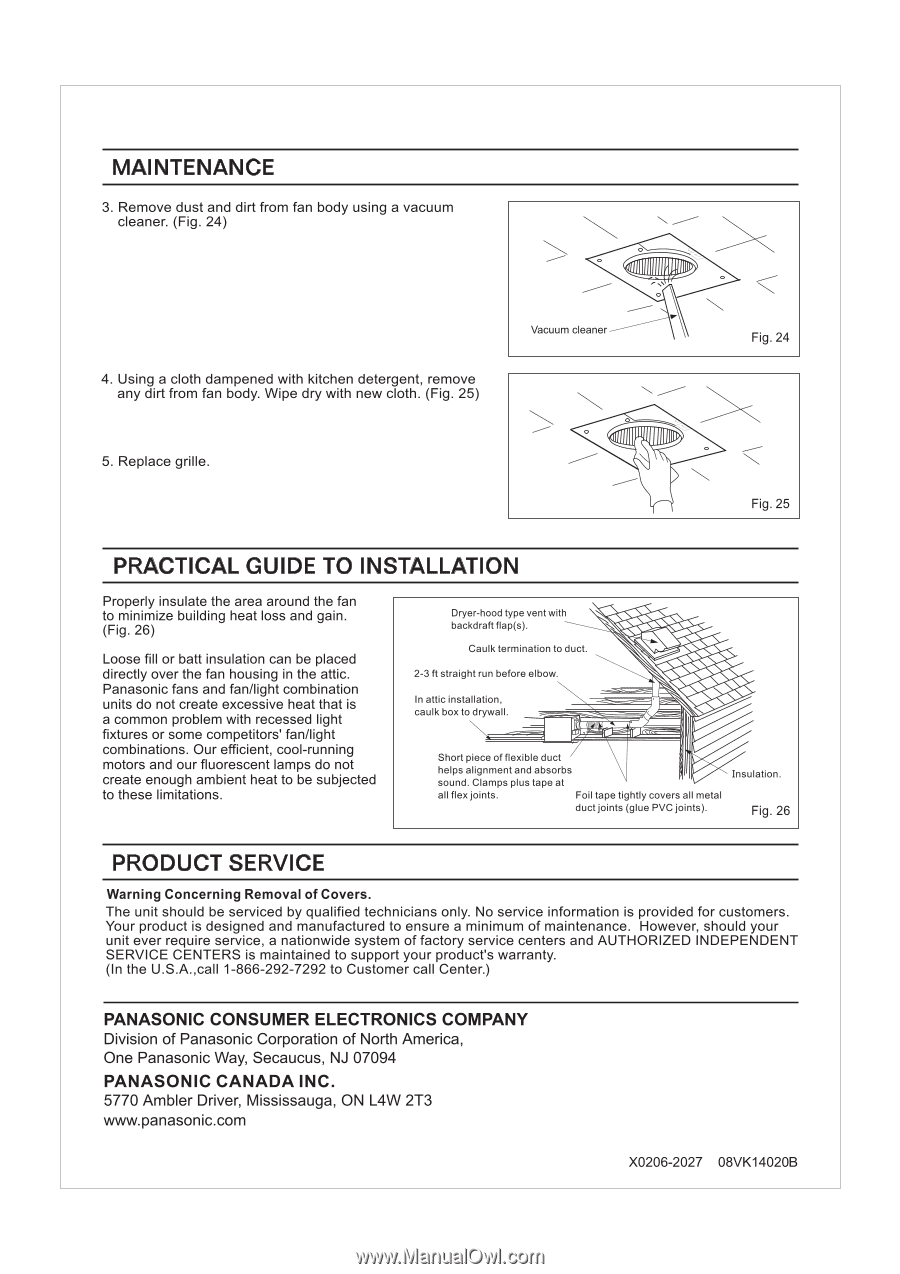
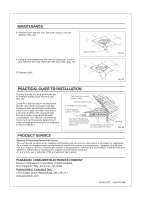
MAINTENANCE 3. Remove dust and dirt from fan body using a vacuum cleaner. (Fig. 24) 4. Using a cloth dampened with kitchen detergent, remove any dirt from fan body. Wipe dry with new cloth. (Fig. 25) Vacuum cleaner Fig. 24 5. Replace grille. Fig. 25 PRACTICAL GUIDE TO INSTALLATION Properly insulate the area around the fan to minimize building heat loss and gain. (Fig. 26) Loose fill or batt insulation can be placed directly over the fan housing in the attic. Panasonic fans and fan/light combination units do not create excessive heat that is a common problem with recessed light fixtures or some competitors' fan/light combinations. Our efficient, cool-running motors and our fluorescent lamps do not create enough ambient heat to be subjected to these limitations. Dryer-hood type vent with backdraft flap(s). Caulk termination to duct. 2-3 ft straight run before elbow. In attic installation, caulk box to drywall. Short piece of flexible duct helps alignment and absorbs sound. Clamps plus tape at Insulation. all flex joints. Foil tape tightly covers a metal duct joints (glue PVC joints). Fig. 26 PRODUCT SERVICE Warning Concerning Removal of Covers. The unit should be serviced by qualified technicians only. No service information is provided for customers. Your product is designed and manufactured to ensure a minimum of maintenance. However, should your unit ever require service, a nationwide system of factory service centers and AUTHORIZED INDEPENDENT SERVICE CENTERS is maintained to support your product's warranty. (In the U.S.A.,call 1-866-292-7292 to Customer call Center.) PANASONIC CONSUMER ELECTRONICS COMPANY Division of Panasonic Corporation of North America, One Panasonic Way, Secaucus, NJ 07094 PANASONIC CANADA INC. 5770 Ambler Driver, Mississauga, ON L4W 2T3 www.panasonic.com X0206-2027 08VK14020B
-
 1
1 -
2
-
3
-
4
-
5
-
6
-
 7
7 -
 8
8 -
 9
9 -
 10
10 -
 11
11 -
 12
12
 |
 |