Pentax Espio 24 EW Espio 24 EW Manual - Page 3
Basic, Operation
 |
View all Pentax Espio 24 EW manuals
Add to My Manuals
Save this manual to your list of manuals |
Page 3 highlights
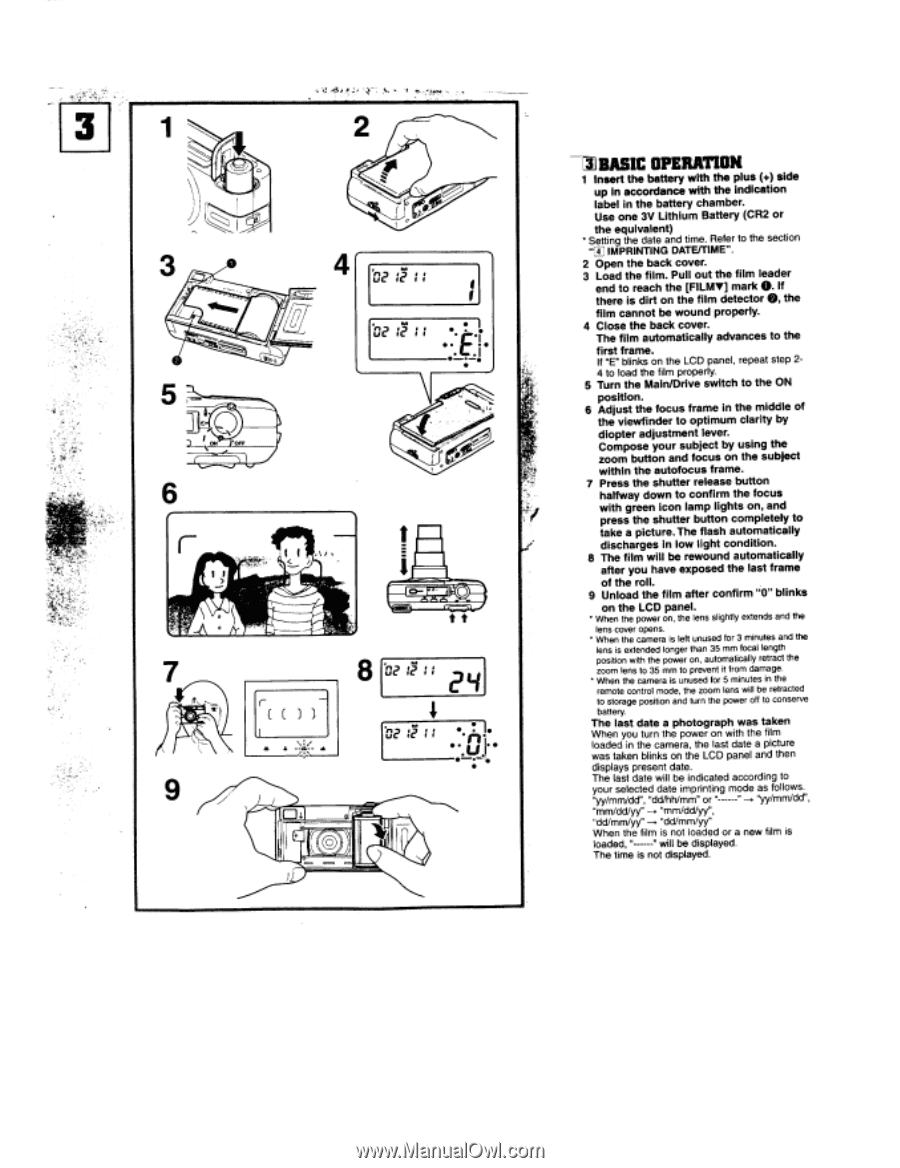
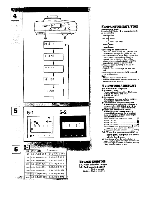
3 1 4. 4+J 4 3 t O. 4 ;" ; t!I2 I? ii • ) o.t. . .• • a ON 6 1 f I a a 0- t t 8 4 u2 r2 r BASIC OPERATION 1 Insert the battery with the plus (+) side up in accordance with the indication label in the battery chamber. Use one 3V Lithium Battery (CR2 or the equivalent) *Setting the date and time. Refer to the section "!1, IMPRINTING DATE/TIME". 2 Open the back cover. 3 Load the film. Pull out the film leader end to reach the [FILMY] mark 0. If there is dirt on the film detector 0, the film cannot be wound properly. 4 Close the back cover. The film automatically advances to the first frame. If "E" blinks on the LCD panel, repeat step 24 to load the film properly. 5 Turn the Main/Drive switch to the ON position. 6 Adjust the focus frame in the middle of the viewfinder to optimum clarity by diopter adjustment lever. Compose your subject by using the zoom button and focus on the subject within the autofocus frame. 7 Press the shutter release button halfway down to confirm the focus with green Icon lamp lights on, and press the shutter button completely to take a picture. The flash automatically discharges in low light condition. 8 The film will be rewound automatically after you have exposed the last frame of the roll. 9 Unload the film after confirm "0" blinks on the LCD panel. • When the power on, the lens slightly extends and the lens cover opens. • When the camera is left unused for 3 minutes and the lens is extended longer than 35 mm focal length position with the power on, automatically retract the zoom lens to 35 mm to prevent it from damage. • When the camera is unused for 5 minutes in the remote control mode, the zoom lens will be retracted to storage position and turn the power off to conserve battery. The last date a photograph was taken When you turn the power on with the film loaded in the camera, the last date a picture was taken blinks on the LCD panel and then displays present date. The last date will be indicated according to your selected date imprinting mode as follows. "yy/mm/dd", "dcVhhirnm" or " "-• "yy/mrn/dcl", "mm/dd/yy" -x "mmidd/yy", "dd/mm/yy" "dd/mm/yy" When the film is not loaded or a new film is loaded, " " will be displayed. The time is not displayed.
-
 1
1 -
 2
2 -
 3
3 -
 4
4 -
 5
5 -
 6
6
 |
 |