Pentax Optio SV Operation Manual - Page 90
Selecting the Recorded Pixels, to select [Recorded Pixels]
 |
UPC - 027075086562
View all Pentax Optio SV manuals
Add to My Manuals
Save this manual to your list of manuals |
Page 90 highlights
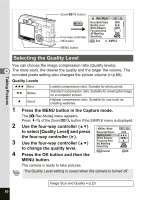
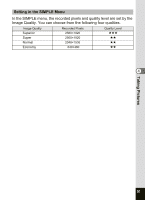
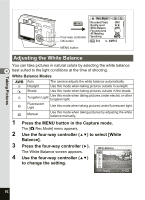
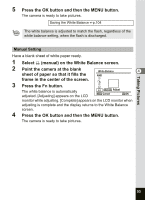
Taking Pictures Zoom/f/y button MENU Four-way controller OK button Fn button MENU button Rec. Mode Recorded Pixels Quality Level White Balance Focusing Area AE Metering Sensitivity 2560 AWB AUTO MENU Exit SIMPLE Selecting the Recorded Pixels You can choose the number of recorded pixels from [2560×1920], 4 [2048×1536], [1600×1200], [1024×768] and [640×480]. The more pixels there are, the larger the picture and the bigger the file size. The data volume also varies depending on the quality level setting (1p.90). Number of Recorded Pixels Size 2560×1920 2048×1536 1600×1200 1024×7680 640×480 Sharp, Clear Appropriate Use Fine printing such as photo printing, large-sized printing, editing Postcard-sized printing, using on homepage, attaching to E-mail 1 Press the MENU button in the Capture mode. The [A Rec.Mode] menu appears. Press x/y of the Zoom/f/y button if the SIMPLE menu is displayed. 2 Use the four-way controller (23) Rec. Mode to select [Recorded Pixels] and Recorded Pixels 2560 press the four-way controller (5). Quality Level White Balance 2048 1600 3 Use the four-way controller (23) Focusing Area AE Metering 1024 640 to change the size. Sensitivity AUTO 4 MENU Cancel Press the OK button and then the OK OK MENU button. The camera is ready to take pictures. 88
-
 1
1 -
2
-
3
-
4
-
5
-
6
-
7
-
8
-
9
-
10
-
11
-
12
-
13
-
14
-
15
-
16
-
17
-
18
-
19
-
20
-
21
-
22
-
23
-
24
-
25
-
26
-
27
-
28
-
29
-
30
-
31
-
32
-
33
-
34
-
35
-
36
-
37
-
38
-
39
-
40
-
41
-
42
-
43
-
44
-
45
-
46
-
47
-
48
-
49
-
50
-
51
-
52
-
53
-
54
-
55
-
56
-
57
-
58
-
59
-
60
-
61
-
62
-
63
-
64
-
65
-
66
-
67
-
68
-
69
-
70
-
71
-
72
-
73
-
74
-
75
-
76
-
77
-
78
-
79
-
80
-
81
-
82
-
83
-
84
-
 85
85 -
 86
86 -
 87
87 -
 88
88 -
 89
89 -
 90
90 -
 91
91 -
 92
92 -
 93
93 -
 94
94 -
 95
95 -
96
-
97
-
98
-
99
-
100
-
101
-
102
-
103
-
104
-
105
-
106
-
107
-
108
-
109
-
110
-
111
-
112
-
113
-
114
-
115
-
116
-
117
-
118
-
119
-
120
-
121
-
122
-
123
-
124
-
125
-
126
-
127
-
128
-
129
-
130
-
131
-
132
-
133
-
134
-
135
-
136
-
137
-
138
-
139
-
140
-
141
-
142
-
143
-
144
-
145
-
146
-
147
-
148
-
149
-
150
-
151
-
152
-
153
-
154
-
155
-
156
-
157
-
158
-
159
-
160
-
161
-
162
-
163
-
164
-
165
-
166
-
167
-
168
-
169
-
170
-
171
-
172
-
173
-
174
-
175
-
176
-
177
-
178
-
179
-
180
 |
 |
