Pfaff 132 Owner's Manual
Pfaff 132 Manual
 |
View all Pfaff 132 manuals
Add to My Manuals
Save this manual to your list of manuals |
Pfaff 132 manual content summary:
- Pfaff 132 | Owner's Manual - Page 1
(CPFAFFD) C- aFardz '132 r 315$ - Pfaff 132 | Owner's Manual - Page 2
that you will immediately try your hand at all the different kinds of sewing your machine can do. We have therefore prepared this informative in struction book and hope you will find it a useful guide. Before putting the machine to work we vise you to glance briefly at the pages of fhis book - Pfaff 132 | Owner's Manual - Page 3
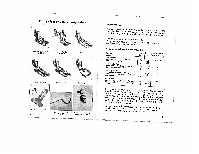
Simple Home Service 18 The Electric Motor 24 The following accessories are available at slight additional charge 1 box for housing accessories, No. 1466 a 1 edger with guide Z-153a 1 feller No. 823 1 hemmer No. Z-824, 4 mm bobbins No. 970 sewing machine needles, System No. 130 R 1 threader - Pfaff 132 | Owner's Manual - Page 4
Z-1016 Quilter guide holder Z-1016 with 101 Important Hints Always Machine oil, but oil. ooDbntelayainlerb.aeNsIetvaenrqduusaenleijuteystd aI sneyeswkfiirnnodmgofyomluurabrcSicheawitniinnegg aOUnsnyelyroenSpleyawirnisnegetodlMyesoaucorhfimnSeaycshEteixmnpee.rNtso. 130. should be entrusted - Pfaff 132 | Owner's Manual - Page 5
To prepare for sewing I' I Before despatch from the works, each machine is subjected to a severe test run. Therefore, should you experience any trouble with the machine, the cause may well be due to wrong manipulation. Do not interfere with any settings without first carefully checking the upper - Pfaff 132 | Owner's Manual - Page 6
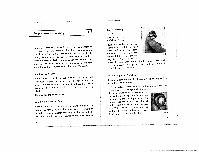
. Upper Threading Fig. 6 Place the spool of thread on the spool pin and bring the thread below the guide and to the left, then from left to right into the upper slot in guide b and from right to left through the lower slot. From there pass the thread down and from right - Pfaff 132 | Owner's Manual - Page 7
of ma 10 [ 2. Sewing General 4 oaoedtfiTmnonoitruthaaohsryewkyinthet,oriosornwnuutrlghrohtirpseiwiunteghwphstebhaoreohtrnaeahricsdnklfettatihthg,.rineenscpscteeoooepefrrieardnrtwewcuhtlps Setting the Length of Stitch - Fig. 8 vwosmtmTrsuecfciilrrarahrlesngektyeehweweihedb - Pfaff 132 | Owner's Manual - Page 8
Fig. 6 - to the left. If this adjustment does not improve the stitch forming, the under thread must then re ceive more ten sion by turning the presser bar is set for oIl regular sewing work on light and medium weight goods Removing the Work from the Machine Raise the take-up lever to its highest and lift - Pfaff 132 | Owner's Manual - Page 9
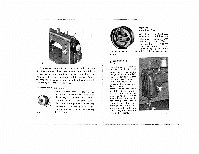
Cleaning and oiling [ I Fig. 12 Machine Head with open Face Cover Plate Regular machine. chanism machine. ooLinlidinntgeavnisednetusthsaerllenyatidailmefnpoderds ethseethttelsemfoirneoeththreruunwnnnoinirnkgginogoff the me the indsaIterfditevieosdernlrneea,eoctbroeruseotstgthahouerenlyarls, - Pfaff 132 | Owner's Manual - Page 10
must be carefully dis mantled. This is done by removing the race Fig. 15 guide Ill, after the small 16 screws 1, 2 and 3 have been taken out retaining key engage into the groove n - see Fig. 14. Finally, replace the guide Ill and fix it down with screws 1, 2 and 3. You must also lubricate - Pfaff 132 | Owner's Manual - Page 11
service 4. Please always remember: many machine troubles may be caused by your not carefully following these working instructions. In many cases, faulty working of your machme can be remedied merely by cleaning and oiling. Machine breaks 1. Inferior quality, knotty sewing thread breaks easily - use - Pfaff 132 | Owner's Manual - Page 12
remove the case and consult a sewing machine specialist. The under thread breaks 1. Inferior quality, knotty sewing thread breaks easily - use a screw with a screwdriver (see page 12: "Regulating the Thread Tensions"). Stitches are missed 1. The needle has not been set high enough - change the - Pfaff 132 | Owner's Manual - Page 13
the regulating screw 13 - see page 1. Uneven stitching 1. The thread is uneven or too thick - sewing machine cannot be rectified by your following the above directions, please consult your Sewing Machine Dealer. He will al ways be glad to advise you. Fig. W Rear View of machine showing support - Pfaff 132 | Owner's Manual - Page 14
obtained. Retighten both screws. 3. Changing the Carbon Brushes a) Remove the Vbelt. b) Take out the 4 screws c in motor end shield plate - see Fig. 20. The motor, complete with plate, can now be drawn from the motor housing, to give free access to the carbon brushes - see Fig. 20. 24 c Fig. 20 End - Pfaff 132 | Owner's Manual - Page 15
-e - 9? paq Id, II) black paq 0 0 a DJoC a 012 6) CC 0a WnJUOfQ 6 U!4!M
-
 1
1 -
 2
2 -
 3
3 -
 4
4 -
 5
5 -
 6
6 -
 7
7 -
8
-
9
-
10
-
11
-
12
-
13
-
14
-
15
 |
 |
(
r
315$
CPFAFFD
)
C-
aFardz
‘132