Pfaff 132 Owner's Manual - Page 5
prepare, sewing
 |
View all Pfaff 132 manuals
Add to My Manuals
Save this manual to your list of manuals |
Page 5 highlights
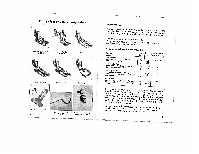
To prepare for sewing I' I Before despatch from the works, each machine is subjected to a severe test run. Therefore, should you experience any trouble with the machine, the cause may well be due to wrong manipulation. Do not interfere with any settings without first carefully checking the upper and under thread ing, the tensions, the needle and the position of the feed dog, the control of which should be set at "Sewing". Inserting the Needle Raise the needle bar to its highest point. With thumb and forefinger of your left hand insert the needle into the clomp. Push the needle up as far as it will go. T h e f I a side of the needle shank must be to the right. Then tighten the thumb screw. Attaching the Presser Foot Slide the foot on to the presser bar, right up against the screw and firmly tighten the latter with a screwdriver. All other types of presser feet supplied for use with the machine ore attached and secured in the same manner 6 Under Threading Figs. 1-5 Removing the Bobbin Case Place the needle bar in top most position and tilt the head over. With thumb and fore finger of your left hand, grip the small latch on bobbin case Fig. 1 (Fig. 1), lift the move the case turn the bobbin latch with case and re bobbin upside inside. down, Release the latch, and let the bobbin drop into your other hand. Winding the Bobbin Before winding the bobbin, disconnect the sewing mecha nism. Proceed as follows: Hold the balance wheel with your left hand and loosen the stop motion screwwith your right hand; this screw must be turned outwards as far as it will go (Fig. 2). After placing the reel on the spool pin, draw the thread once round tensioner a (fig. 3) and to bobbin b placed on the winder pin. With your left hand then wind the end of the thread a few times from front to back round the bobbin, Fig. 2 7
-
 1
1 -
 2
2 -
 3
3 -
 4
4 -
 5
5 -
 6
6 -
 7
7 -
 8
8 -
 9
9 -
 10
10 -
 11
11 -
12
-
13
-
14
-
15
 |
 |
