Pfaff 132 Owner's Manual - Page 6
Upper, Threading, Replacing, Bobbin
 |
View all Pfaff 132 manuals
Add to My Manuals
Save this manual to your list of manuals |
Page 6 highlights
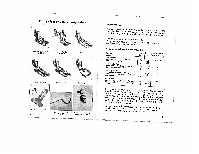
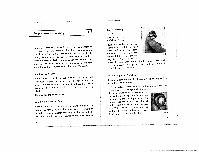
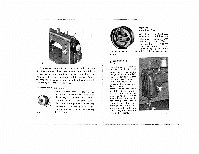
Fig.3 Now press on the winder by means of latch and turn the free balance wheel over towards you to set it in motion as you start treadling. The winder action stops automatically when the bobbin is fully loaded. Finally, the stop motion screw is firmly retightened by screwing it inwards against the balance wheel. Threading the Bobbin Case Hold the case with its open side up and insert the bobbin as indicated by the arrow, i. e. so that the thread un winds from left to right (Fig. 4). Pass the thread through slot a, along and underneath the spring b and out through opening c in the side of the Fig. 4 bobbin case. 8 Replacing the Bobbin Case With thumb and forefinger of your left hand hold the bobbin case (complete with bobbin) by its latch (Fig. 1) and slide the case on to the small stud in the center of Fig 5 the bobbin case down so the that hook (Fig. 5). Now press the latch clicks into pa- sition. Upper Threading Fig. 6 Place the spool of thread on the spool pin and bring the thread below the guide and to the left, then from left to right into the upper slot in guide b and from right to left through the lower slot. From there pass the thread down and from right to left through the slot in thread tensioner and take-up spring c, then up again and from right to left through the take-up lever d, then down and through the guide in nee dle bar a and finally from left to right through the eye of the needle. Fig. 6 9
-
 1
1 -
 2
2 -
 3
3 -
 4
4 -
 5
5 -
 6
6 -
 7
7 -
 8
8 -
 9
9 -
 10
10 -
 11
11 -
 12
12 -
13
-
14
-
15
 |
 |
