Pfaff 1530 Owner's Manual - Page 45
Hemming with the twin needle, Smocking effect with elastic threads
 |
View all Pfaff 1530 manuals
Add to My Manuals
Save this manual to your list of manuals |
Page 45 highlights
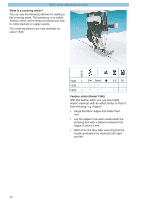
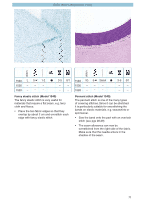
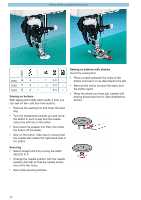
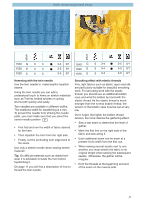
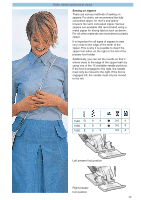
Utility stitches and practical sewing stitch stitch 1540 G 0 3 1530 E 0 3 1520 E 0 3 3-5 0/1 3-5 0/1 3-5 0/1 1540 G 1530 E 1520 E 0 3-4 0 3-4 0 3-4 3-5 0/1 3-5 0/1 3-5 0/1 Hemming with the twin needle Use the twin needle to make beatiful topstitch seams. Using the twin needle you can add a professional touch to hems on stretch materials such as T-shirts, knitted articles or cycling shorts both quickly and easily. Twin needles are available in different widths. The traditional width for topstitching is 4 mm. To prevent the needle from striking the needle plate, you must make sure that you select the center needle position . • First fold and iron the width of fabric desired for the hem. • Then topstitch the hem from the right side. • Finally, cut the protruding hem edge back to the seam. Use only a stretch needle when sewing stretch material! Tip: On difficult materials such as ribbed knitwear it is advisable to baste the hem before topstitching it. On page 11 you will find a description of how to thread the twin needle. Smocking effect with elastic threads Fine, light fabrics such as Batist, rayon and silk are particularly suitable for beautiful smocking work. For smocking work with the elastic thread, you should use an additional bobbin case and wind the bobbin by hand with the elastic thread. As the elastic thread is much stronger than the normal bobbin thread, the tension of the bobbin case must be set at very low. Don't forget, the higher the bobbin thread tension, the more intense the gathering effect. • Sew a test seam to determine the level of gather. • Mark the first line on the right side of the fabric and sew along it. • Each additional seam can be sewn at a presser foot's width from the first row. • When sewing several seams next to one another, you must stretch the fabric to its original length when sewing the subsequent seams. Otherwise, the gather will be irregular. • Knot the threads at the beginning and end of the seam on the reverse side. 35
-
 1
1 -
2
-
3
-
4
-
5
-
6
-
7
-
8
-
9
-
10
-
11
-
12
-
13
-
14
-
15
-
16
-
17
-
18
-
19
-
20
-
21
-
22
-
23
-
24
-
25
-
26
-
27
-
28
-
29
-
30
-
31
-
32
-
33
-
34
-
35
-
36
-
37
-
38
-
39
-
 40
40 -
 41
41 -
 42
42 -
 43
43 -
 44
44 -
 45
45 -
 46
46 -
 47
47 -
 48
48 -
 49
49 -
 50
50 -
51
-
52
-
53
-
54
-
55
-
56
-
57
-
58
-
59
-
60
-
61
-
62
-
63
-
64
-
65
-
66
-
67
-
68
-
69
-
70
-
71
-
72
-
73
-
74
-
75
-
76
-
77
-
78
-
79
-
80
-
81
-
82
 |
 |
