Pfaff 72 Owner's Manual - Page 5
Operation, Sewing, Machine
 |
View all Pfaff 72 manuals
Add to My Manuals
Save this manual to your list of manuals |
Page 5 highlights
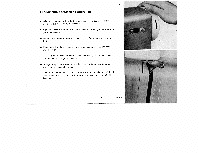
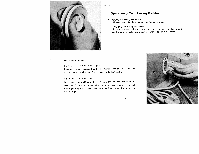
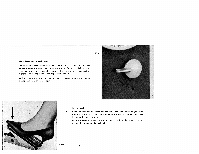
DR 506 Operation of Your Sewing Machine I Engaging the Sewing Mechanism Hold balance wheel and turn stop motion knob clockwise. Disengaging the Sewing Mechanism Hold balance wheel and turn stop motion knob counter-clockwise (toward you). The sewing mechanism is then disengaged for bobbin winding. Electrical Information Power Drive and Sewlight IL Push plug 1 into receptacle 2 on back of machine, and plug 3 at other end of cord into the wall outlet. Cord 4 leads to the foot control. Foot-driven machines have merely a sewlight cord whose plug is pushed into the wall outlet. The switch on the sewlight, push botton on face cover. Mount driving belt. Before you drop the machine, remove the belt from the stand wheel, pulling it to the right. DR 561 4
-
 1
1 -
 2
2 -
 3
3 -
 4
4 -
 5
5 -
 6
6 -
 7
7 -
 8
8 -
 9
9 -
 10
10 -
 11
11 -
12
-
13
-
14
-
15
-
16
-
17
-
18
-
19
-
20
-
21
-
22
-
23
-
24
-
25
-
26
-
27
-
28
-
29
-
30
-
31
-
32
-
33
-
34
-
35
-
36
-
37
-
38
-
39
-
40
-
41
-
42
-
43
-
44
-
45
 |
 |
