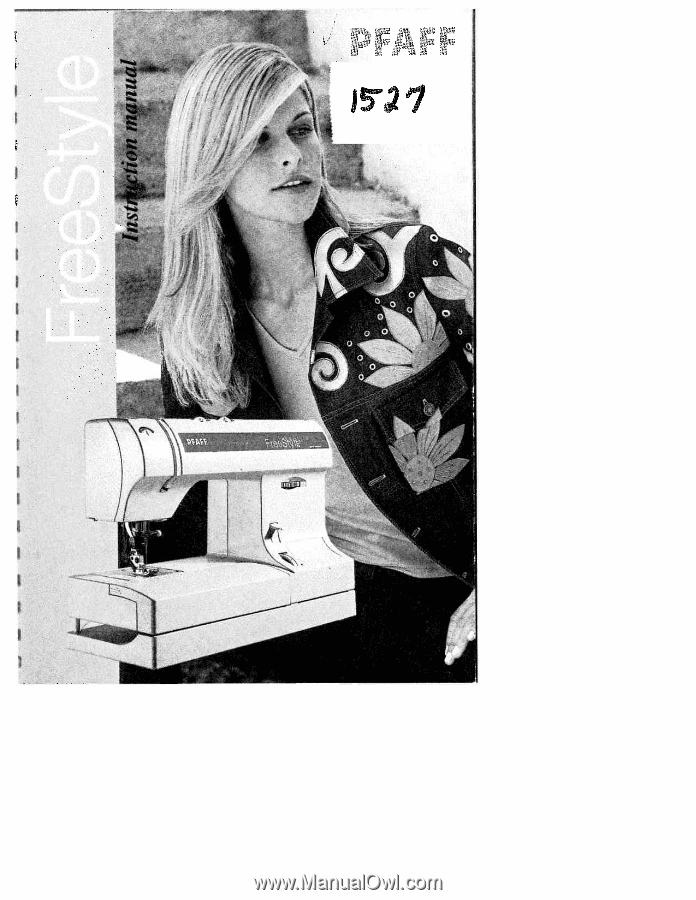
Pfaff Freestyle 1527 Owner's Manual
Pfaff Freestyle 1527 Manual
 |
View all Pfaff Freestyle 1527 manuals
Add to My Manuals
Save this manual to your list of manuals |
Pfaff Freestyle 1527 manual content summary:
- Pfaff Freestyle 1527 | Owner's Manual - Page 1
- Pfaff Freestyle 1527 | Owner's Manual - Page 2
U' I, 9 F F £9 - Pfaff Freestyle 1527 | Owner's Manual - Page 3
'arts of your FreeStyle sewing machine Connection socket "foot control with main cord" Main switch with fixing screw 7 Presser foot lifter 8 Button for "reverse sewing" 9 Stitch length dial o Carrying handle 1 Stitch selection 2 Thread guide 3 Sewing lamp (max. 15 watt) 4 Stitch width dial 5 Needle - Pfaff Freestyle 1527 | Owner's Manual - Page 4
_ . - . -- --- ------__. -- - Pfaff Freestyle 1527 | Owner's Manual - Page 5
thiioug/i the instruction manual carefit//v. A small investment of your ti/ne is wart/i it! This approach is the only way to real/v find all of the options your Fn'eSr'ie sewing machine imius to otter and how to mumake the most of them. if you have any questions no problem! Your PFAFF dealer - is - Pfaff Freestyle 1527 | Owner's Manual - Page 6
needle, threading bobbin, or changing presser foot, etc. 20. Always unplug sewing machine from the electric outlet when removing covers, lubricating, or when making any other user servicing adjustments mentioned in the instruction manual. 21. Hold plug when rewinding into cord reel. Do not allow - Pfaff Freestyle 1527 | Owner's Manual - Page 7
sewing lamp is 15 watts. This sewing machine is a high-quality 4. The tension of the drive belt must only be electronic-mechanical device. It is a machine 4 adjusted by a PFAFF of our qualified service staff. 11. Be sure to use only original PFAFF parts. 12. The machine is designed for - Pfaff Freestyle 1527 | Owner's Manual - Page 8
41 -44 Left needle position Main switch Maintenance and trouble-shooting Monograms Needle table Needle thread tension Non-elastic stitches Oiling the sewing machine Optional accessories Patchwork quilt Placing sewing thread on spool holder Practical sewing Presser foot lifter 16 2 61-64 41 58-59 - Pfaff Freestyle 1527 | Owner's Manual - Page 9
stitches 17-18 Sewing light 63 Sewing on buttons 28 Sewing on patches 32 Sewing on zippers 34-35 Sewing table Introduction Shirring triple straight stitch 24 Stretch triple zigzag stitch 24 Top-stitching Trouble-shooting Twin needle 21 64 11,29 Utility stitch table Introduction - Pfaff Freestyle 1527 | Owner's Manual - Page 10
:h:iFcFohorrrseaeqlrlugsiiernewg,ianaglpefpatlninqdeuetéodplae-nsdptiottcsahiptiienorgnin. g. Straight stitch: For operations. Zigzag most sewing and top-stitching for most zigzag operations. For all sewing and top-stitching require a right needle position. For serging, appliqu - Pfaff Freestyle 1527 | Owner's Manual - Page 11
Heavy open overlock stitch Decorative stitch Application For stretch seams, e.g. inside seams as well as seams on sportswear and workwear For sewing elastic bands on elastic materials or seams on stretch materials For elastic seams which require a left needle position For elastic seams which - Pfaff Freestyle 1527 | Owner's Manual - Page 12
I I $ I I I I I I I $ $ $ I * I I I $ I * * I S - Pfaff Freestyle 1527 | Owner's Manual - Page 13
Operate your Pfaff FreeStyle Operate your Pfaff FreeSty'e Electrical connection Removable accessory tray Bobbins Bobbin Needle thread tension Lowering the feed dog Stitch width dial Needle position dial Reverse sewing Stitch length dial Stitch selection 2 3 4-7 8-9 9 10 12 13 13 13 14 15 15 15 - Pfaff Freestyle 1527 | Owner's Manual - Page 14
instruction book in the conip; it Ii tot carryingcase. I I Top cover Open the folding cover (6) upwards I The stitches of the sewing Main switch When the main switch (2) is switched cc the sewing lamp lights up. The sewing machine is now ready tu 1ff' * This appliance has a polarized - Pfaff Freestyle 1527 | Owner's Manual - Page 15
Operat' your Pfriff FreeSt',k Accessory tray Your Pfaff FreeStyle sewing machine has a removable accessory tray (27) which is also used as an extended work support. Using the free arm In order to sew with the free arm, you must remove the accessory tray. Using both hands, swing the accessory tray ( - Pfaff Freestyle 1527 | Owner's Manual - Page 16
handwheel (4) firmly and turn the handwheel release disc (3) until it stops in the direction of the arrow. This stops the needle from moving while the machine is winding the bobbin. /j\ Placing the bobbin Switch off the main switch (2) Place the empty bobbin so that the black pin of the bobbin - Pfaff Freestyle 1527 | Owner's Manual - Page 17
FreeStyle , II!IIJ Winding the bobbin from the spool holder Place the sewing thread on the spool holder (8). To guarantee free movement of the thread and to give additional hold to the thread spool, fit a spool cap corresponding to the size of the thread spool Threading Place the thread into guide - Pfaff Freestyle 1527 | Owner's Manual - Page 18
Pfaff FreeStyle a * S S $ S L ZEE t S S Winding from the second spool holder I Push the second spool holder (7) into its hole and place a spool of thread with the corresponding spool cap on it. Threading Place the thread into guide the machine is already threaded, you can easily wind - Pfaff Freestyle 1527 | Owner's Manual - Page 19
PfinfFreeSvIe It Winding through the needle Even if the machine has been completely threaded, you can still wind the lever must be positioned at its very top. Pass the thread to the right under the guide hook D. Then wind the thread several times around the bobbin. Press the foot control and winding - Pfaff Freestyle 1527 | Owner's Manual - Page 20
Operate vane Ptf FreeStyle Bobbin Case/Hook Cover Switch off the main switch Hold the pull out the bobbin case. Release the lever and remove the empty bobbin. Thread tension To ensure perfect sewing and a durable seam, the top and bottom thread-tensions must be well adjusted to each other and the - Pfaff Freestyle 1527 | Owner's Manual - Page 21
Opc'rate viur PftffFrcStyIe Inserting the bobbin Insert the full bobbin into the bobbin case. In doing so, pull the thread sideways through slot A, then under the tension plate B until it rests in the opening (see arrow). Check: When you look at the bobbin and pull the thread, the bobbin must turn - Pfaff Freestyle 1527 | Owner's Manual - Page 22
Operate your Pfu/f FreeStyle /\ Threading the needle thrtnt Switch off the main swprlt a I corresponding spool cap. Now, using both hands, pull the thru,i a / p. into guide A and under thread guide hook D. Pass the thread through a the Iefthand threading slot (11) and downwards. Pull - Pfaff Freestyle 1527 | Owner's Manual - Page 23
on threading in the usual way, but make sure the threads are not twisted with each other. Pull the threads right and left into thread guide (22) and thread the needles. II - Pfaff Freestyle 1527 | Owner's Manual - Page 24
I I0 )UE Ilufi I i 'lI /j\ Drawing up the bobbin thread Turn off the main switch Raise the presser foot. Hold the needle thread and turn the handwheel towards you until the needle is at the top again and the bobbin thread has formed a loop. Pull the needle thread to draw up the bobbin thread. - Pfaff Freestyle 1527 | Owner's Manual - Page 25
Operah' our Pfa/j Freestyle j f Presser foot lifter The presser foot is raised or lowered with the presser foot litter (17). / Removing the presser foot Turn off the main switch 'p - Pfaff Freestyle 1527 | Owner's Manual - Page 26
The Intigrated dual teedIlDT Sy.Im PFAFF offers the ideal soluhoi h I difficult materials: the intigratc'd ( lc' I This system feeds the material hm th top and bottom simultaneously a: I in industrial sewing machinesTh l;ilai is fed precisely. When sewing light or I difficult materials such - Pfaff Freestyle 1527 | Owner's Manual - Page 27
Operute your P/off FreeStyle Changing the needle Switch off the main switch To remove: Lower required needle thread tension (10) with the help of the mark A. The normal setting for sewing is 4 to 5. For embroidering, darning and buttonhole set the tension between 2 and 3. Dropping the feed dog - Pfaff Freestyle 1527 | Owner's Manual - Page 28
< -""-- /6 Operate veer Pfaff Fre'eStle Stitch width dial The stitch width can be adjusted : Straight stitch is sewn with stitch width 0. In chapter "Utility stitches and practi;iI sewing' (pages 19-38). you will find recommendations in the tables for the stitch width selection of individual - Pfaff Freestyle 1527 | Owner's Manual - Page 29
41 4 tI I 4 Operate your Pfaff FreeStyle Reverse sewing The machine sews in reverse only as long as the reverse sewing button (18) is pressed. Stitch length adjustment dial With the stitch length adjustment dial (19) you can adjust the stitch length between 0 and 6 mm by - Pfaff Freestyle 1527 | Owner's Manual - Page 30
(jYei Stitch seIecton, stitch dia IiutJ I ' Utility stitches 4 Each stitch is idenbfied by a ettor 1 l stitches and their corresponding citt I are shown on the inside of the lid, a ehof is also found in the Introduction chapk I Turn the dial (21) until the correspondin I letter is positioned - Pfaff Freestyle 1527 | Owner's Manual - Page 31
Ind pi cVIi at ( ifl 44 I Utility stitches and practical sewing Sewing chart General sewing aids Non-elastic stitches Elastic stitches '4 Buttonhole Button sewing Hemming with the twin needle Smocking Gathering Darning 4 sewing on zippers 4 Stabiiizifl9 edges Sewing lace 20 21 22 23-24 26-27 28 29 - Pfaff Freestyle 1527 | Owner's Manual - Page 32
for each stitch or technique. These charts also provide you with further instructions that are necessary when sewing the selected stitches. The choice of the sewing foot, the setting of the needle thread tension and whether the sewing is carried out with the top feed switched on or off. Always - Pfaff Freestyle 1527 | Owner's Manual - Page 33
needle plate or use the edge guide (standard accessory No.8). The edge guide is inserted into hole A and is secured with fixing screw B. Sewing aid for thick seams I To ensure a consistent feed when beginning sewing at a thick seam, we I recommend supporting the presser foot on a piece of - Pfaff Freestyle 1527 | Owner's Manual - Page 34
, the thread lies over pin C. thus preventing curling of the fabric edge. In this way you can sew beautiful smooth seams. The raw edge must be guided along edq' guide B.You can adjust this edge guile with adjusting screw A. Important: When the blind stitch fool is used for overcasting with the - Pfaff Freestyle 1527 | Owner's Manual - Page 35
presser foot 3. If the stitches are visible on the right side, adjust edge guide B by turning adjusting S screw A. c Use the needle position and the width about 1 cm Place the fabric under the sewing foot so that the crease line runs along edge guide B. Using the needle positioning knob 28, - Pfaff Freestyle 1527 | Owner's Manual - Page 36
I E • 0 Stretch 3-5 oil I • E 3-5 Stretch 3-5 0/1 Stretch triple straight stitch This stitch is used for sewing all seams where great strength is needed, e.g. inside trouser seams. Turn the stitch length dial away from you as far as it will go for - Pfaff Freestyle 1527 | Owner's Manual - Page 37
lingerie. Mark elastic and fabric in quarters. elastic to fabric at quarter Pminarkings. • Place fabric and elastic under sewing toot. Stretch elastic to fit the fabric. Begin sewing. Honeycomb stitch The honeycomb stitch is an elastic and decorative hem which is particularly suitable for hems on - Pfaff Freestyle 1527 | Owner's Manual - Page 38
it is necessary to use stabilizer i material from contracting while sewing. To produce beautiful seams, embroidering or darning threads are ideally or dress pin, .nui always sew a sample buttonhole first. Note: Before starting any buttonhole, always pLish the guide of the buttonhole Ii fully to - Pfaff Freestyle 1527 | Owner's Manual - Page 39
presser foot towards the front. Clamp the threads to the left and right of protrusion B. Slide the buttonhole runner as far forwards as possible and sew the buttonhole as described for your select model. • Pull the loop of the gimp thread into the buttonhole and cut the threads. while holding the - Pfaff Freestyle 1527 | Owner's Manual - Page 40
on as described to the left. • Remove the match and pull the fabric and the button apart. • Wrap the shank you have just created with sewing thread and knot it. (See illustrations below). Securing • Select straight stitch by turning the width dial (24) to 0. • Change the needle position with the - Pfaff Freestyle 1527 | Owner's Manual - Page 41
higher the bobbin thread tension, the more intense the gathering needle position . effect. • First fold and iron the width of fabric desired for the hem. • Sew a test seam to determine the level of gather. Then topstitch the hem from the right side. • Mark the first line on the right side of - Pfaff Freestyle 1527 | Owner's Manual - Page 42
guide grooves the elastic is fed evenly during the sewing process. Gathering with elastic thread Sleeve and waist seams can be gathered by sewing and lay the elastic thread around the needle. • Lower the presser foot and sew a few stitches. Then pull the elastic thread evenly at both ends. • - Pfaff Freestyle 1527 | Owner's Manual - Page 43
machine into the darning position. Place the darning work in the darning hoop. Dropthefeeddog. Pull up the bobbin thread and hold the threads when you start sewing. • Darn the damaged area by guiding the fabric back and forth evenly in the prescribed direction while ensuring that each line - Pfaff Freestyle 1527 | Owner's Manual - Page 44
damaged area of the face side of the fabric. I damaged fabric. It must be a little larger than the damaged area. • Sew over the fabric edges with the elastic stitch. I • Now sew over the damaged area. • Cut the under layed piece of material • Now cut the damaged area back to the seam from - Pfaff Freestyle 1527 | Owner's Manual - Page 45
a metal zipper for strong fabrics such as denim. For all other materials we recommend a plastic zipper. It is important for all types of zippers to sew very close to the edge of the teeth of the zipper. This is why it is possible to insert the zipper foot either on the - Pfaff Freestyle 1527 | Owner's Manual - Page 46
(Itilits' stitches and practical ewing £ Fufly concealed, sew-in zipper • Insert the zipper foot on the presser toot and close the zipper. • Now you can continue sewing the seam up to the end of the zipper and sew the cross seam. • Sew the second half of the zipper parallel at the same distance. - Pfaff Freestyle 1527 | Owner's Manual - Page 47
needle to the nght needle position C. • Stitch along the edge of the zipper. Just before the end of the seam, open the zipper and finish sewing the seam. Close the zipper and baste the overlap evenly to the other half of the zipper. Then - Pfaff Freestyle 1527 | Owner's Manual - Page 48
twice (approx. 2 mm) • Lay the folded fabric edge underneath the hemmer and sew a few stitches. I • Leave the needle in the fabric, raise the presser the fabric into the hemmer foot scroll. • Lower the presser foot and guide the fabric evenly into the hemmer. Tip: On silk, viscose and chiffon - Pfaff Freestyle 1527 | Owner's Manual - Page 49
* First the lace is basted onto the right side of the fabric. * Sew on both sides of the lace at a narrow margin. The fabric underneath the lace is cut down the middle and ironed to the side. Sew over both edges of the lace with a small, dense, zigzag stitch (stitch - Pfaff Freestyle 1527 | Owner's Manual - Page 50
Liility tiiche ciIpii ii,iI - Pfaff Freestyle 1527 | Owner's Manual - Page 51
Decoratne and ernbraidtr t hmque I I I S S Ii I Decorative sewing and embroidery techniques Sewing table for decorative sewing 40 Monograms 41 Embroidering with the dense zigzag stitch/Tapering Appliqué Richelieu Eyelet embroidery atchwork quilt stitching 42-44 44 45 45 46 47 39 - Pfaff Freestyle 1527 | Owner's Manual - Page 52
length and width of the stitches, £5 MS 5- 0,5-1 0 2-3 - For decorative stitches we recommend using special embroidery threads which are available from your Pfaff dealer. Use stabilizer under the fabric to be decorated. This prevents the material from pulling. Use a magic pen or marking chalk to - Pfaff Freestyle 1527 | Owner's Manual - Page 53
. Hoop the fabric in an embroidery hoop and embroider using the zigzag stitch. Tie off the threads and remove the I stabilizer. Tip: By sewing quickly and moving the material slowly you will achieve dense stitches. When embroidering on terry-cloth, the monogram must first be sewn with a narrow - Pfaff Freestyle 1527 | Owner's Manual - Page 54
and embroidery rechinque i I I I fr. Embrokiering with a dense zigzag stitch/Tapering Tapering is easy with your select sewing machine By adjusting the width of this dense zigzag shtch you can create interesting embroidery. Even embroidering Place stabilizer under the fabric. • Set needle - Pfaff Freestyle 1527 | Owner's Manual - Page 55
penetrated the material to the right, reduce the stitch width using the width dial (24) by 0.5 mm to 4.5 mm. Sew a stitch. Reduce the width once again by 0.5 mm and sew a stitch. Continue in this manner until the stitch width is 0.5 mm. Loaves: Select right needle position and embroider half - Pfaff Freestyle 1527 | Owner's Manual - Page 56
buttonhole seam, the buttonhole can have a width of up to 10 mm. • Sew two buttonhole seams about 1 mm apart using a dense zigzag stitch E, stitch width it easier for you to appliqué. Insert the appliqué foot in the sewing machine. • Transfer your drafted pattern to the face side, smooth side, of - Pfaff Freestyle 1527 | Owner's Manual - Page 57
artistic form of eyelet and nsert embroidery is easy to sew with your owing machine. Using a magic marker, draw your motif onto the at the darning position (see page 31). k lend more durability to the embroidery, sew all of the contours twice using the straight stitch (stitch length approx. 1 mm). - Pfaff Freestyle 1527 | Owner's Manual - Page 58
the quilt onto the batting and the bottom quilt layer. select sowing machine. A patchwork quilt consists of three layers of fabric, two layers of see page 57) is particularly helpful for sewing patchwork and quilting. • Use your Pfaff select model to sew all layers together. Work from the inside - Pfaff Freestyle 1527 | Owner's Manual - Page 59
out from above the hem. Using the stretch zigzag, stitch width 2-3 mm, sew the hem from the face side. The needle must perforate the hem on the out to the desired width. Using stretch zigzag stitch, stitch width 2-3 mm, sew along both of the fabric edges. The needle must perforate the area of the - Pfaff Freestyle 1527 | Owner's Manual - Page 60
De ,ruie sewing and e,nhwtdesv re hniques ç \I I 4 I I I I I - Pfaff Freestyle 1527 | Owner's Manual - Page 61
I I I I I I I I I I. I I I I I I I I I I I I I Sd/pSU 1t) JO - Pfaff Freestyle 1527 | Owner's Manual - Page 62
.4cce, sories uul iicedle Presser feet (normal accr'; n 0 Standard presser foot P Part No. 98-694 816-00 1 C'ear view foot (Fancy-stitch foot not suitable for lop feed) Part No. 98-694 864-01 3 BHnd stftch and overtock foot Part No. 98-694-890-00 4 Zpperand edgestitchng foot Part No. 98-694 884 - Pfaff Freestyle 1527 | Owner's Manual - Page 63
orie and ,wedlec 8 Edge guide Part No. 98-802 422-00 IA 2 3 • 13 Spool cap 1 Part No. 93-036 048-44 2. Part No. 93-035 050-44 3. Part No. 93- - Pfaff Freestyle 1527 | Owner's Manual - Page 64
93-036 917-91 Decorative stitch foot 93-036 962-91 Compass guide 93-036 953-91 Fagotting guide Patchwork foot (without top feed) 93-036 952-46 93-036 925-91 For sewing knitted fabrics For darning damaged pieces For sewing leather a. synth. For embroidering leather a. synth For circle-shaped - Pfaff Freestyle 1527 | Owner's Manual - Page 65
Make sure the fabrics are placed right sides together. Hold the top fabric slightly taut while sewing. The more you hold the top fabric the greater the gathering effect you will achieve. • Be sure to guide the fabric edges evenly through the foot. • Disengage the shirring foot by pushing it down at - Pfaff Freestyle 1527 | Owner's Manual - Page 66
plate. The notch between the needle plate and the sewing machine provides space for the gimp thread while sewing. Feed the gimp thread under the work support so that it does not become knotted during on the second pintuck, allow the first sewing. pintuck to run parallel in a groove in the foot - Pfaff Freestyle 1527 | Owner's Manual - Page 67
With the ruffler you can make closely or widely spaced pleats automatically while sewing. This is very useful for ruffles. home decorating. etc. The ruffler lace in one operation. When you buy the ruffler from your PFAFF dealer, full operating instructions are included. hp' A Pie fabric to be is It - Pfaff Freestyle 1527 | Owner's Manual - Page 68
paper from [he back of the appliqué. Position and press your appliqué pieces in place on your base fabric. Place a stabilizer under your work area. Sew over the edges of the appliqué material with a narrow satin stitch zigzag. Make sure that the stitch covers the outer edge so that no fraying - Pfaff Freestyle 1527 | Owner's Manual - Page 69
longer stitch nqfh. Always sew a test seam first. WI en you have finished, pull the work rufully from the machine by holding il last loops 1/4 inch quilt and patchwork foot. • Sew together your pieces of fabric using stitch E. For a seam allowance of 1/4 guide your fabric along the outer edge of - Pfaff Freestyle 1527 | Owner's Manual - Page 70
fabrics, Latex, double-knit fabrics, hosiery, Quiana and Simplex Medium ball point Heavy ball point Stretch-fabric needle developed especially for Pfaff. Particularly suitable for delicate stretch and knitted fabrics Wide-meshed corsetry, Lycra, Simplex and Latex Acute ball point Twill, work - Pfaff Freestyle 1527 | Owner's Manual - Page 71
whether needles can iirniwlieel In this way, needle breakage is avoided as much as penetrate possible. easily, by turning the fl Zigzag sewing • Classification Stitch length Stitch width Needle Suitable for spacing * 130/705 H-ZWI size: 80 0,5-1,5 mm wide 1,6 mm decoration size: 80 - Pfaff Freestyle 1527 | Owner's Manual - Page 72
Accessories and needlec - Pfaff Freestyle 1527 | Owner's Manual - Page 73
laz,u('na,zce and troubic- hnoring - 4 -- Maintenance and troubIe-shootng Changing the needle plate 62 Cleaning and oiling 62 Replacing the sewing lamp 63 Trouble-shooting 64 6! - Pfaff Freestyle 1527 | Owner's Manual - Page 74
off the main switch It is very important to clean and oil your sewing machine, because it will rewardyou with a longer service life. Tin more often you use the machine, tlie more care it needs. Removal: • Raise the sewing foot and remove the removable accessory tray. • Push the point of a small - Pfaff Freestyle 1527 | Owner's Manual - Page 75
and trouble- slwori, / Changing the sewing lamp I IX Switch oft the main switch Disconnect the mains plug and the foot control plug from the machine. Take off the removable accessory tray (27). The sewing lamp is located inside the left side of the sewing machine Removal: Hold the sewing machine - Pfaff Freestyle 1527 | Owner's Manual - Page 76
trouble- chooring Troubeshooting Problem: The machine skips stitches The needle is not properly inserted. The wrong needle is inserted. Needle is bent or blunt. Machine -59) Let the machine feed the fabric. Only guide the fabric lightly When Machine does not feed or feeds irregularly Sewing lint - Pfaff Freestyle 1527 | Owner's Manual - Page 77
-- - - ------- .- .' - - Pfaff Freestyle 1527 | Owner's Manual - Page 78
-
 1
1 -
 2
2 -
 3
3 -
 4
4 -
 5
5 -
 6
6 -
 7
7 -
8
-
9
-
10
-
11
-
12
-
13
-
14
-
15
-
16
-
17
-
18
-
19
-
20
-
21
-
22
-
23
-
24
-
25
-
26
-
27
-
28
-
29
-
30
-
31
-
32
-
33
-
34
-
35
-
36
-
37
-
38
-
39
-
40
-
41
-
42
-
43
-
44
-
45
-
46
-
47
-
48
-
49
-
50
-
51
-
52
-
53
-
54
-
55
-
56
-
57
-
58
-
59
-
60
-
61
-
62
-
63
-
64
-
65
-
66
-
67
-
68
-
69
-
70
-
71
-
72
-
73
-
74
-
75
-
76
-
77
-
78
 |
 |