Pfaff creative vision 5.0 Owner's Manual - Page 33
D™ Embroidery Software
 |
View all Pfaff creative vision 5.0 manuals
Add to My Manuals
Save this manual to your list of manuals |
Page 33 highlights
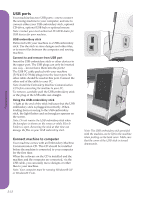
Preparations 4D™ Embroidery Software Computer Connection The Embroidery Machine Communication module is automatically installed. This is required to use the Send To features in any 4D™ Embroidery System module, and Send Multiple in 4D™ Organizer. 4D™ QuickFont Create font files (.vf3) for your PFAFF® creative vision™ embroidery machine from most TrueType® or OpenType® fonts on your computer. 4D™ Organizer Find your designs and pictures easily. Browse them in different sizes and print selected groups as full worksheets of thumbnail catalogs. Covert your designs between major embroidery formats, to pictures or desktop wallpaper for your computer. Create a personal HTML catalog of your designs. Installing your software If you own other PFAFF® 4D™ Embroidery System software, you may need to install the 4D™ Embroidery System 8.2 (or higher version) Update instead of installing the Embroidery Machine Communication Software. Then add the PFAFF® creative vision™ from the Machine Manager in 4D™ Configure, as described in Step 5. Continue with Step 6 to install hardware drivers. 1. Ensure your embroidery machine is disconnected from your computer. 2. Ensure you are logged onto your computer with a user name that is an administrator on the computer, then install your software from the CD provided. 3. Insert your CD. In Windows® 7/Vista, an AutoPlay message may appear, asking what you wish to do with the CD. Click the option to Run Menu.exe. Select your desired language, and select the "Install Embroidery Machine Communication Software" option from the menu. 4. Follow the instructions in the Installation Wizard. When asked to enter your Installation Code, enter the following number: 850078. 5. In the 4D™ Configure Wizard under MyMachines select your machine type: PFAFF® creative vision™. Under Send 1 or Send 2 select PFAFF® creative vision™. It is recommended to set the Embroidery Machine Communication module to start automatically when starting Windows. Note: You can find more detailed information about the installation in the 4D™ Embroidery System Getting Started Guide, in the folder 'UserGuides' on the CD. Install hardware drivers and connect the embroidery machine Windows® 7/Vista 6. From the main menu of your CD, click the Install Drivers option for your version of Windows® 7/Vista. If the following User Account Control message appears: 'A program needs your permission to continue', click the Continue button. 7. During the installation process a security message may appear asking 'Would you like to install this device software?' Click Install to continue. Click Finish on the last page. 8. You may now connect your embroidery machine to your computer. A message will appear and you will be informed when your embroidery machine is ready to be used. Windows® XP 6. From the main menu of your CD, click the Install Drivers option for Windows® XP. Drivers are only available for 32-bit Windows® XP. 2:13
-
 1
1 -
2
-
3
-
4
-
5
-
6
-
7
-
8
-
9
-
10
-
11
-
12
-
13
-
14
-
15
-
16
-
17
-
18
-
19
-
20
-
21
-
22
-
23
-
24
-
25
-
26
-
27
-
 28
28 -
 29
29 -
 30
30 -
 31
31 -
 32
32 -
 33
33 -
 34
34 -
 35
35 -
 36
36 -
 37
37 -
 38
38 -
39
-
40
-
41
-
42
-
43
-
44
-
45
-
46
-
47
-
48
-
49
-
50
-
51
-
52
-
53
-
54
-
55
-
56
-
57
-
58
-
59
-
60
-
61
-
62
-
63
-
64
-
65
-
66
-
67
-
68
-
69
-
70
-
71
-
72
-
73
-
74
-
75
-
76
-
77
-
78
-
79
-
80
-
81
-
82
-
83
-
84
-
85
-
86
-
87
-
88
-
89
-
90
-
91
-
92
-
93
-
94
-
95
-
96
-
97
-
98
-
99
-
100
-
101
-
102
-
103
-
104
-
105
-
106
-
107
-
108
-
109
-
110
-
111
-
112
-
113
-
114
-
115
-
116
-
117
-
118
-
119
-
120
-
121
-
122
-
123
-
124
-
125
-
126
-
127
-
128
-
129
-
130
-
131
-
132
-
133
-
134
-
135
-
136
-
137
-
138
-
139
-
140
-
141
-
142
 |
 |