Pfaff expression 2.0 Owner's Manual - Page 41
Sequencing 4.0 and 3.0
 |
View all Pfaff expression 2.0 manuals
Add to My Manuals
Save this manual to your list of manuals |
Page 41 highlights
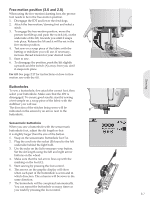
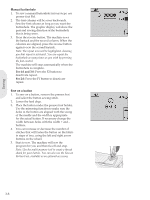
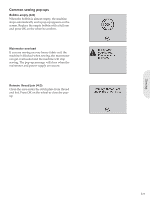
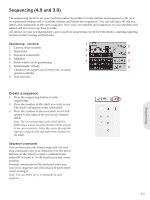
Sequencing (4.0 and 3.0) The sequencing function on your machine makes it possible to create stitches and sequences with your own personal settings and to combine stitches and letters into sequences. You can add up to 40 stitches, letters and commands in the same sequence. Save your own stitches and sequences on your machine and reload and sew them any time you like. All stitches in your sewing machine can be used for sequencing except for buttonholes, darning, tapering stitches, button sewing and bartacks. Sequencing - overview 1. Current stitch number 2. Stitch Àeld 3. Sequence commands 1 5 2 6 3 4. Alphabet 5. Stitch width/stitch positioning 4 7 6. Stitch length/density 8 7. Character set (upper case/lower case, normal/ special symbols) 8. Font selection Sequencing Create a sequence 1. Press the sequencing button to enter sequencing. 2. Press the number of the stitch you wish to use. The stitch will appear in the stitch Àeld. 3. Press the number of the next stitch and it will appear to the right of the previously entered stitch. Note: The current position in the stitch Àeld is marked by a cursor. Inserted stitches will be placed at the cursor position. Move the cursor through the sequence using the left and right arrow buttons on the wheel. Sequence commands You can insert tie-offs, thread snips (for 4.0) and stop commands into your sequence. Use the arrow buttons on the wheel to select a command and press OK to insert it. It will be placed at the cursor position. Inserted commands will be included when you save your sequence and will always be performed when sewing it. Note: You can insert up to 3 commands in each sequence. 4:1
-
 1
1 -
2
-
3
-
4
-
5
-
6
-
7
-
8
-
9
-
10
-
11
-
12
-
13
-
14
-
15
-
16
-
17
-
18
-
19
-
20
-
21
-
22
-
23
-
24
-
25
-
26
-
27
-
28
-
29
-
30
-
31
-
32
-
33
-
34
-
35
-
 36
36 -
 37
37 -
 38
38 -
 39
39 -
 40
40 -
 41
41 -
 42
42 -
 43
43 -
 44
44 -
 45
45 -
 46
46 -
47
-
48
-
49
-
50
-
51
-
52
 |
 |
