Pfaff hobby 1022 Owner's Manual - Page 26
Setting utility stitches, Setting fancy stitches, model 1042 only
 |
View all Pfaff hobby 1022 manuals
Add to My Manuals
Save this manual to your list of manuals |
Page 26 highlights
Operating the machine Setting utility stitches All stitch patterns that you can sew with your machine are illustrated in the stitch pattern chart (8). Using the stitch pattern adjustment button (9) you can set the desired stitch by turning the dial until the required letter appears in the adjustment Àeld (4). The lower value shows you the optimum stitch length. Setting fancy stitches (model 1042 only) Using the stitch pattern adjustment button (9) select the fancy stitches M-P. Turn the stitch pattern adjustment button until the required letter appears in the adjustment Àeld (4). Note: For embroidering use the clear view foot. 22
-
 1
1 -
2
-
3
-
4
-
5
-
6
-
7
-
8
-
9
-
10
-
11
-
12
-
13
-
14
-
15
-
16
-
17
-
18
-
19
-
20
-
 21
21 -
 22
22 -
 23
23 -
 24
24 -
 25
25 -
 26
26 -
 27
27 -
 28
28 -
 29
29 -
 30
30 -
 31
31 -
32
-
33
-
34
-
35
-
36
-
37
-
38
-
39
-
40
-
41
-
42
-
43
-
44
-
45
-
46
-
47
-
48
-
49
-
50
-
51
-
52
-
53
-
54
-
55
-
56
-
57
-
58
-
59
-
60
-
61
-
62
-
63
-
64
-
65
-
66
-
67
-
68
-
69
-
70
-
71
-
72
 |
 |
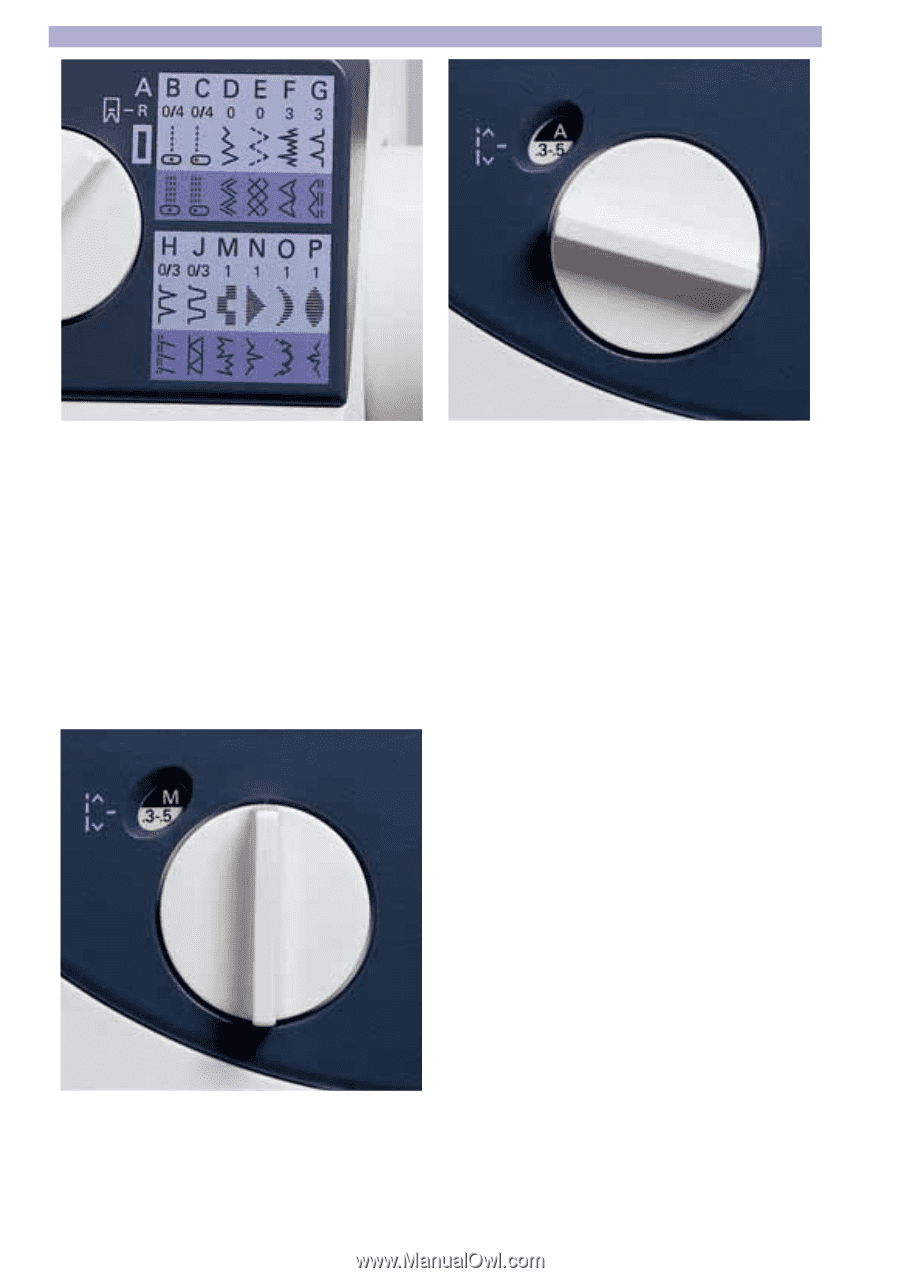
Operating the machine
22
Setting utility stitches
All stitch patterns that you can sew with your machine are illustrated in the stitch pattern
chart (8).
Using the stitch pattern adjustment button (9) you can set the desired stitch by turning
the dial until the required letter appears in the adjustment
À
eld (4).
The lower value shows you the optimum stitch length.
Setting fancy stitches
(model 1042 only)
Using the stitch pattern adjustment button
(9) select the fancy stitches M-P.
Turn the stitch pattern adjustment button
until the required letter appears in the ad-
justment
À
eld (4).
Note:
For embroidering use the clear
view foot.