Pfaff hobbylock 603A Owner's Manual - Page 15
Causes, sewing, their, so'utions
 |
View all Pfaff hobbylock 603A manuals
Add to My Manuals
Save this manual to your list of manuals |
Page 15 highlights
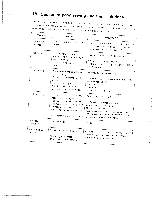
16. Causes of poor sewing and their so'utions TaTdnhe,jysstcm maaencnrbtusenecRurhreeadasKsodimeoewpni"ysdbeyssmmgiaulakerdngtofotnmeceecoaorsrneecastsvaode(ituoowstumsoeecnctasusraspbodesecssiaoculrseebeTdohfoeerseliomwos lenoa 1 unsetemdd efnort difficult errors PROBLEM Cloth does not feed Needle breaks Thread breaks Skip stitching occurs Poor seam formation CAUSE Presser foot pressure s 100 a1< The needle IS Dent or 1he needle point is damaged Needle is fitted incorrectly Cloth has been pulled excessively ADJUSTMENT °-ess n the control Outton n he center of the presser foot regulating button to increase 1he presser 1 oot pressure(see p.8) Reølace neecle for a new one (see 0 11) Fit needles correctly (see p 11) Avoid pushing or pulling the fabr c excessively during sewing. The machine has been threaded ncorrectly Thread has become tangled or caught. Tension is too tight. Needles fitted incorrectly Wrong needle has been used Re-thread correctly (see p.4) Check that the thread has not become tangled on the thread stand See p 6 See p '1 Always use DC I needles i The needle is bent or the needle point damaged Needles are not fitted perfectly. The wrong needle is being used Tnreading is incorrect. Presser foot pressure s too weaK. Incorrect threads are being used. Replace needles (see p.111 Re-fit needles correctly (see p.11) Always use DC 1 needles. Re-thread correctly. 0 usn me center ot 'he presser toot regulating button and increase the presser toot pressure (see o 81 Use correct threads and needle size. Thread tension incorrect. See p 6 Fabric puckering occurs Thread tension is too strong. Threading is incorrect Thread has become tangled. Reduce the thread tension as much as possible when sewing lightweight fabrics Re-thread correctly tsee p.4) 13
-
 1
1 -
2
-
3
-
4
-
5
-
6
-
7
-
8
-
9
-
 10
10 -
 11
11 -
 12
12 -
 13
13 -
 14
14 -
 15
15 -
 16
16 -
 17
17 -
 18
18 -
 19
19
 |
 |
