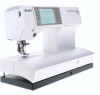
Pfaff performance 2056 Owner's Manual - Page 4
Table, content - bobbins
 |
View all Pfaff performance 2056 manuals
Add to My Manuals
Save this manual to your list of manuals |
Page 4 highlights
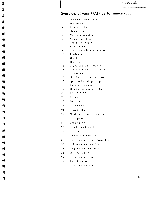
Table of content Introduction Overview of your performance 2056 3 Operating your performance 1 :9 Function buttons 3:2 Stitch chart 1:10 Operating your performance 2056 3:2 Lid Sewing with free arm 1:15 Main menu 1:15 Selection menus 3:4 3:4 F Carrying case 1:15 Selecting a stitch 3:6 F Accessories 1:16 Sewing menu Altering the stitch settings 3:7 F 3:1 Preparations Voltage switch Electrical connection More Options for sewing 3:9 2:2 Context menu 3:10 2:2 Info system 3:15 Connecting the foot control 2:2 Main switch 2:2 Changing the presser foot 2:3 Presser foot lift 2:3 The IDT (Integrated Dual Feed) 2:4 Lowering the feed dog 2:5 Bobbin winding 2:6 Inserting the bobbin and bobbin case 2:9 Threading your performance 2056 2:10 Integrated needle threader 2:1 1 Creating stitch sequences Stitch sequences 4:2 Creating a new stitch sequence 4:3 Altering the settings of a selected stitch 4:4 Editing a stitch sequence 4:4 Saving a Stitch sequence 4.5 Alphabets 4:6 Creating an alphabet sequence 4:7 Combine alphabet and stitch sequences 4:7 E Bringing up the bobbin thread 2:12 Thread cutter 2:12 Utility sewing Changing the needle 2:13 Straight stitch - No 1 5:2 Threading the twin needle 2:13 Sewing in zippers - No 1 5:2 Getting started 2:14 Topstitching - No 1 5:3 Correct thread tension - How to get it 2:15 Electronic knee lift 2:16 Basting stitch - No 17 Blindhem stitch - No 15 5:3 F 5:4 Stretch Blindhem stitch - No 16 5:4 Zigzag stitch - No 3 5:5 Stretch triple zigzag stitch - No 14 5:5
-
 1
1 -
 2
2 -
 3
3 -
 4
4 -
 5
5 -
 6
6 -
 7
7 -
 8
8 -
 9
9 -
 10
10 -
11
-
12
-
13
-
14
-
15
-
16
-
17
-
18
-
19
-
20
-
21
-
22
-
23
-
24
-
25
-
26
-
27
-
28
-
29
-
30
-
31
-
32
-
33
-
34
-
35
-
36
-
37
-
38
-
39
-
40
-
41
-
42
-
43
-
44
-
45
-
46
-
47
-
48
-
49
-
50
-
51
-
52
-
53
-
54
-
55
-
56
-
57
-
58
-
59
-
60
-
61
-
62
-
63
-
64
-
65
-
66
-
67
-
68
-
69
-
70
-
71
-
72
-
73
-
74
-
75
-
76
-
77
-
78
-
79
-
80
-
81
-
82
-
83
-
84
-
85
-
86
-
87
-
88
-
89
-
90
-
91
-
92
-
93
-
94
-
95
-
96
-
97
-
98
-
99
-
100
-
101
-
102
-
103
-
104
-
105
-
106
-
107
-
108
-
109
-
110
 |
 |
