Pfaff performance 2056 Owner's Manual - Page 95
Circular, Embroidery, Guide, Narrow
 |
View all Pfaff performance 2056 manuals
Add to My Manuals
Save this manual to your list of manuals |
Page 95 highlights
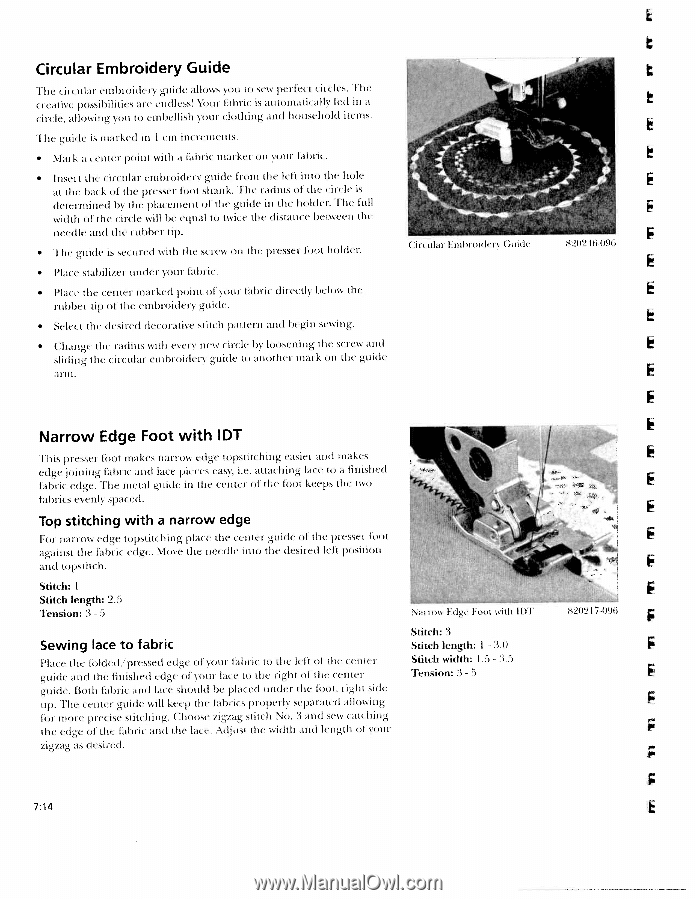
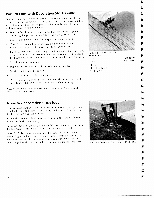
Circular Embroidery Guide 'Flie circtilai enihroider' guide allows '.on to se' perfect t nclt's. 11w creatise 1 >ossjhilities aie r idless '101w iahru is automatically fed in a iiclt', allossmg 'amli to ('nilX'llish sour lothi ig and household items. ilie guitie is niai ked in I tul iiiti t'ilieilis. • .\1;nk a center point with a fai)ric maiker omi 'otir iahmic. • Inset t the cii cimlar tmhr ider guide from the left into the liolt' at the hat k of the presser foot shank. lht' iadi is of the code is tlttt'itiiiiit'd l)V the pl;icemiiemit of tile guide ii the Iioltlt'r. hlie lull width of the circle \5 ill he equal to [is ice time dist imee hemiAeemm the needle and the m ubbem tip. • lime guide is secum ed with the screw on time presser foi )t hiokli'r. • Place stahiliier nod 1 .ow fahi ic. • Place the center marked point of 'onr fabri( directi beh)w the lliI)l)eI lii) tij I lie eimmlirtiit1ei guide. • Select the desimed decoratii stitch pattern and begin sewing. • (Thange the radius iiitli evets tie dirt le i) loosening the set ew and sliding the ircimlai eiiibroider guide to another mat k on the guide ai in. ( imimhmi EillhmoHlt'it (.tmidc H202l(i-()96 Narrow Edge Foot with IDT Ibis foot makes narrow edge topstit( lung easiei and makes edge jomuimig lain ic and lace meet's easy, i.e. attaching lace to a finished fabric edge. 1 lie metal guide in the center of the foot keeps the two fabi it s e' en l spaced. Top stitching with a narrow edge Fom iiariow edge topstitchiiug plate time t eiltei gnide ol the i)ressei hot aganist the fabi it edge. Mos e the i meedit' into time desim ed left sii ion and topstitchi. Stitch: I Stitch length: 2.5 Tension: 3 - 5 Sewing lace to fabric Piat e the folded pm essed edge of ow fabric to the left of time entui guide and the finished edge of oum hfte to the right of the entem guide. Both fabm it md late should be placed wider tIme foot, i ight side lip. 1 lie eentei guide will keep the lain ics properly sepaiatetl allowmmug foi mom e pie mse smitclummmg. ( :fmoose /.tg/ag stilt li .\o. 3 and sets at fmmng the edge of the fahi it and ti ie lace, Atlj mist the w idt Ii and lengt Ii of 'anti Lig/ag as desim ed ai I )w Ldge Foot with 11)1 Stitch: 3 Stitch length: I - .1.1) Stitch width: I 5 - 3.5 Tension: 3 5 H2021 7-096 'I. 7:14
-
 1
1 -
2
-
3
-
4
-
5
-
6
-
7
-
8
-
9
-
10
-
11
-
12
-
13
-
14
-
15
-
16
-
17
-
18
-
19
-
20
-
21
-
22
-
23
-
24
-
25
-
26
-
27
-
28
-
29
-
30
-
31
-
32
-
33
-
34
-
35
-
36
-
37
-
38
-
39
-
40
-
41
-
42
-
43
-
44
-
45
-
46
-
47
-
48
-
49
-
50
-
51
-
52
-
53
-
54
-
55
-
56
-
57
-
58
-
59
-
60
-
61
-
62
-
63
-
64
-
65
-
66
-
67
-
68
-
69
-
70
-
71
-
72
-
73
-
74
-
75
-
76
-
77
-
78
-
79
-
80
-
81
-
82
-
83
-
84
-
85
-
86
-
87
-
88
-
89
-
 90
90 -
 91
91 -
 92
92 -
 93
93 -
 94
94 -
 95
95 -
 96
96 -
 97
97 -
 98
98 -
 99
99 -
 100
100 -
101
-
102
-
103
-
104
-
105
-
106
-
107
-
108
-
109
-
110
 |
 |