Philips 27DVCR55S User manual - Page 10
Optional Connections
 |
View all Philips 27DVCR55S manuals
Add to My Manuals
Save this manual to your list of manuals |
Page 10 highlights
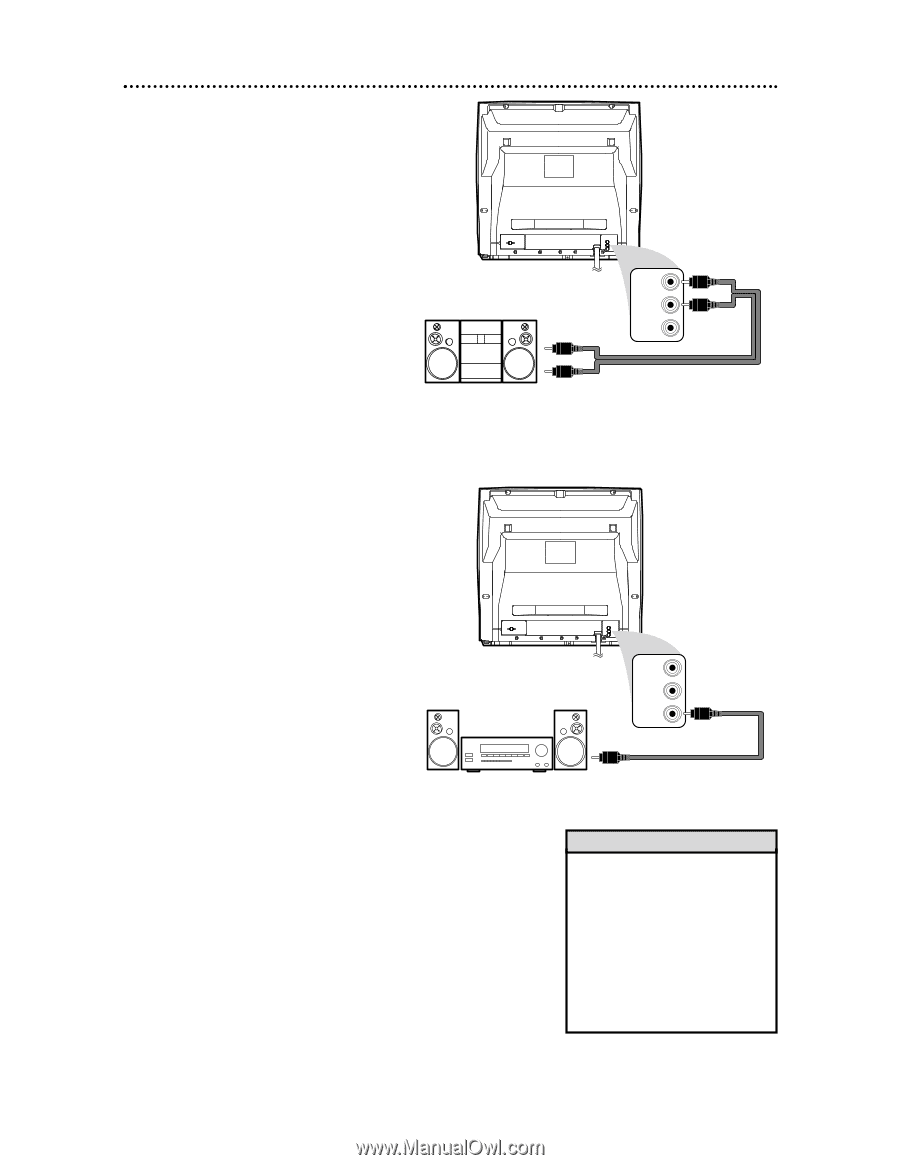
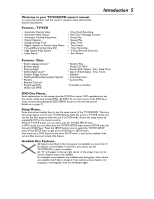
10 Optional Connections Analog Stereo Hookups If you want to hear the TV/VCR/DVD sound through a stereo instead, make this connection. 1 Complete the antenna/Cable TV connections. Details are on pages eightnine. 2 Connect red and white audio cables to the red and white AUDIO OUT jacks on the back of the TV/VCR/DVD and to the AUDIO IN jacks on the stereo. Match the cable colors to the jack colors. Audio cables are not supplied. Use RCA-style cables. 3 Set your stereo to Auxiliary In or the correct "Source" mode. See your stereo owner's manual for details. Audio cables to red and white AUDIO OUT jacks on ANT. TV/VCR/DVD L AUDIO OUT R COAXIAL L AUDIO OUT R COAXIAL Audio cables to Stereo's AUDIO IN jacks Digital Stereo Hookups You can connect the TV/VCR/DVD to a Stereo that has a Digital Coaxial In jack. Use this hookup if you want to hear the TV/VCR/DVD sound through the Stereo instead. Use these connections for a Dolby Digital-compatible Stereo or for a Receiver that has a Mini-Disc or Digital Audio Tape deck. 1 Connect the antenna/Cable TV signal. Details are on pages eight-nine. 2 Connect a digital audio coaxial cable (not supplied) to the orange COAXIAL jack on the TV/VCR/DVD. Also connect the cable to the Stereo's COAXIAL DIGITAL AUDIO IN jack. 3 If the Stereo is Dolby Digital-compatible, set DOLBY DIGITAL to ON. If the Stereo is not Dolby Digitalcompatible or if you connected to a Mini-Disc or Digital Audio Tape Deck, set DOLBY DIGITAL to OFF. Details are on page 72. An incorrect setting causes noise distortion and damages speakers. To see if your Stereo has Dolby Digital, look for a Dolby Digital logo on your Stereo. Or, refer to the Stereo owner's manual. To orange COAXIAL jack on TV/VCR/DVD ANT. L AUDIO OUT R COAXIAL L AUDIO OUT R COAXIAL To Stereo's COAXIAL DIGITAL AUDIO IN jack Helpful Hints • You cannot use a Mini-Disc or Digital Audio Tape deck to copy 5.1 channel Dolby Digital surround sound Discs. • Discs recorded in Dolby Digital should show this on the Disc or case. If the Disc is not recorded in 5.1 channel Dolby Digital surround sound, you will not hear multi-channel sound even if you use the Digital Stereo hookup.
-
 1
1 -
2
-
3
-
4
-
 5
5 -
 6
6 -
 7
7 -
 8
8 -
 9
9 -
 10
10 -
 11
11 -
 12
12 -
 13
13 -
 14
14 -
 15
15 -
16
-
17
-
18
-
19
-
20
-
21
-
22
-
23
-
24
-
25
-
26
-
27
-
28
-
29
-
30
-
31
-
32
-
33
-
34
-
35
-
36
-
37
-
38
-
39
-
40
-
41
-
42
-
43
-
44
-
45
-
46
-
47
-
48
-
49
-
50
-
51
-
52
-
53
-
54
-
55
-
56
-
57
-
58
-
59
-
60
-
61
-
62
-
63
-
64
-
65
-
66
-
67
-
68
-
69
-
70
-
71
-
72
-
73
-
74
-
75
-
76
-
77
-
78
-
79
-
80
 |
 |