Philips 37PF7321 User Guide - Page 18
TV as a PC Monitor
 |
View all Philips 37PF7321 manuals
Add to My Manuals
Save this manual to your list of manuals |
Page 18 highlights
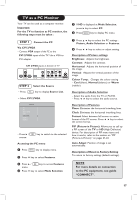
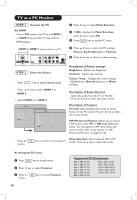
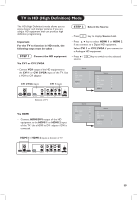
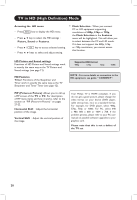
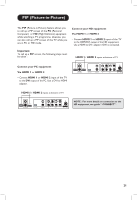
TV as a PC Monitor Your TV can be used as a computer monitor. Important For the TV to function as PC monitor, the following steps must be taken : STEP 1 Connect the PC Via CVI 2/VGA - Connect VGA output of the PC to the CVI 2/VGA input of the TV. Use a VGA to CVI adaptor. CVI 2/VGA inputs at bottom of TV L HDMI 2 R HDMI 1 DVI (AUDIO IN) CVI-2 / VGA VIDEO IIN AUDIO IIN L L L R TV : R R Pr Pb Y (AUDIO IN) AV CVI-1 SERV U SERVC STEP 2 Select the Source - Press key to display Source List. - Select CVI 2/VGA. 5 If HD is displayed at Mode Selection, press Æ key to select PC. 6 Press key to display PC menu. 7 Press Î ï key to select the PC settings : Picture, Audio Selection or Features. 8 Press Í Æ key to select or adjust setting. Description of Picture settings Brightness: Adjusts the brightness. Contrast: Adjusts the contrast. Horizontal: Adjusts the horizontal position of the image. Vertical: Adjusts the vertical position of the image. Colour Temp.: Changes the colour setting - Cool (bluer), Normal (balance) or Warm (redder). Description of Audio Selection - Select the audio from the TV or PC/HD. - Press Í Æ key to select the audio source. Source TV Æ AV Æ SIDE / SVHS Æ CVI 1 Æ CVI 2/VGA Æ HDMI 1 Æ HDMI 2 Æ - Press Æ / source. key to switch to the selected Accessing the PC menu 1 Press key to display menu. 2 Press ï key to select Features. 3 Press Æ / menu. key to access Features 4 Press ï key to select Mode Selection Description of Features Phase: Eliminates the horizontal interfeing lines. Clock: Eliminates the horizontal interfeing lines. Format: Select between full screen or native format of the PC screen. Press Í Æ key to select the screen format. PIP (Picture-in Picture): Allows you to call up a PIP screen of the TV or HD (High Defintion) device. For description of PIP menu items and how it works, refer to the section on "PIP (Picture-in-Picture)" on pages 21-22. Auto Adjust: Position of image is set automatically. Description of Reset to Factory Setting: To return to factory settings (default settings). NOTE For more details on connection to the PC equipment, see guide "CONNECT". 17
-
 1
1 -
2
-
3
-
4
-
5
-
6
-
7
-
8
-
9
-
10
-
11
-
12
-
 13
13 -
 14
14 -
 15
15 -
 16
16 -
 17
17 -
 18
18 -
 19
19 -
 20
20 -
 21
21 -
 22
22 -
 23
23 -
24
-
25
-
26
-
27
 |
 |
