Philips 50FD9955 User manual - Page 13
Setting the BNC connectors, Setting a computer image to the correct RGB select, screen, Setting high
 |
UPC - 037849925560
View all Philips 50FD9955 manuals
Add to My Manuals
Save this manual to your list of manuals |
Page 13 highlights
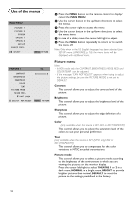
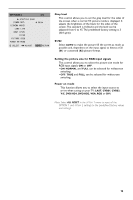
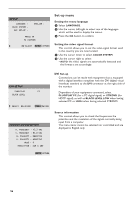
OPTION 1 OSD BNC SELECT RGB SELECT HD SELECT ALL RESET œ next page MJ SELECT 1/2 MENU RETURN Setting the BNC connectors This control allows you to select whether to set the AV3 input of the 5 BNC connectors to RGB or Component. See Connect Peripheral Equipment, p. 6. & Select BNC SELECT with the cursor up/down. é Press the cursor left/right to select: • RGB if you connected a device with RGB output (5 BNC connectors) • COMP if you connected a device with component output (CrPrYCbPb connectors) Setting a computer image to the correct RGB select screen This control allows you to select the most appropriate RGB Select mode for a moving image, such as video mode, wide mode or a digital broadcast. & Select RGB SELECT with the cursor up/down. é Press the cursor left/right to select one of the modes in order to display the following signals correctly: • AUTO: automatically selects the suitable mode for the specifications of input signals as listed in the table "Computer input signals supported by this system", p. 19. • STILL: to display VESA standard signals. Use this mode for a still image from a computer. • MOTION: the video signal will be converted to RGB signals to make the picture more easily viewable. Use this mode for a motion image from a computer. • WIDE 1: when a 852 dot x 480 line signal with a horizontal frequency of 31.7 kHz is input, the image may be compressed horizontally. To prevent this, select WIDE 1. • WIDE 2: when a 848 dot x 480 line signal with a horizontal frequency of 31.0 kHz is input, the image may be compressed horizontally. To prevent this, select WIDE 2. • DTV: select this mode when watching digital broadcasting (480p). Setting high definition images to the suitable screen size This control allows you to set whether the number of vertical lines of the input high definition image is 1035 or 1080. & Select HD SELECT. é Press the cursor left/right to select the correct HD mode: • 1080A for special digital broadcasts (e.g. DTC 100) • 1080B for standard digital broadcasts • 1035I for Japanese "High Vision" signal format. All Reset This control allows you to reset all the OPTION 1 and 2 settings to the predefined factory values and settings. & Select ALL RESET and press the OK button. é Select ALL RESET. When the message SETTING NOW disappears, all the settings are restored to the predefined factory values. 13
-
 1
1 -
2
-
3
-
4
-
5
-
6
-
7
-
 8
8 -
 9
9 -
 10
10 -
 11
11 -
 12
12 -
 13
13 -
 14
14 -
 15
15 -
 16
16 -
 17
17 -
 18
18 -
19
-
20
-
21
-
22
-
23
-
24
 |
 |
