Philips 51PP9100D User manual - Page 13
Synchronisation Of Time - manual
 |
View all Philips 51PP9100D manuals
Add to My Manuals
Save this manual to your list of manuals |
Page 13 highlights
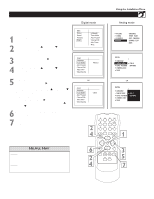
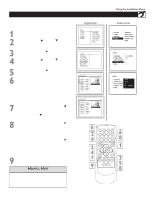
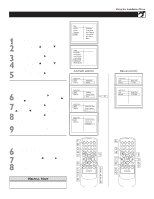
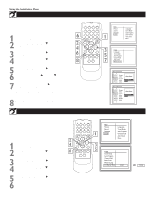
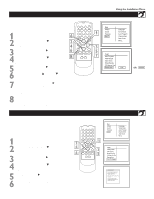
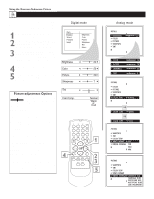
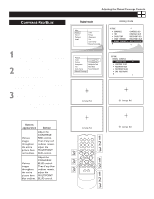
AUTO CHRON (SYNCHRONISATION OF TIME) This menu is present only for digital signals. Auto Chron™ sets the clock of the TV automatically or manually. For automatic selection, there will be queries for Time Zone, Day Light saving and channel to seek clock. For manual selection, you need to key in the time. 1 Press the MENU button on the remote control to show the onscreen menu. 2 x y Press the CURSOR UP x or DOWN y buttons to scroll though the onscreen menu until the word Install is highlighted. 3 q Press the CURSOR RIGHT q button to display the Install menu features. 4 x y Press the CURSOR UP x or DOWN y buttons to scroll through the Install features until the word Auto Chron is highlighted. 5 q Press the CURSOR RIGHT q button to display the Auto Chron options- Auto and Manual. For Automatic selection With the Auto Chron™ options displayed, and Auto highlighted; you can set the clock of the TV automatically. q Using the CURSOR RIGHT q button, enter the x Time Zone option. Press the CURSOR UP x or 6 y DOWN y button to select the time zone. 7 x y q Press the CURSOR RIGHT q button to display the Daylight Saving Time option. Press the CURSOR UP x or DOWN y button to select YES or NO. 8 q Press the CURSOR RIGHT q button to display the Search forTime, EnterChanneloption. Use the NUMBERED buttons to enter the channel you want to seek the time. 9 When finished, press the EXIT/INFO button to remove the menu from the TV's screen. For Manual selection With the Auto Chron options displayed, and Manual highlighted; you can set the clock of the TV manually. 6 Use the NUMBERED buttons to set the time. 7 p q Press the CURSOR LEFT p or RIGHT q button to select AM or PM. 8 When finished, press the EXIT/INFO button to remove the menu from the TV's screen. Using the Installation Menu HELPFUL HINT To switch between Digital and Analog Channels, use the A/D button on the Remote Control. 13
-
 1
1 -
2
-
3
-
4
-
5
-
6
-
7
-
 8
8 -
 9
9 -
 10
10 -
 11
11 -
 12
12 -
 13
13 -
 14
14 -
 15
15 -
 16
16 -
 17
17 -
 18
18 -
19
-
20
-
21
-
22
-
23
-
24
-
25
-
26
-
27
-
28
-
29
-
30
-
31
-
32
-
33
-
34
-
35
-
36
-
37
-
38
-
39
 |
 |
