Philips 55PP9363H User manual - Page 39
Setting The Clock
 |
View all Philips 55PP9363H manuals
Add to My Manuals
Save this manual to your list of manuals |
Page 39 highlights
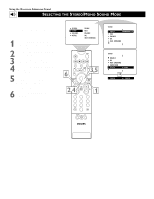
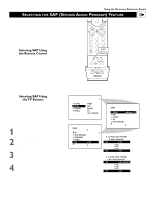
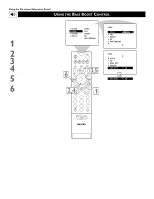
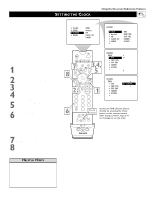
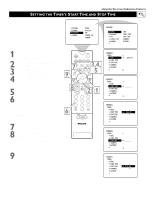
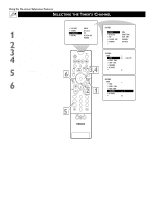
SETTING THE CLOCK Using the On-screen Submenus: Features Your TV comes with an on-screen clock. You will need to set the clock before you can use the Timer feature. During normal operation, the time appears on the screen when you press the STATUS/EXIT button. You can show the time on screen constantly by turning the TIMER DISPLAY control on (see page 40). For instructions on setting the Timer's START and STOP times, see page 41. Then go to pages 42 and 43 to learn how to select the Timer's channel and activate the Timer. NOTE: You can access the TIME (clock) feature directly by pressing the Clock button on the remote control. 1 Press the MENU/SELECT button on the remote control to show the onscreen menu. 2 Press the CURSOR RING DOWN twice to highlight FEATURES. 3 Press the CURSOR RING RIGHT to enter the FEATURES submenu. 4 Press the CURSOR RING RIGHT again to shift the display left and highlight the TIME control. 5 Press the CURSOR RING RIGHT again to highlight the time indicator area. 6 Press the NUMBER buttons to enter the correct time. If you make a mistake entering the time, press the CURSOR RING LEFT or RIGHT to move among the input slots to make corrections. NOTE: You can also press the CURSOR RING UP or DOWN to cycle through digits to input the time. 7 Press the CURSOR RING UP or DOWN to select AM or PM. 8 Press the STATUS/EXIT button to exit the menu. PICTURE SOUND FEATURES INSTALL TIMER AutoLock PIP CLOSED CAP FORMAT FEATURES TIMER AutoLock PIP CLOSED CAP FORMAT TIME START TIME STOP TIME CHANNEL ACTIVATE 8 6 POWER 7TV SWAP SOUND VCR PIP CH DN UP 3,4, ACC ACTIVE CONTROL FREEZE PICTURE 5 FEATURES TIMER TIME START TIME STOP TIME CHANNEL ACTIVATE _ _:_ _ STATUS/ EXIT MENU/ SELECT MUTE 2VOL 1 CH 123 FEATURES TIMER TIME START TIME STOP TIME CHANNEL ACTIVATE 8:00 PM 456 789 TV/VCR A/CH SURF REC • 0 SUCRF lock Button PIP ON/OFF FORMAT SLEEP SAP AV DOLBY V PROG.LIST Access the TIME (Clock) feature directly by pressing the Clock button on the remote control. After doing so, follow steps 5-8 on this page to set the clock. ITR/ RECORD HOME VIDEO HOME PERSONAL MOVIES POSITION PIP HELPFUL HINTS • For single-digit entries, be sure to press 0 first and then the hour number. • If you'd like, set the clock automatically using the AutoChron™ feature (on page 5 in the Quick Use and Setup Guide). • Clock settings may be lost when the TV is unplugged or when AC power to the set is interrupted. 39
-
 1
1 -
2
-
3
-
4
-
5
-
6
-
7
-
8
-
9
-
10
-
11
-
12
-
13
-
14
-
15
-
16
-
17
-
18
-
19
-
20
-
21
-
22
-
23
-
24
-
25
-
26
-
27
-
28
-
29
-
30
-
31
-
32
-
33
-
 34
34 -
 35
35 -
 36
36 -
 37
37 -
 38
38 -
 39
39 -
 40
40 -
 41
41 -
 42
42 -
 43
43 -
 44
44 -
45
-
46
-
47
-
48
-
49
-
50
-
51
-
52
-
53
-
54
-
55
-
56
-
57
-
58
-
59
-
60
-
61
-
62
-
63
-
64
-
65
-
66
-
67
-
68
-
69
-
70
-
71
-
72
 |
 |
