Philips AZ3811 User manual - Page 14
Get started
 |
View all Philips AZ3811 manuals
Add to My Manuals
Save this manual to your list of manuals |
Page 14 highlights
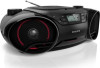
3 Get started Caution • Use of controls or adjustments or performance of procedures other than herein may result in hazardous radiation exposure or other unsafe operation. Always follow the instructions in this chapter in sequence. If you contact Philips, you will be asked for the model and serial number of your apparatus.The model number and serial number are on the bottom of your apparatus.Write the numbers here: Model No Serial No Install batteries Note • You can use both batteries and AC power as power supply of this apparatus. • Batteries are not supplied with the accessories. 1 Open the battery compartment. 2 Insert 8 batteries (type: R-20, UM-1 or D-cells) with correct polarity (+/-) as indicated. 3 Close the battery compartment. ( 2 )
-
 1
1 -
2
-
3
-
4
-
5
-
6
-
7
-
8
-
 9
9 -
 10
10 -
 11
11 -
 12
12 -
 13
13 -
 14
14 -
 15
15 -
 16
16 -
 17
17 -
 18
18 -
 19
19 -
20
-
21
-
22
-
23
-
24
-
25
-
26
 |
 |
