Philips DCM292 User manual - Page 10
Get started - remote control
 |
UPC - 609585186965
View all Philips DCM292 manuals
Add to My Manuals
Save this manual to your list of manuals |
Page 10 highlights
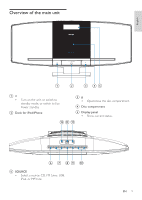
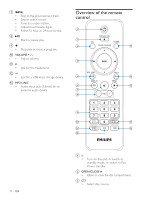
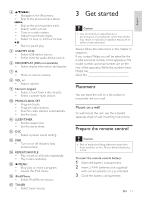
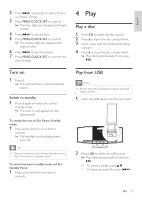
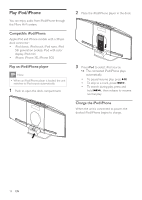
d // / • Navigate in the iPod menu. • Skip to the previous/next album. / • Skip to the previous/next track. • Search within a track. • Tune to a radio station. • Adjust hour/minute digits. • Select 12 hour or 24 hour format. • Start or pause play. e USB/MP3 LINK • Select USB device source. • Select external audio device source. f RDS/DISPLAY (RDS not available) • Select display information during play. g • Mute or restore volume. h VOL +/• Adjust volume. i Numeric keypad • Select a track from a disc directly. • Select a preset radio station. j PROG/CLOCK SET • Program tracks. • Program radio stations. • Scan for radio stations automatically. • Set the clock. k SLEEP/TIMER • Set the sleep timer. • Set the alarm timer. l DSC • Select a preset sound setting. m DBB • Turn on or off dynamic bass enhancement. n REPEAT/SHUFFLE • Play a track or all tracks repeatedly. • Play tracks randomly. o /MENU • Stop play or erase a program. • Access the iPod menu. p iPod/iPhone • Select iPod/iPhone source. q TUNER • Select tuner source. 3 Get started Caution • Use of controls or adjustments or performance of procedures other than herein may result in hazardous radiation exposure or other unsafe operation. Always follow the instructions in this chapter in sequence. If you contact Philips, you will be asked for the model and serial number of this apparatus.The model number and serial number are on the rear of the apparatus.Write the numbers here: Model No Serial No Placement You can place the unit on a flat surface or mount the unit on a wall. Mount on a wall To wall mount the unit, see the included separate sheet of wall mounting instructions. Prepare the remote control Caution • Risk of explosion! Keep batteries away from heat, sunshine or fire. Never discard batteries in fire. To insert the remote control battery: 1 Open the battery compartment. 2 Insert 2 AAA batteries (not supplied) with correct polarity (+/-) as indicated. 3 Close the battery compartment. EN 11 English
-
 1
1 -
2
-
3
-
4
-
 5
5 -
 6
6 -
 7
7 -
 8
8 -
 9
9 -
 10
10 -
 11
11 -
 12
12 -
 13
13 -
 14
14 -
 15
15 -
16
-
17
-
18
-
19
-
20
 |
 |
