Philips DVDR3505 Quick start guide - Page 1
Philips DVDR3505 Manual
 |
UPC - 609585125148
View all Philips DVDR3505 manuals
Add to My Manuals
Save this manual to your list of manuals |
Page 1 highlights
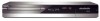
Quick Start Guide DIGITAL VIDEO DISC RECORDER WITH DIGITAL TUNER DVDR3505/37 Playable Discs This unit is compatible to play back the following discs / files. is a trademark of DVD Format/Logo Licensing Corporation. Playable discs DVD-video DVD+RW Logos Playable discs CD-DA (audio CD) video CD Logos DVD+R CD-RW DVD+R Double Layer DVD-RW (Finalized video mode discs only) DVD-R (Finalized video mode discs only) CD-R Playable files CD-DA MP3 Windows Media™ Audio JPEG DivX® Media CD-RW/-R CD-RW/-R DVD+RW/+R DVD-RW/-R Region Codes The number inside the globe refers to region of the world. This unit can play back DVDs that are labeled for ALL regions or for region 1. Recordable Discs This unit can record to DVD+RW, DVD+R, DVD-RW and DVD-R. DVD+R/DVD-R can only Logo Attributes be recorded to once. DVD+RW/DVD-RW can be recorded to and erased many times. • Following discs are recommended for good recording quality and are proven to be compatible with this unit. However, depending on the media condition the unit may not read the disc properly. DVD+RW DVD+R 8cm/12cm, single-sided, single layer disc Verbatim DVD+R 8x, DVD+RW 4x, DVD-R 8x, DVD-RW 2x, JVC DVD-RW 4x, Maxell DVD+R 4x/8x/16x, DVD-R 8x/16x, Approx. max. recording time (SLP mode): 360 minutes (4.7GB) (for 12cm) 108 minutes (1.4GB) (for 8cm) SONY DVD+R 4x/8x/16x, DVD+RW 4x, TDK DVD+R 4x/8x/16x Performance of any other discs are not guaranteed. DVD-RW DVD-R • You can play back DVD+RW on most DVD players without finalizing. However, if you have added or deleted chapters, or made chapters hidden, you must perform "Make Edits Compatible" before being able to see those effects on other units (see page 83 in the user manual). To play back discs other than DVD+RW on other DVD players, you will need to finalize. Unrecordable Discs • DVD-RW recorded in the mode other than +VR is not recordable on this unit unless you erase all contents in the disc (see page 82 in the user manual). • DVD-R recorded in the mode other than +VR is not recordable on this unit. E7H40UD_EN_QG_v2.indd 1 1 Connections Basic Connection 1) Disconnect the power cord of your TV from the AC outlet. 2) Disconnect RF coaxial cable from antenna input jack of your TV. 3) Make the connection as illustrated below. VHF / UHF antenna or cable TV company RF coaxial cable RF coaxial cable IN VIDEO VIDEO IN OUT Y L PB/CB L R OUT ANTENNA AV IN IN R PR/CR OUT S-VIDEO AV OUT COMPONENT VIDEO OUTPUT S-VIDEO HDMI OUT COAXIAL DIGITAL AUDIO OUTPUT PCM / BITSTREAM RCA audio cable RCA video cable ANT. IN This connection is for TV loop through only rear of your TV 4) Plug in the power cords of the devices to the AC outlet. R L AUDIO IN VIDEO IN Connection Using RF Modulator 1) Disconnect the power cords of the devices from the AC outlet. 2) Make the connection as illustrated below. VHF / UHF antenna RF coaxial cable RF coaxial cable rear of this unit IN VIDEO VIDEO IN OUT Y L PB/CB L HDMI OUT or cable TV company rear of your RF modulator (not supplied) R OUT ANTENNA AV IN IN R PR/CR OUT S-VIDEO AV OUT COMPONENT VIDEO OUTPUT S-VIDEO RCA audio cable COAXIAL DIGITAL AUDIO OUTPUT PCM / BITSTREAM RCA video cable ANT. IN 3 4 ANT. IN CHANNEL R L AUDIO IN VIDEO IN TO TV RF coaxial cable rear of your TV Set channel 3 or 4 3) Set your RF modulator's channel 3/4 switch to either 3 or 4. 4) Plug in the power cords of the devices to the AC outlet. 5) Turn on your TV and choose the same channel as you set the RF modulator's channel 3/4 switch to. • RF modulator is not supplied with this unit. You need to purchase it at your local store. Connection to a Cable / Satellite Box 1) Disconnect the power cords of the devices from the AC outlet. 2) Make the connection as illustrated below. e.g.) satellite dish This connection is for TV loop through only rear of your TV AUDIO IN VIDEO IN R L or cable TV company RF coaxial cable ANT. IN RF OUT RF coaxial cable AUDIO OUT R L VIDEO S-VIDEO OUT OUT ANT. IN IN IN VIDEO VIDEO IN OUT L R OUT ANTENNA AV IN IN S-VIDEO HDMI OUT OUT S-VIDEO COAXIAL DIGITAL AUDIO OUTPUT PCM / BITSTREAM RCA video cable VIDEO VIDEO IN OUT Y L PB/CB L RCA audio cable cable/satellite box OUT or ANTENNA RCA video cable RCA audio cable R AV IN IN R PR/CR OUT S-VIDEO AV OUT COMPONENT VIDEO OUTPUT S-VIDEO S-video cable 3) Plug in the power cords of the devices to the AC outlet. * Refer to the user manual for other connection methods. Finding the Viewing Channel 1) Press [STANDBY-ON y] to turn on the unit. 2) Turn on your TV. If connected to your VCR, make sure it is switched off or in standby mode before proceeding. 3) Press "2" on the TV's remote control, then press channel down button repeatedly until you see the "Initial Setup" menu. This is the correct viewing channel (external input channel) for the recorder. For some TVs, there may be a button on the TV's remote control that accesses the external input channel. It may be labeled "SOURCE", "AV", or "SELECT". In such case, press it repeatedly. Follow to the back side of this sheet. 2008/06/02 15:59:22
-
 1
1 -
 2
2
 |
 |