Philips HF3470 User manual - Page 7
Introduction, General description Fig. 5, Preparing for use, Using the appliance - manual
 |
UPC - 075020012142
View all Philips HF3470 manuals
Add to My Manuals
Save this manual to your list of manuals |
Page 7 highlights
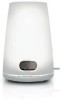
10 English -- This appliance meets the requirements of the low voltage directive 2006/95/EC and the EMC directive 2004/108/EC.Int Introduction Congratulations on your purchase and welcome to Philips! To fully benefit from the support that Philips offers, register your product at www.philips.com/welcome. The Philips Wake-up Light helps you wake up more pleasantly.The light intensity of the lamp gradually increases to the set level in the 30 minutes before the set wake-up time.The light gently prepares your body for waking up at the programmed time.To make waking up an even more pleasant experience, you can use natural wake-up sounds or the FM radio. The effects of the Wake-up Light The Philips Wake-up Light gently prepares your body for waking up during the last half hour of sleep. In the early morning hours our eyes are more sensitive to light than when we are awake. During that period the relatively low light levels of a simulated natural sunrise prepare our body for waking up and getting alert. People who use the Wake-up Light wake up more easily, have a better overall mood in the morning and feel more energetic. Because the sensitivity to light differs per person, you can set the light intensity of your Wake-up Light to a level that matches your light sensitivity for an optimal start of the day. For more information about the Wake-up Light, see www.philips.com. General description (Fig. 5) A Vents B Lamp housing C Power cord D Antenna E Display 1 Hour indication of clock time/alarm time 2 Clock time symbol 3 Alarm symbol 4 Radio symbol 5 'Birds' sound symbol 6 'Beep' sound symbol 7 Display brightness symbol 8 Sound level symbol 9 Radio frequency symbol 10 Light symbol F Menu '-' button G MENU button H SELECT button I Menu '+' button J Control lever with 'alarm off ','alarm on' and 'snooze' positions K Buttons on the side of the appliance 1 Light intensity '+' button 2 Light on/off button 3 Light intensity '-' button 4 Volume increase button 5 Radio on/off button 6 Volume decrease button English 11 Preparing for use Before first use 1 Place the Wake-up Light 16-20in/40-50cm from your head, for example on a bedside table. 2 Put the plug in the wall outlet. -- The hour indication on the display starts flashing to indicate that you have to set the clock time (Fig. 6). Setting the clock time You cannot use the Wake-up Light until you have set the clock time. 1 When the hour indication on the display flashes, press the menu + or - button to set the hour. Note:You can only do this when you are in the set clock menu and when the hour indication flashes. If this is not the case, press the MENU button, use the menu + or - button to select the set clock menu and press the SELECT button to confirm.You are now in the set clock menu. 2 Press the SELECT button to confirm. ,, The minute indication starts flashing (Fig. 7). 3 Press the menu + or - button to set the minutes. 4 Press the SELECT button to confirm. ,, The appliance leaves the menu and the display shows the set clock time. The appliance is now ready for use. Note: Every time you remove the plug from the wall outlet for more than approximately 15 minutes, you have to set the clock time again.To change the set clock time when the plug is still in the wall outlet, see section 'Menu functions' in chapter 'Using the appliance'. Using the appliance Use this appliance for its intended household use as described in this manual... Menu functions Below find a description of all functions that can be set in the menu. These functions appear in the menu in the following order: -- Clock time -- Alarm time -- Alarm sound -- Display brightness: You can choose a display brightness between 1 and 4. You can set the menu functions in the following way: 1 Press the MENU button to enter the menu (Fig. 8). 2 Press the menu + or - button to select a function (Fig. 9). 3 Press the SELECT button to enter this function (Fig. 10). 4 Press the menu + or - button to change a setting (Fig. 9). 5 Press the SELECT button to confirm (Fig. 10).
-
 1
1 -
 2
2 -
 3
3 -
 4
4 -
 5
5 -
 6
6 -
 7
7 -
 8
8 -
 9
9 -
 10
10
 |
 |
