Philips HTS6500 User manual - Page 15
Step 3, Connecting to TV - inputs
 |
UPC - 609585114234
View all Philips HTS6500 manuals
Add to My Manuals
Save this manual to your list of manuals |
Page 15 highlights
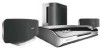
Basic Connections (continued) English Option 1 SUB- FRONT FRONT WOOFER RIGHT LEFT L R HDMI OUT Option 2 ~ MAINS FM/AM ANTENNA AM FM 75 Step 3: Connecting to TV This connection enables you to view the playback from this DVD system. You only need to choose one of the options below to make the video connection. - For a standard TV, follow option 1 or 2. - For a progressive scan TV, follow option 3. - For a HDMI TV, follow option 4. - For TV with only a single antenna input jack, follow option 5. IMPORTANT! Connect the DVD system directly to the TV. Helpful Hint: - To hear the TV channels through this DVD system, connect the AUDIO IN - TV IN jacks to the corresponding AUDIO output jacks on the TV using an audio cable. Press TV on the remote control when watching the TV programs. Option 1: Using the Video (CVBS) jack (good picture quality) Use the supplied composite video cable (yellow) to connect the CVBS jack on the DVD system to the video input jack (or labeled as A/V In, Video In, Composite or Baseband) on the TV. Option 2: Using the S-Video jack (excellent picture quality) Use an S-video cable (not supplied) to connect the S-VIDEO (Y/C) jack on the DVD system to the S-Video input jack (or labeled as Y/C or S-VHS) on the TV. TIPS: Before making or changing any connections, make sure that all the devices are disconnected from the power outlet. 15
-
 1
1 -
2
-
3
-
4
-
5
-
6
-
7
-
8
-
9
-
 10
10 -
 11
11 -
 12
12 -
 13
13 -
 14
14 -
 15
15 -
 16
16 -
 17
17 -
 18
18 -
 19
19 -
 20
20 -
21
-
22
-
23
-
24
-
25
-
26
-
27
-
28
-
29
-
30
-
31
-
32
-
33
-
34
-
35
-
36
-
37
-
38
-
39
-
40
-
41
-
42
-
43
-
44
-
45
-
46
-
47
-
48
-
49
-
50
-
51
-
52
-
53
-
54
-
55
 |
 |
