Philips MCD139 User manual - Page 13
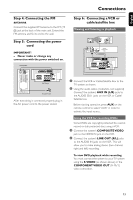
Step 6, Connecting a VCR or, cable/satellite box, Step 4: Connecting the FM, antenna, Step 5,
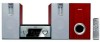 |
View all Philips MCD139 manuals
Add to My Manuals
Save this manual to your list of manuals |
Page 13 highlights
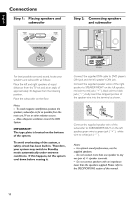
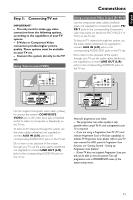
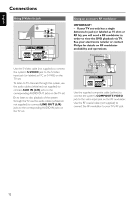
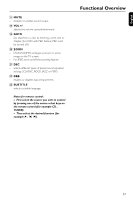
English Step 4: Connecting the FM antenna ● Connect the supplied FM antenna to the FM (75 Ω) jack at the back of the main unit. Extend the FM antenna and fix its end to the wall. Step 5: Connecting the power cord IMPORTANT! - Never make or change any connection with the power switched on. Connections Step 6: Connecting a VCR or cable/satellite box Viewing and listening to playback ANTENNA FM (75Ω) ANTENNA FM (75Ω) ● After everything is connected properly, plug in the AC power cord to the power socket. 1 Connect the VCR or Cable/Satellite Box to the TV system as shown. 2 Using the audio cables (red/white, not supplied) Connect the system's AUX IN (L/R) jacks to the AUDIO OUT jacks on the VCR or Cable/ Satellite box. Before star ting operation, press AUX on the remote control to select "AUX" in order to activate the input source. Using the VCR for recording DVDs Some DVDs are copyright-protected.You cannot record or dub protected discs using a VCR. 3 Connect the system's COMPOSITE VIDEO jack to the VIDEO IN jack on the VCR. 4 Connect the system's LINE OUT (R/L) jacks to the AUDIO IN jacks on the VCR. This will allow you to make analog stereo (two channel, right and left) recording. To view DVD playback while recording You must connect the system to your TV system using the S-VIDEO (as shown above) or the COMPONENT VIDEO OUT (Pr Pb Y) video connection. 13
-
 1
1 -
2
-
3
-
4
-
5
-
6
-
7
-
 8
8 -
 9
9 -
 10
10 -
 11
11 -
 12
12 -
 13
13 -
 14
14 -
 15
15 -
 16
16 -
 17
17 -
 18
18 -
19
-
20
-
21
-
22
-
23
-
24
-
25
-
26
-
27
-
28
-
29
-
30
-
31
-
32
-
33
-
34
-
35
-
36
-
37
-
38
-
39
 |
 |
