Philips SRU5100 User manual - Page 8
Troubleshooting, Limited Lifetime Warranty, Setup, cont. - code
 |
View all Philips SRU5100 manuals
Add to My Manuals
Save this manual to your list of manuals |
Page 8 highlights
Setup, cont. Any Mode chosen for Volume/Mute control MUST have its own Volume/Mute function or the Volume/Mute buttons will do nothing. Setting ALL Volume/Mute Control to any one Mode This routine can set all Modes to "punch-through" to any one chosen Mode for Volume/Mute button control without the needing to change to that Mode. 1. Press and hold the CODE SEARCH button until the red indicator turns on, then release the button. 2. Press and hold the MUTE button until the red indicator blinks off, then release the button. 3. Press and release the desired Mode button (TV, VCR, etc.) for Volume/Mute control, the red indicator blinks then stays on. 4. Press and release the MUTE button and the red indicator turns off. The red indicator will blink rapidly for three seconds if the Mode you have selected has no Volume/Mute control. 5. All other Modes will now punch-through to your chosen Mode for Volume/Mute control. 6. All "Visual" and "Audio" programmed Modes will now punch-through to the respective Modes you have chosen for Volume/Mute control. Setting any Mode to use its own Volume/Mute Control This routine can set any Mode to use only its own Volume/Mute control. Note - If your chosen Mode has no Volume/Mute functions of its own then the Volume/ Mute buttons will do nothing. 1. Press and hold the CODE SEARCH button until the red indicator turns on, then release the button. 2. Press and hold the MUTE button until the red indicator blinks off, then release the button. 3. Press and release the desired Mode button (TV, VCR, etc.), the red indicator blinks then stays on. 4. Press and release the VOLUME- (Down) button, the red indicator blinks then stays on. 5. Press and release the MUTE button and the red indicator turns off. 6. All "Visual" and "Audio" programmed Modes will now punch-through to the respective Modes you have chosen for Volume/Mute control. Troubleshooting Remote does not operate your product. • Press the mode button of the product you want to control. • Program the remote with a new code. • Install new batteries. (You might have to reprogram your remote after installing new batteries.) • Remote may not be compatible with your product. Remote does not operate some features of your product. • Program remote with a new code. • Remote may not be able to operate all features of your product or button names might be different than your product. Red Indicator blinks after you program a product code. • Remote did not accept the code. • Try to program the code again or try a different code. For help with setup, please call: 919-573-7853. Limited Lifetime Warranty The manufacturer warrants that this product shall be free from defects in material, workmanship and assembly, under normal use, in accordance with the specifications and warnings, for as long as you own this product. This warranty extends only to the original purchaser of the product, and is nontransferable. Defective products, together with the dated proof of purchase, must be returned to the place of purchase for repair or replacement. THERE ARE NO OTHER EXPRESS WARRANTIES. Incidental and consequential damages are disclaimed where permitted by law. This warranty gives you specific legal rights, and you may also have other rights which vary from state to state. Made in China. Quality Assured in USA. Ledgewood, NJ 07852 14 15
-
 1
1 -
2
-
 3
3 -
 4
4 -
 5
5 -
 6
6 -
 7
7 -
 8
8 -
 9
9 -
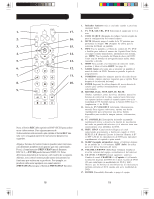 10
10 -
 11
11 -
 12
12 -
 13
13 -
14
-
15
-
16
-
17
-
18
-
19
-
20
-
21
-
22
-
23
 |
 |