Pioneer 6100TV Owners Manual - Page 16
Mounting Location
 |
UPC - 012562594552
View all Pioneer 6100TV manuals
Add to My Manuals
Save this manual to your list of manuals |
Page 16 highlights
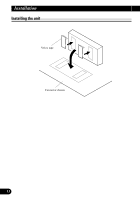
Installation Mounting Location 7 Example 1: Mounting on a rear window (Fig. 1) 1 7 Example 3: Mounting on a rear side window (Fig. 3) 1 1. Clamps 7 Example 2: Mounting on a hatchback window (Fig. 2) 1 1. Clamps Warm the window glass when the air temperature is low. To prevent a reduction in adhesive strength ON the car heater or rear defogger to warm the glass to a temperature of 20˚C or more. Note: • Install the antenna on the window on the driver's side of the car. • Do not install with the antenna elements together as this reduces reception sensitivity. 1. Clamps When mounting on a hatchback window, use clamps where necessary to assure the cable is not stretched or does not cause an obstruction when the hatch is opened or closed. 15
-
 1
1 -
2
-
3
-
4
-
5
-
6
-
7
-
8
-
9
-
10
-
 11
11 -
 12
12 -
 13
13 -
 14
14 -
 15
15 -
 16
16 -
 17
17 -
 18
18 -
 19
19 -
 20
20 -
 21
21 -
22
-
23
-
24
-
25
-
26
-
27
-
28
-
29
-
30
-
31
-
32
-
33
-
34
-
35
-
36
-
37
-
38
-
39
-
40
-
41
-
42
-
43
-
44
-
45
-
46
-
47
-
48
-
49
-
50
-
51
-
52
-
53
-
54
-
55
-
56
 |
 |
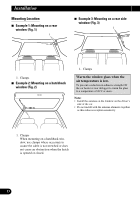
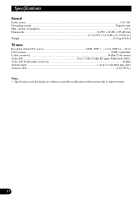
Mounting Location
7
Example 1: Mounting on a rear
window (Fig. 1)
1. Clamps
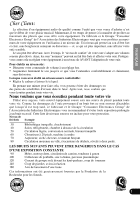
7
Example 2: Mounting on a hatchback
window (Fig. 2)
1. Clamps
When mounting on a hatchback win-
dow, use clamps where necessary to
assure the cable is not stretched or does
not cause an obstruction when the hatch
is opened or closed.
7
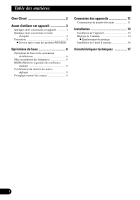
Example 3: Mounting on a rear side
window (Fig. 3)
1. Clamps
Note:
•
Install the antenna on the window on the driver’s
side of the car.
•
Do not install with the antenna elements together
as this reduces reception sensitivity.
Warm the window glass when the
air temperature is low.
To prevent a reduction in adhesive strength ON
the car heater or rear defogger to warm the glass
to a temperature of 20˚C or more.
1
1
1
15
Installation