Pioneer AVH P3100DVD Installation Manual
Pioneer AVH P3100DVD - DVD Player With LCD monitor Manual
 |
UPC - 012562944050
View all Pioneer AVH P3100DVD manuals
Add to My Manuals
Save this manual to your list of manuals |
Pioneer AVH P3100DVD manual content summary:
- Pioneer AVH P3100DVD | Installation Manual - Page 1
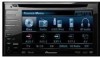
English Français Español DVD AV RECEIVER AUTORADIO AV LECTEUR DE DVD RADIO AV CON DVD AVH-P3100DVD Installation Manual Manuel d'installation Manual de instalación - Pioneer AVH P3100DVD | Installation Manual - Page 2
wound around the steering column or gearshift. Be sure to install the display in such a way that it will not obstruct driving. • Make sure that wires will not interfere with moving parts of the vehicle, such as the gearshift, parking brake or seat sliding mechanism. • Do not shorten any leads. If - Pioneer AVH P3100DVD | Installation Manual - Page 3
• This unit cannot be installed in a vehicle without ACC (accessory) position on the ignition installation. - Secure the wiring with cable clamps or adhesive tape. To protect the wiring . Connect it to an external power amp's system remote control or the vehicle's auto-antenna relay control terminal - Pioneer AVH P3100DVD | Installation Manual - Page 4
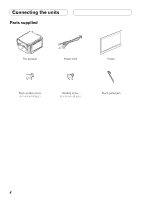
Connecting the units Parts supplied This product Power cord Frame Flush surface screw (5 × 6 mm) (8 pcs.) Binding screw (5 × 6 mm) (8 pcs.) Touch panel pen 4 - Pioneer AVH P3100DVD | Installation Manual - Page 5
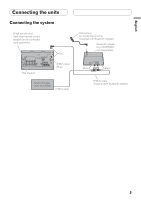
Connecting the system Wired remote input Hard-wired remote control adaptor can be connected (sold separately). Blue This product IP-BUS input (Blue) Multi-CD player (sold separately) IP-BUS cable Microphone for hands-free phoning (supplied with Bluetooth adapter) Bluetooth adapter (e.g. CD - Pioneer AVH P3100DVD | Installation Manual - Page 6
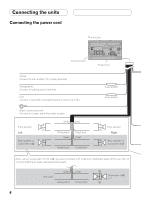
Connecting the units Connecting the power cord This product Antenna input Fuse (10 A) Yellow Connect to the constant 12 V supply terminal. Orange/white Connect to lighting switch terminal. Red Connect to terminal controlled by ignition switch (12 V DC). Black (chassis ground) Connect to a clean - Pioneer AVH P3100DVD | Installation Manual - Page 7
equipment with Mute function, wire this lead to the Audio Mute lead on that piece of equipment. If not, keep the Audio Mute lead free of any connections. Connection method 1. Clamp the lead. 2. Clamp firmly with needle-nosed pliers. Note: · The position of the parking brake switch depends on the - Pioneer AVH P3100DVD | Installation Manual - Page 8
to the speaker Front speaker leads and system remote control (blue/white). When you connect the multi-channel processor Rear speaker to this unit, refer to multi-channel processor's or Subwoofer installation manual for the connection method. Front speaker Rear speaker - Pioneer AVH P3100DVD | Installation Manual - Page 9
. To video output RCA cable (sold separately) Rear view camera Fuse resistor Violet/white Of the two lead wires connected to the back lamp, connect the one in which the voltage changes when the gear shift is in the REVERSE (R) position. This connection enables the unit to sense whether the car is - Pioneer AVH P3100DVD | Installation Manual - Page 10
Wired remote input Hard-wired remote control adaptor can be connected (sold separately). This product Optical output (Black) Blue Microphone for hands-free phoning (supplied with Bluetooth adapter) Bluetooth multi-channel processor) Black Blue IP-BUS cable Multi-CD player (sold separately) 10 - Pioneer AVH P3100DVD | Installation Manual - Page 11
of a fatal accident. • Avoid installing the optical cable connection box in locations where the operation of the brake may be prevented. Otherwise, it or could dismount itself, which leads to an accident or other problems. • Do not install this unit near the doors where rainwater is likely to be - Pioneer AVH P3100DVD | Installation Manual - Page 12
the display Display with RCA input jacks (sold separately) Video input (V IN) This product Audio input (L IN, R IN) To video input RCA cables (sold separately) Rear monitor output (V OUT) To video output To audio outputs External video component (sold separately) • It is necessary to change - Pioneer AVH P3100DVD | Installation Manual - Page 13
pawl gets in the way, bend it down. Factory radio mounting bracket • To some types of vehicles, this unit cannot be properly installed. In such case, use the optional installation kit (ADT-VA133). Binding screw or flush surface screw Be sure to use the screws supplied with this unit. Dashboard or - Pioneer AVH P3100DVD | Installation Manual - Page 14
réglementation est applicable, elle doit être respectée, et les fonctions DVD de cet appareil ne doivent pas être utilisées. ATTENTION • PIONEER ne vous recommande pas d'installer ou d'entretenir vous-même cet écran, car ces travaux peuvent présenter un risque d'électrocution ou d'autres dangers - Pioneer AVH P3100DVD | Installation Manual - Page 15
d'impédance). • Pour éviter tout court-circuit, surchauffe ou mauvais fonctionnement, assurez-vous de suivre les instructions ci-dessous. - Déconnectez la borne négative de la batterie avant l'installation. - Fixez solidement les câbles avec des serrecâbles ou du ruban adhésif. Pour protéger le - Pioneer AVH P3100DVD | Installation Manual - Page 16
Raccordements des appareils Pièces fournies Ce produit Cordon d'alimentation Cadre Vis à tête plate (5 × 6 mm) (8 pcs) Vis de pression (5 × 6 mm) (8 pcs.) Stylet pour écran tactile 4 - Pioneer AVH P3100DVD | Installation Manual - Page 17
de télécommande câblée peut être connecté à cette prise (vendu séparément). Bleu Microphone pour téléphonie mains libres (fourni avec l'adaptateur Bluetooth) Adaptateur Bluetooth (par ex. CD-BTB200) (vendu séparément) Cet appareil Entrée IP-BUS (Bleu) Lecteur de CD à chargeur (vendu séparément - Pioneer AVH P3100DVD | Installation Manual - Page 18
Raccordements des appareils Branchement du cordon d'alimentation Cet appareil Entrée d'antenne Fusible (10 A) Jaune Connectez à une prise d'alimentation constante 12 V. Orange/blanc Connectez à la prise du commutateur d'éclairage. Rouge Connectez à une prise commandée par le commutateur d' - Pioneer AVH P3100DVD | Installation Manual - Page 19
avec une fonction de mise en sourdine, raccordez ce conducteur au conducteur de mise en sourdine audio de cet équipement. Sinon, laissez le conducteur de mise en sourdine audio non raccordé. Méthode de connexion 1. Serrez le conducteur. 2. Serrez fermement avec une pince à mâchoires pointues - Pioneer AVH P3100DVD | Installation Manual - Page 20
(bleu/blanc). Enceinte arrière Si vous reliez un processeur multi-canaux à cet ou caisson de appareil, reportez-vous au manuel d'installation grave du processeur multi-canaux pour la méthode de connexion. Enceinte avant Enceinte arrière ou caisson de grave Remarque: · Change - Pioneer AVH P3100DVD | Installation Manual - Page 21
caméra de recule peuvent apparaître plus proche ou plus loin qu'en réalité. Cet appareil Entrée de la caméra de recul (REAR CAMERA IN) ATTENTION Vous devez utiliser une caméra capable de fournir des images inversées, comme dans un miroir. À la sortie vidéo Caméra de - Pioneer AVH P3100DVD | Installation Manual - Page 22
(par ex. CD-BTB200) (vendu séparément) À SWR À SWL Noir Entrée IP-BUS (Bleu) Bleu Noir Câble IP-BUS (fourni avec l'adaptateur Bluetooth) Boîte de raccordement de câble à fibres optiques (fourni avec le processeur multi-canaux) Câble à fiches Cinch (RCA) (fourni avec le processeur multi - Pioneer AVH P3100DVD | Installation Manual - Page 23
ble à fibres optiques au moyen de la bande autoagrippante dans l'espace disponible de la console. Bande autoagrippante (rigide) Bande autoagrippante (souple) • Pour installer la boîte de raccordement de câble à fibres optiques au moyen des attaches. Enroulez le câble à fibres optiques et la boîte de - Pioneer AVH P3100DVD | Installation Manual - Page 24
Câbles à fiches Cinch (RCA) (vendu séparément) Sortie du moniteur arrière (V OUT) À la sortie vidéo Cet appareil Entrée audio (L IN, R IN) Aux sorties audio Appareil vidéo externe (vendu séparément) • Lorsque vous connectez l'appareil vidéo externe, vous devez changer l'option AV Input dans le - Pioneer AVH P3100DVD | Installation Manual - Page 25
du chauffage. • Des performances optimales peuvent être obtenues quand l'appareil est installé avec un angle de moins de 30°. Installation à l'aide des perçages sur le côté de l'appareil Fixation de l'appareil sur les supports de montage d'origine de la voiture. Positionnez l'appareil de façon que - Pioneer AVH P3100DVD | Installation Manual - Page 26
los casos en que resulten aplicables, estas normas deben respetarse y no deben usarse las funciones de DVD de esta unidad. PRECAUCIÓN • PIONEER no recomienda que sea usted mismo quien instale o revise su pantalla. La instalación o revisión del producto puede exponerle a descargas eléctricas u otros - Pioneer AVH P3100DVD | Installation Manual - Page 27
Español N STAR N STAR Conexión de las unidades Nota • No se puede instalar esta unidad en un vehículo sin una posición ACC (accesorio) en el interruptor de encendido. F ACC O F O OF OF T T Posición ACC Sin posición ACC • El uso de esta unidad en condiciones diferentes de las siguientes - Pioneer AVH P3100DVD | Installation Manual - Page 28
Conexión de las unidades Piezas suministradas Este producto Cable de alimentación Bastidor Tornillo de cabeza embutida (5 × 6 mm) (8 piezas) Tornillo de apriete (5 × 6 mm) (8 piezas) Bolígrafo de panel táctil 4 - Pioneer AVH P3100DVD | Installation Manual - Page 29
de control remoto cableado (vendido separadamente) Azul Micrófono para telefonía de manos libres (suministrado con el adaptador Bluetooth) Adaptador Bluetooth (e.g., CD-BTB200) (vendido separadamente) Este producto Entrada IP-BUS (Azul) Reproductor de Multi-CD (vendido separadamente) Cable IP - Pioneer AVH P3100DVD | Installation Manual - Page 30
Conexión de las unidades Conexión del cable de alimentación Este producto Entrada para antena Fusible (10 A) Amarillo Conecte el terminal de suministro de 12 V constante. Anaranjado/blanco Conecte al terminal de interruptor de iluminación. Rojo Conecte al terminal controlado por del interruptor - Pioneer AVH P3100DVD | Installation Manual - Page 31
conductor de silenciamiento de audio libre de conexiones. Método de conexión 1. Apriete el cable. 2. Apriete firmemente con alicates de punta de aguja. Nota: · La posición del freno de estacionamiento depende del modelo del vehículo. Para conocer detalles, consulte el manual del propietario del - Pioneer AVH P3100DVD | Installation Manual - Page 32
conecte nada a los conductores de los altavoces y al control remoto del sistema (azul/blanco). Cuando conecte el procesador multicanal a esta unidad, consulte el manual de instalación del procesador multicanal para el método de conexión. Nota: · Cambie el ajuste inicial de esta unidad (refiérase al - Pioneer AVH P3100DVD | Installation Manual - Page 33
objetos en la vista trasera pueden parecer más cercanos o más distantes de que realmente están. Este producto Entrada para cámara de vista trasera (REAR CAMERA IN) PRECAUCIÓN Se debe utilizar una cámara que genere imágenes invertidas de espejo. A la salida de vídeo Cámara de vista trasera Cable - Pioneer AVH P3100DVD | Installation Manual - Page 34
separadamente) Salida óptica (Negro) Este producto Azul Micrófono para telefonía de manos libres (suministrado con el adaptador Bluetooth) Adaptador Bluetooth (e.g., CD-BTB200) (vendido separadamente) A SWR A SWL Negro Entrada IP-BUS (Azul) Azul Negro Cable IP-BUS (suministrado con - Pioneer AVH P3100DVD | Installation Manual - Page 35
o desmontarse, lo que causaría un accidente u otros problemas. • No instale esta unidad cerca de las puertas donde el agua de la lluvia podría derramar de la caja de la consola. Cinta de gancho Cinta de bucle • Cuando instale la caja de conexión de cable óptico con la atadura de fijación. Envuelva - Pioneer AVH P3100DVD | Installation Manual - Page 36
OUT) A la salida de vídeo Este producto Entrada de audio (L IN, R IN) A las salidas de audio Componente de vídeo externo (vendido separadamente) • Se requiere los pasajeros en los asientos traseros. ADVERTENCIA No instale nunca la pantalla en un lugar donde quede visible al conductor durante la conducción del - Pioneer AVH P3100DVD | Installation Manual - Page 37
(iii) pueda afectar la capacidad del conductor para manejar el vehículo de manera segura. • El láser semiconductor se dañará si se sobrecalienta. Instale esta unidad alejada de lugares calientes como cerca de la salida del calentador. • Se obtiene el rendimiento óptimo cuando se instala la unidad en - Pioneer AVH P3100DVD | Installation Manual - Page 38
ELECTRONICS OF CANADA, INC. 300 Allstate Parkway, Markham, Ontario L3R 0P2, Canada TEL: 1-877-283-5901 TEL: 905-479-4411 PIONEER ELECTRONICS DE MEXICO, S.A. de C.V. Blvd.Manuel Avila Camacho 138 10 piso Col.Lomas de Chapultepec, Mexico, D.F. 11000 TEL: 55-9178-4270 Published
-
 1
1 -
 2
2 -
 3
3 -
 4
4 -
 5
5 -
 6
6 -
 7
7 -
8
-
9
-
10
-
11
-
12
-
13
-
14
-
15
-
16
-
17
-
18
-
19
-
20
-
21
-
22
-
23
-
24
-
25
-
26
-
27
-
28
-
29
-
30
-
31
-
32
-
33
-
34
-
35
-
36
-
37
-
38
 |
 |

English
Français
Español
Installation Manual
Manuel d’installation
Manual de instalación
DVD AV RECEIVER
AUTORADIO AV LECTEUR DE DVD
RADIO AV CON DVD
AVH-P3100DVD