Pioneer CDJ-1000 Owner's Manual - Page 11
Dj Player Operation, Disc Loading/unloading - cue skips track
 |
View all Pioneer CDJ-1000 manuals
Add to My Manuals
Save this manual to your list of manuals |
Page 11 highlights
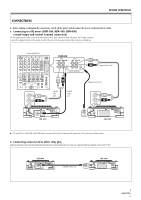
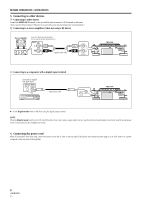
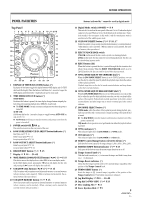
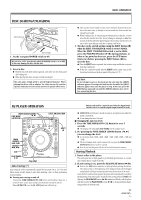
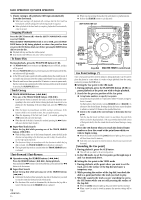
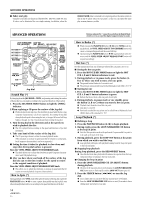
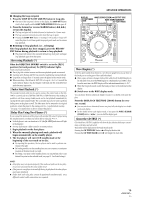
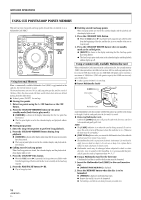
BASIC OPERATION DISC LOADING/UNLOADING Label surface up Insert straight 1. Set the rear-panel POWER switch to ON. Do not force a disc into the unit when the POWER switch is set to OFF as this may damage the disc and the unit. 2. Insert a disc. ¶ Hold the disc with label surface upwards, and insert into the front panel disc loading slot . ¶ When playing 8cm discs, be sure to install an adaptor. This unit spins at high speed to provide high performance. When playing 8cm discs with an adaptor, for safety reasons the rotation speed is reduced as a result scratch and reverse speeds will be lower. ¶ Only one disc can be loaded at a time. Never attempt to load more than one disc at the same time, or attempt to load a second disc when one disc has already been loaded. ¶ When loading a disc, do not placing any twisting force on the disc, or try to force the disc into the slot. Also, do not attempt to interrupt or defeat the motion of the disc when the player begins to draw a disc into the slot or to eject a disc, since damage to the disc or player could occur. 3. The disc can be ejected anytime using the EJECT button (0) when the EJECT UNLOCK/LOCK switch is set to UNLOCK. When the EJECT UNLOCK/LOCK switch is set to LOCK, press the PLAY/PAUSE button (6) during playback, or when a Cue point has been set, press the CUE button (back cue) before pressing the EJECT button (0) to eject the disc. ¶ When the EJECT button is pressed, disc rotation stops and the disc is ejected from the loading slot. ¶ If the disc cannot be ejected with the EJECT button, insert a pin in the forced ejection hole on the front panel of the player. P. 5 CAUTION: Do not attempt to press a disc back into the slot when the [EJECT] indicator appears. Pressing a disc back into the slot while the [EJECT] indicator appears may cause the player to stop. In this case, press the EJECT button again and wait until the [EJECT] indicator goes out before reinserting the disc. DJ PLAYER OPERATION WAVE SEARCH(ZOOM) TIME MODE 2, 3 / AUTO CUE EJECT UNLOCK/LOCK EJECT 0 TRACK SEARCH 4, ¢ SEARCH 1, ¡ CUE PLAY/PAUSE 6 Jog dial Auto Cueing (*) Auto cueing is used to automatically specify the Cue point (see p. 12) to be used before sound actually begins to play when inserting a disc or when performing track searching. ¶ Turning auto cueing on and off Pressing the TIME MODE/AUTO CUE button and holding it down for a second or more causes auto cueing to be alternately turned on and off. When AUTO CUE is on, the [A. CUE] indicator will be lit up. Buttons indicated by * cannot be used when the Digital Mode switch is set to on (and the digital output terminal is used). ¶ AUTO CUE on/off status is stored in memory and persists even when the power is turned off. ¶ It can change the Auto Cue level. 7 Changing the Auto Cue level 1. Press the TIME MODE/AUTO CUE button for over 5 seconds. ¶ The display will indicate [A.CUE-60dB] (in the original state). 2. By -pressing the WAVE SEARCH (ZOOM) button (2, 3) you can change the level. ¶ It can choose from -36dB, -42dB, -48dB, -54dB, -60dB, -66dB, -72dB and -78dB. ¶ The level change mode can be removed if you press the TIME MODE/ AUTO CUE button or wait 15 seconds. ¶ Even if you turn the power off, the set level will remain in memory. Starting Playback 1. Insert a disc in the player. This unit spins discs at high speeds to provide high performance. As a result, disc loading takes a couple of seconds. 2. If auto cueing is on, press the PLAY/PAUSE button (3/8). ¶ Wait for the CUE button indicator to light up before pressing the button. The silent portion at the beginning of the displayed track will be skipped and playback will begin instantaneously from the first bars of the track. Once the first track has been played, the player will automatically search for the beginning of the next track to be played. The cueing indicator [CUE] will light up, the PLAY/PAUSE button [3/8] indicator will flash, and the player will then wait for the PLAY/PAUSE button (3/8) to be pressed before beginning playback of the next track. 11 En
-
 1
1 -
2
-
3
-
4
-
5
-
 6
6 -
 7
7 -
 8
8 -
 9
9 -
 10
10 -
 11
11 -
 12
12 -
 13
13 -
 14
14 -
 15
15 -
 16
16 -
17
-
18
-
19
-
20
 |
 |
