Pioneer CDJ-400 CDJ-400 Operating Instructions - Page 19
Advanced Operations - and cross dj
 |
UPC - 012562878423
View all Pioneer CDJ-400 manuals
Add to My Manuals
Save this manual to your list of manuals |
Page 19 highlights
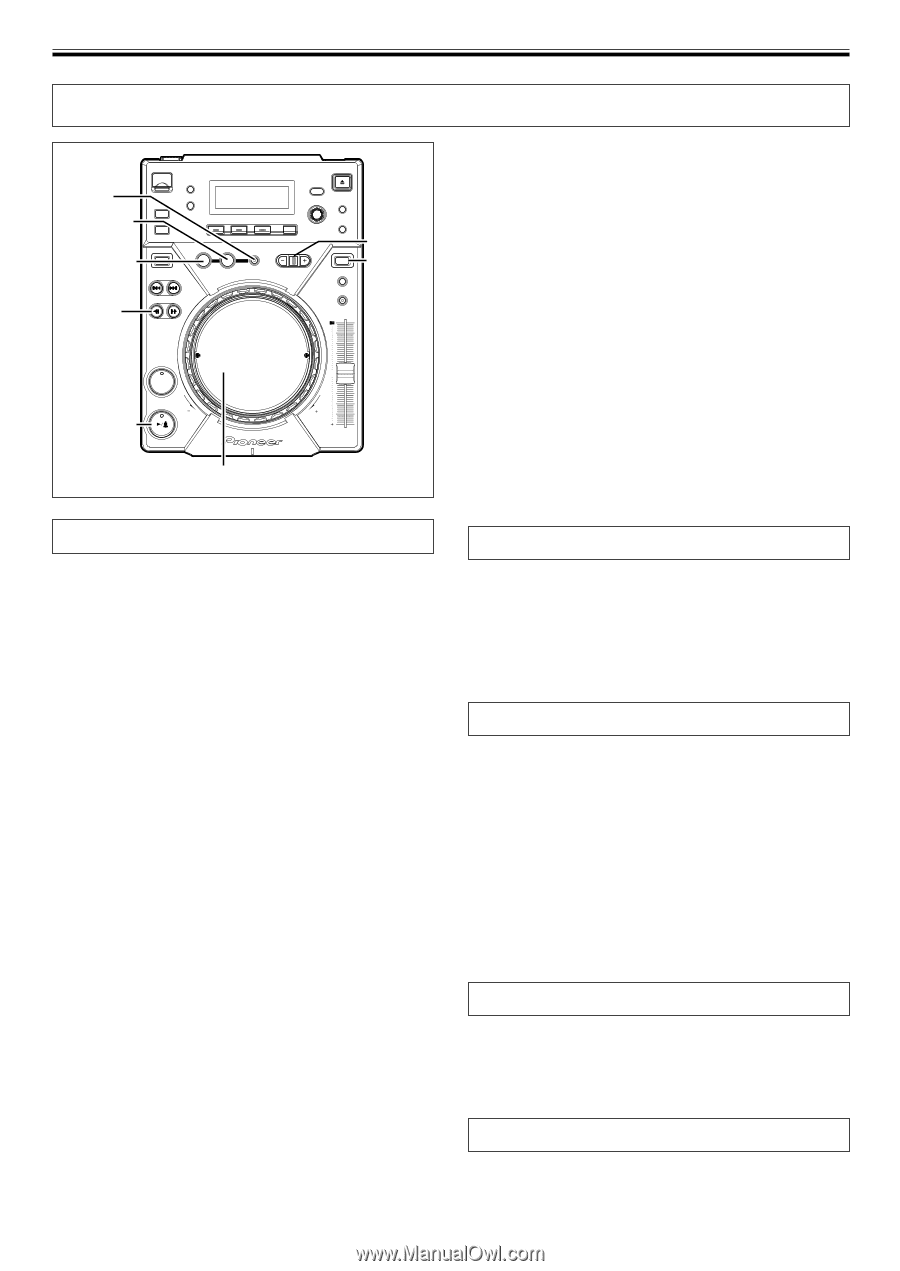
OPERATIONS (ADVANCED OPERATIONS) ADVANCED OPERATIONS RELOOP/ EXIT OUT/ OUT ADJUST IN/ REALTIME CUE/ REV HOT LOOP SEARCH 1, ¡ BEAT LOOP/ LOOP DIVIDE VINYL JOG MODE VINYL CUE PLAY/PAUSE Jog dial Loop playback 7 Creating a loop 1. Press the PLAY/PAUSE button (6) button to start play- back. 2. During playback, press the IN/REALTIME CUE/HOT LOOP button at the loop-in point. ¶ Note that this operation is not needed if a prerecorded cue point is to be used as the start of the loop. 3. During playback, press the OUT/OUT ADJUST button at the desired loop-out point. ¶ Loop playback will start between the loop-in point and loop-out point. ¶ By using the frame search, the loop-out point can be set in units of frames. ¶ During playback of MP3s, looping is only possible within one and the same track set having a cue point. 7 To start loop playback with automatically set loop-out point (Auto BEAT LOOP) Press the BEAT LOOP/LOOP DIVIDE during playback or pause mode. ¶ The point at which the button is pressed will be set as the loopin point, and a loop-out point will automatically be set based on the track's BPM; loop playback will then start. ¶ If the numerical BPM value is not displayed, loop play will begin based on BPM=130. 7 To divide loops (LOOP DIVIDE) Press the BEAT LOOP/LOOP DIVIDE buttons during loop playback. ¶ Pressing the - button will divide the playback loop, and pressing the + button will return the playback loop to its original length. 7 Returning to loop-in point during loop playback to start over the loop playback (HOT LOOP) Press IN/REALTIME CUE/HOT LOOP button during loop playback. ¶ Returns to loop-in point and restarts loop playback. 7 To exit loop playback Press RELOOP/EXIT button during loop playback. ¶ The track will continue playback in sequence from the loop out point without returning to the loop-in point. 7 Changing the loop-out point 1. Press the OUT/OUT ADJUST button during loop playback. ¶ The time of the out point is shown in the display, the OUT/OUT ADJUST button starts to flash rapidly and the IN/REALTIME CUE/HOT LOOP button indicator turns off. 2. Press one of the SEARCH buttons (1, ¡) or turn the jog dial. ¶ The loop-out point is moved forwards or backwards in oneframe units. ¶ The loop-out point cannot be moved before the loop-in point. ¶ During playback of MP3s, loop adjustment is only possible within one and the same track set having a cue point. ¶ Pressing the OUT/OUT ADJUST button or waiting 30 seconds or longer will cause the player to exit from the loop-out adjust mode and to resume loop playback. 7 Returning to loop playback (RELOOP) After loop playback has been stopped, press the RELOOP/ EXIT button during playback. ¶ Returns to the previously set loop-in point, and restarts loop playback. If the loop is divided with loop divide, the loop will return to its original length. ¶ During playback of MP3s, re-looping is possible only within the same folder. Fader start playback The supplied control cable may be used to connect the CONTROL connector of the CDJ-400 to the matching CONTROL connector on a Pioneer DJ mixer, thus making it possible to exit from cueing standby mode and start playback immediately by raising the channel fader on the DJ mixer. The cross fader may also be used to perform fade-in starts on the player as well. The fader may also be returned to its original position to return the player to the cueing point (back cueing.) (See P.9 for instructions on connecting the units.) Scratch play When jog mode is set to [VINYL], pressing the top surface of the jog dial and turning it causes playback to occur in proportion to the speed and direction of jog dial rotation. 1. Press the JOG MODE VINYL button so the button indica- tor lights. 2. During playback, press the top surface of the jog dial. ¶ The playback will stop and become playback corresponding to the rotation of the jog dial (as explained in step 3). 3. Rotate the jog dial in the direction and at the speed you wish playback to be performed. ¶ Playback will be heard in the direction and speed proportional to the jog dial rotation. 4. Remove hand from jog dial. ¶ Returns to original playback. Spin play During playback in VINYL mode, either press the surface of the jog dial or press the PLAY/PAUSE button (6) to pause playback, then rotate the jog dial quickly; playback will occur in the direction and at a speed proportional to the direction and speed of jog dial rotation, even if you then release your hand from the jog dial. Reverse play Press the DIRECTION REV button. The button indicator will light. Playback will begin in the reverse direction. ¶ Playback acceleration/deceleration produced with jog dial rotation will operate in reverse. 19
-
 1
1 -
2
-
3
-
4
-
5
-
6
-
7
-
8
-
9
-
10
-
11
-
12
-
13
-
 14
14 -
 15
15 -
 16
16 -
 17
17 -
 18
18 -
 19
19 -
 20
20 -
 21
21 -
 22
22 -
 23
23 -
 24
24
 |
 |