Pioneer CT-W205R Operating Instructions - Page 14
Troubleshooting
 |
View all Pioneer CT-W205R manuals
Add to My Manuals
Save this manual to your list of manuals |
Page 14 highlights
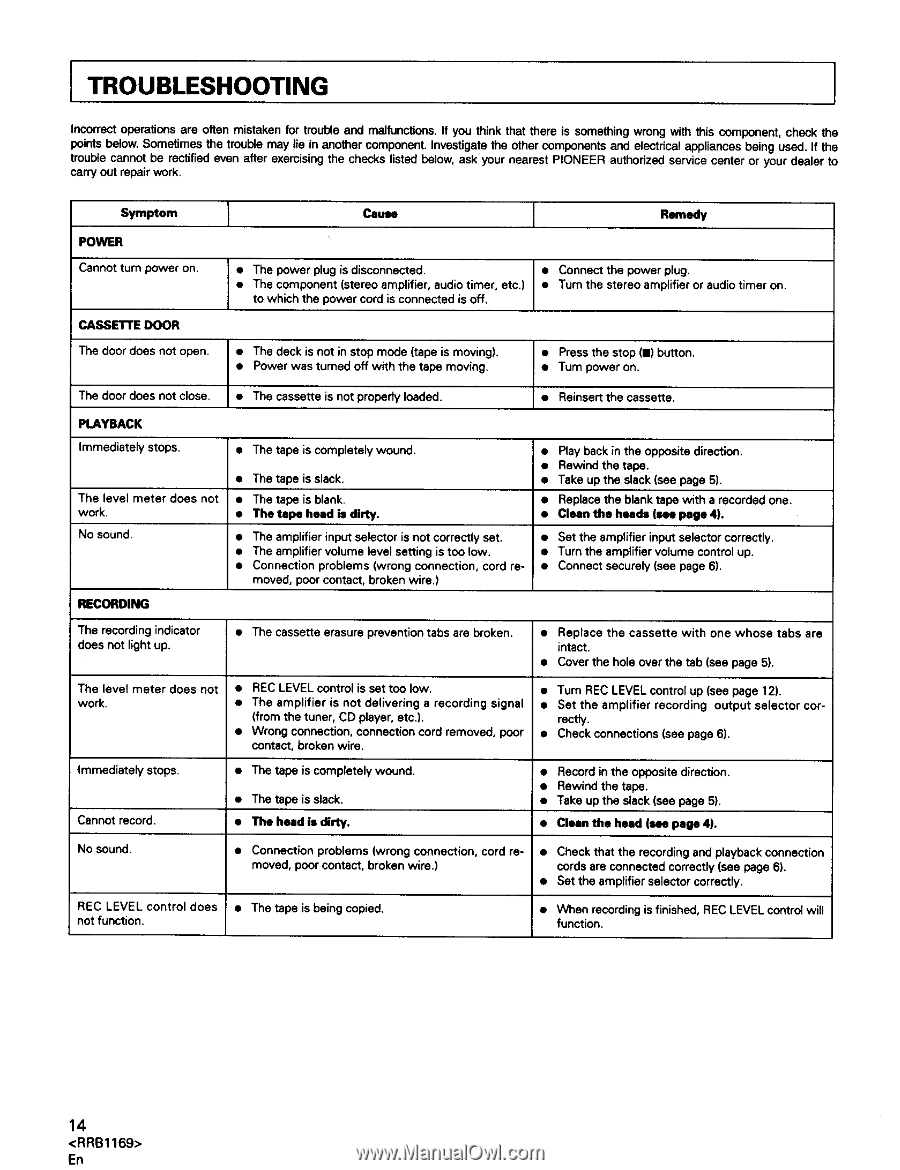
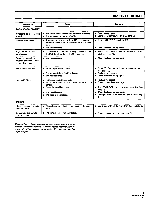
TROUBLESHOOTING Incorrect operations are often mistaken for trouble and malfunctions. If you think that there is something wrong with this component, check the points below. Sometimes the trouble may lie in another component. Investigate the other components and electrical appliances being used. If the trouble cannot be rectified even after exemising the checks listed below, ask your nearest PIONEER authodzed service center or your dealer to carry out repair work. Symptom POWER Cause Remedy Cannot turn power on. CASSE'R'E DOOR The door does not open. • The power plug is disconnected. • The component (stereo amplifier, audio timer, etc.) to which the power cord is connected is off. • Connect the power plug. • Turn the stereo amplifier or audio timer on. • Thedeck is not in stop mode (tape is moving). • Power was turnedoff with the tape moving, • Press the stop (11)button. • Turn power on. The door does not close. • The cassette is not property loaded. • Reinsert the cassette. PLAYBACK Immediately stops. The level meter does not work. No sound. • The tape is completely wound. • The tape is slack. • The tape is blank. • The tape head is dirty. • The amplifier input selector is not correctly set. • The amplifier volume level setting is too low. • Connection problems (wrong connection, cord re- moved, poor contact, broken wire.) • Ray back in the opposite direction. • Rewind the tape. • Take up the slack (see page 5). • Replace the blank tape with a recorded one. • Clean the heads (see page 4), • Set the amplifier input selector correctly. • Turn the amplifier volume control up. • Connect securely (see page 6). RECORDING The recording indicator does not light up. The level meter does not work, • The cassette erasure prevention tabs are broken. • REC LEVEL control is set too low. • The amplifier is not delivering a recording signal (from the tuner, CD player, etc.). • Wrong connection, connection cord removed, poor contact, broken wire. • Replace the cassette with one whose tabs are intact. • Cover the hole over the tab (see page 5). Turn REC LEVEL control up (see page 12). Set the amplifier recording output selector correctS. e Check connections (see page 6). Immediately stops. Cannot record. • The tape is completely wound. • The tape is slack. • The head is dirty. • Record in the opposite direction. • Rewind the tape. • Take up the slack (see page 5). • Clean the head (see page 4). No sound. • Connection problems (wrong connection, cord removed, poor contact, broken wire.) • Check that the recording and playback connection cords are connected correctly (see page 6). • Set the amplifier selector correctly. REC LEVEL control does not function, • The tape is being copied. • When recording is finished, REC LEVEL control will function. 14 En
-
 1
1 -
2
-
3
-
4
-
5
-
6
-
7
-
8
-
 9
9 -
 10
10 -
 11
11 -
 12
12 -
 13
13 -
 14
14 -
 15
15 -
 16
16
 |
 |