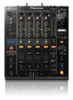
Pioneer DJM-900nexus Owner's Manual - Page 23
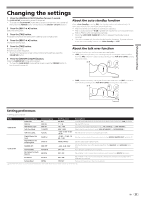
Changing the settings
 |
UPC - 884938131056
View all Pioneer DJM-900nexus manuals
Add to My Manuals
Save this manual to your list of manuals |
Page 23 highlights
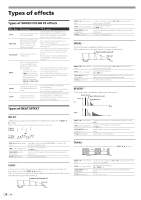
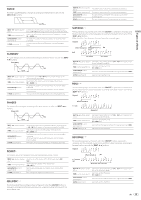
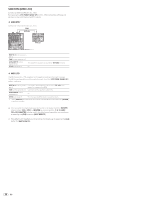
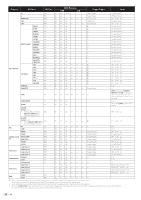
Changing the settings Changing the settings 1 Press the [ON/OFF (UTILITY)] button for over 1 second. The [USER SETUP] mode setting screen is displayed. ! To display the [CLUB SETUP] mode setting screen, first turn this unit's power off, then press the [POWER] button while pressing the [ON/OFF (UTILITY)] button. 2 Press the [BEAT c, d] button. Select the setting item. 3 Press the [TAP] button. The screen switches to the setting item's setting value change screen. 4 Press the [BEAT c, d] button. Change the setting value. About the auto standby function When [Auto Standby] is set to [ON], the standby mode is set automatically if 4 hours pass with all of the conditions shown below met. - That none of this unit's buttons or controls are operated. - That no audio signals of -10 dB or greater are input to this unit's input terminals. - That no PRO DJ LINK connections are made. ! When the [LFO FORM (WAKE UP)] button is pressed, the standby mode is canceled. ! This unit is shipped with the auto standby function turned on. If you do not want to use the auto standby function, set [Auto Standby] to [OFF]. 5 Press the [TAP] button. Enter the setting value. The previous screen reappears. ! To return to the previous screen without changing the settings, press the [QUANTIZE] button. 6 Press the [ON/OFF (UTILITY)] button. Close the [USER SETUP] mode setting screen. ! To close the [CLUB SETUP] mode setting screen, press the [POWER] button to turn this unit's power off. About the talk over function The talk over function has the two modes described below. - [ADV] (advanced talk over): The mid-range only of the sound of channels other than the [MIC] channel is attenuated according to the [Talk Over LEVEL] setting value and output. dB Frequency - [NOR] (normal talk over): The sound of channels other than the [MIC] channel is attenuated according to the [Talk Over LEVEL] setting value and output. dB Frequency Setting preferences *: Setting upon purchase Mode Options settings Screen display Setting value Descriptions Fader Start F.S. ON, OFF* Turns the fader start function on and off for all DJ players connected to the [LINK] terminals. MIDI CH MIDI CH 1* to 16 Sets the MIDI channel. USER SETUP MIDI Button Type Talk Over Mode MIDI BT TLK MOD TGL*, TRG ADV*, NOR Selects the MIDI signal transmission mode, [TGL (TOGGLE)] or [TRG (TRIGGER)]. Selects the talk over function's mode, [ADV(ADVANCED)] or [NOR(NORMAL)]. Talk Over LEVEL TLK LVL -6 dB, -12 dB, -18 dB*, Sets the talk over function's sound attenuation level. -24 dB Digital Master Out Level DOUT LV -19 dB*、-15 dB、-10 dB、-5 dB Sets the maximum level of the sound output from the [DIGITAL MASTER OUT] terminals. 1 Digital Master Out Sampling Rate DOUT FS 48 kHz, 96 kHz* Sets the digital signal's sampling rate. CLUB SETUP MASTER ATT. Auto Standby MST ATT AUTOSTB -6 dB, -3 dB, 0 dB* ON*, OFF Sets the attenuation level of the sound output from the [MASTER1] and [MASTER2] terminals. Turns the auto standby function on and off. Mic Output To Booth Monitor MIC BTH ON*, OFF Sets whether or not to output the microphone's audio signals from [BOOTH] terminals. PC UTILITY PC UTLY ON*, OFF Sets whether or not to launch the computer's setting utility software automatically when a USB cable is connected. Factory Reset INITIAL YES, NO* Restores all the settings to their factory defaults. 1: Note that the output sound may be distorted even if the master level indicator does not light up to the very top. En 23
-
 1
1 -
2
-
3
-
4
-
5
-
6
-
7
-
8
-
9
-
10
-
11
-
12
-
13
-
14
-
15
-
16
-
17
-
 18
18 -
 19
19 -
 20
20 -
 21
21 -
 22
22 -
 23
23 -
 24
24 -
 25
25 -
 26
26 -
 27
27 -
 28
28
 |
 |
