Pioneer DV-59AVi Owner's Manual - Page 60
The Video Settings menu
 |
View all Pioneer DV-59AVi manuals
Add to My Manuals
Save this manual to your list of manuals |
Page 60 highlights
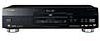
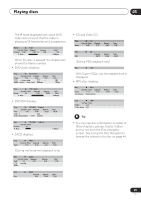
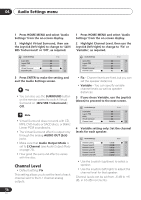
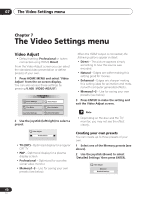
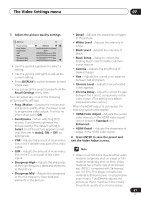
07 The Video Settings menu Chapter 7 The Video Settings menu Video Adjust • Default setting: Professional or (when connected using HDMI) Direct From the Video Adjust screen you can select the standard video presentation or define presets of your own. 1 Press HOME MENU and select 'Video Adjust' from the on-screen display. You can also access these settings by pressing V.ADJ (VIDEO ADJUST). HOME MENU DVD Audio Settings Video Adjust Play Mode Disc Navigator Initial Settings Setup Navigator 2 Use the joystick (left/right) to select a preset. When the HDMI output is connected, the following options appear instead: • Direct - The picture appears simply according to how the source was encoded. • Natural - Edges are softer making this setting good for movies. • Enhanced - Edges are sharper making this setting ideal for animation and material with computer generated effects. • Memory1-3 - Use for saving your own presets (see below) 3 Press ENTER to make the setting and exit the Video Adjust screen. • Depending on the disc and the TV/ monitor, you may not see the effect clearly. Video Adjust Professional • TV (CRT) - Optimized display for a regular CRT TV • PDP - Optimized display for a plasma display screen • Professional - Optimized for a professional video monitor • Memory1-3 - Use for saving your own presets (see below) Creating your own presets You can create up to three presets of your own. 1 Select one of the Memory presets (see above). 2 Use the joystick (down) to select 'Detailed Settings' then press ENTER. Video Adjust Memory1 Detailed Settings 60 En
-
 1
1 -
2
-
3
-
4
-
5
-
6
-
7
-
8
-
9
-
10
-
11
-
12
-
13
-
14
-
15
-
16
-
17
-
18
-
19
-
20
-
21
-
22
-
23
-
24
-
25
-
26
-
27
-
28
-
29
-
30
-
31
-
32
-
33
-
34
-
35
-
36
-
37
-
38
-
39
-
40
-
41
-
42
-
43
-
44
-
45
-
46
-
47
-
48
-
49
-
50
-
51
-
52
-
53
-
54
-
 55
55 -
 56
56 -
 57
57 -
 58
58 -
 59
59 -
 60
60 -
 61
61 -
 62
62 -
 63
63 -
 64
64 -
 65
65 -
66
-
67
-
68
-
69
-
70
-
71
-
72
-
73
-
74
-
75
-
76
-
77
-
78
-
79
-
80
-
81
-
82
-
83
-
84
-
85
-
86
-
87
-
88
-
89
-
90
-
91
-
92
-
93
-
94
-
95
-
96
-
97
-
98
-
99
-
100
 |
 |