Pioneer DV-600AV-S Operating Instructions - Page 13
Connections, Connecting to an AV receiver - usb
 |
UPC - 012562858845
View all Pioneer DV-600AV-S manuals
Add to My Manuals
Save this manual to your list of manuals |
Page 13 highlights
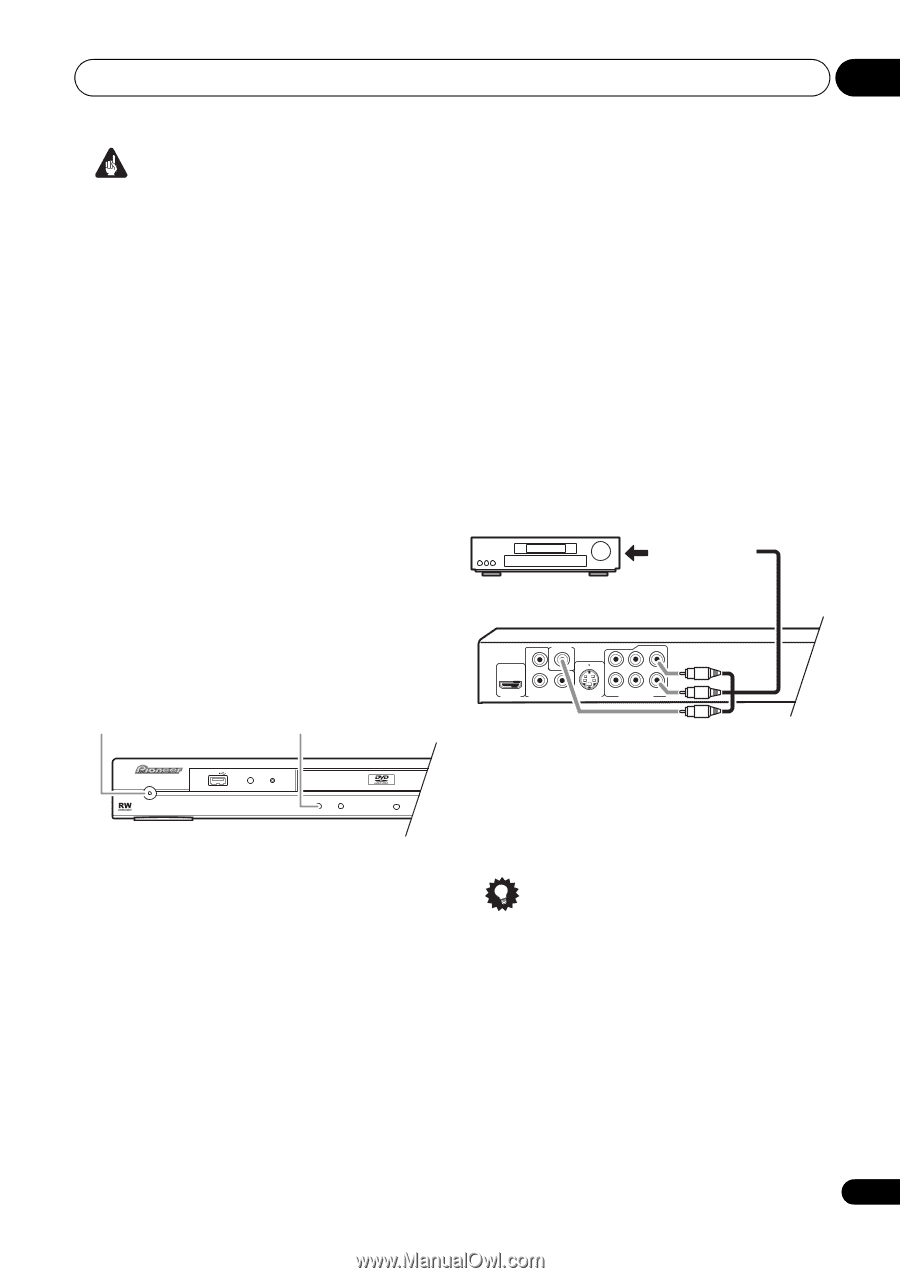
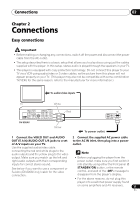
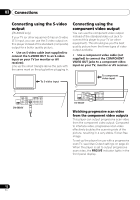
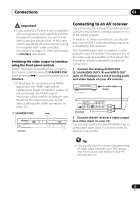
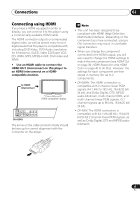
Connections 02 Important • If you connect a TV that is not compatible with a progressive scan signal and switch the player to progressive, you will not be able to see any picture at all. In this case, switch everything off and reconnect using the supplied video cable (see Easy connections on page 11), then switch back to Interlace (see below). Switching the video output to interlace using the front panel controls Switch the player to standby then, using the front panel controls, press STANDBY/ON while pressing to switch the player back to Interlace. • If the player is connected using HDMI, disconnect the HDMI cable before resetting the player to interlace output. (If left connected, the HDMI output resolution will be reset to its default-see Resetting the output resolution to the default setting with HDMI connection on page 16.) STANDBY/ON STANDBY/ON USB DVD/USB HDMI DV-600AV Connecting to an AV receiver You can connect this player to your AV receiver using the multichannel analog outputs or one of the digital outputs. In addition to these connections, you should also connect the 2 channel analog outputs for compatibility with all discs. You'll probably also want to connect a video output to your AV receiver. You can use any of the video outputs available on this player (the illustration shows a standard (composite) connection). 1 Connect the analog AUDIO OUT (5.1ch)/AUDIO OUT L/R and VIDEO OUT jacks on this player to a set of analog audio and video inputs on your AV receiver. AV receiver To audio/video inputs VIDEO OUT PB SL C L PR Y HDMI OUT COMPONENT VIDEO OUT S-VIDEO OUT DV-600AV SR SW R AUDIO OUT (5.1ch) 2 Connect the AV receiver's video output to a video input on your TV. You can also use the S-video (DV-600AV only) or component video jacks to connect to the AV receiver if you prefer. Tip • You usually have to connect the same kind of video cable between your DVD player and AV receiver, and between your AV receiver and TV. 13 En
-
 1
1 -
2
-
3
-
4
-
5
-
6
-
7
-
 8
8 -
 9
9 -
 10
10 -
 11
11 -
 12
12 -
 13
13 -
 14
14 -
 15
15 -
 16
16 -
 17
17 -
 18
18 -
19
-
20
-
21
-
22
-
23
-
24
-
25
-
26
-
27
-
28
-
29
-
30
-
31
-
32
-
33
-
34
-
35
-
36
-
37
-
38
-
39
-
40
-
41
-
42
-
43
-
44
-
45
-
46
-
47
-
48
-
49
-
50
-
51
-
52
-
53
-
54
-
55
-
56
-
57
-
58
-
59
-
60
-
61
-
62
-
63
 |
 |