Pioneer DVR-2920Q Operating Instructions
Pioneer DVR-2920Q - DVD±RW / DVD-RAM Drive Manual
 |
View all Pioneer DVR-2920Q manuals
Add to My Manuals
Save this manual to your list of manuals |
Pioneer DVR-2920Q manual content summary:
- Pioneer DVR-2920Q | Operating Instructions - Page 1
- Pioneer DVR-2920Q | Operating Instructions - Page 2
the user to the presence of important operating and maintenance (servicing) instructions in the literature accompanying the product. Note: This equipment Product Name: DVD / CD Writer Model Numbers: DVR-2920Q Responsible Party Name: PIONEER ELECTRONICS (USA) INC. Customer Support Division 1925 - Pioneer DVR-2920Q | Operating Instructions - Page 3
of this product. Refer all servicing to qualified personnel. The caution label shown to the right appears on your unit (top of cover). IMPORTANT NOTICE - RECORD THE MODEL NUMBER AND SERIAL NUMBER OF THIS UNIT BELOW. THE NUMBERS ARE ON THE REAR PANEL. MODEL #: Pioneer DVR-2920Q SERIAL #: KEEP THESE - Pioneer DVR-2920Q | Operating Instructions - Page 4
, read and follow these safety instructions. Read & Retain Instructions - Read all operating and user Pioneer authorized service representative for repairing this drive (refer to the enclosed Service & Support Card). Damage Requiring Service - Unplug the unit and refer servicing to qualified service - Pioneer DVR-2920Q | Operating Instructions - Page 5
audio / etc. content and the opposite side containing non-DVD content such as digital audio material. The non-DVD audio side is not compliant with the CD Audio Specification; therefore, may not play. The DVD side of DualDisc media plays in this unit. For more details about the DualDisc specification - Pioneer DVR-2920Q | Operating Instructions - Page 6
write the formats listed above. Supported media required for specific DVD and CD writing speeds. Average writing speed may decrease when multiple discs are written during the same session. When writing to DVD at 12X and 16X, use Pioneer-tested media. For media brand information, refer to the - Pioneer DVR-2920Q | Operating Instructions - Page 7
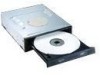
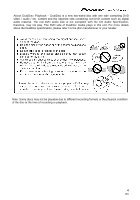
before trying to eject the tray using the Forced Ejection Hole. 2) Disc Tray Press the Eject button to open the loading tray then place a CD or DVD disc onto the tray with the label facing up. Press the Eject button again or gently push the tray to close and load. Do not - Pioneer DVR-2920Q | Operating Instructions - Page 8
on the BIOS version; computer settings, or the type of Serial ATA interface used. For further information regarding computer specifications and settings, consult the Operating Instructions accompanying your computer or contact the computer manufacturer. 7 En - Pioneer DVR-2920Q | Operating Instructions - Page 9
the blank panel installed on the front of the 5.25" slot. 4) Insert the drive into the slot. 5) When affixing is required, please refer to the instruction manual that came with your PC. Please use screws with a length of 5 mm (3/16") or less for mounting. Using longer screws may damage the drive - Pioneer DVR-2920Q | Operating Instructions - Page 10
(when enabled) recognizes the disc media and automatically adjusts the drive's write instructions: 1. Double-click the DriveUtility.exe file to launch the program. The Drive Utility window appears. 2. Choose the Pioneer DVR-216 drive from the drop-down menu. The DVR-2920Q consists of a Pioneer DVR - Pioneer DVR-2920Q | Operating Instructions - Page 11
TROUBLESHOOTING Manual Disc Ejection If the tray fails to open and all other minimum of 60 seconds to allow the disc to stop spinning. 3) Insert a straightened paper clip or small wire into the manual eject hole. 4) Press smoothly but firmly until the tray protrudes by at least a ½ inch (5 mm to 10 - Pioneer DVR-2920Q | Operating Instructions - Page 12
support non-standard shapes such as business cards, diamond, etc.) [Disc Transfer Rate] Data Read (sustained) DVD CD DVD Max. 27.7 MBytes/sec. (Max 20X DVD-R) CD Max. 6.14 MBytes/sec. (Max. 40X CD-R) * Media ] Software disc (x 1) Operating Instructions (x 1) Note: Specifications and designs are - Pioneer DVR-2920Q | Operating Instructions - Page 13
Nous vous remercions pour cet achat d'un produit Pioneer. Nous vous demandons de lire soigneusement ce mode d'emploi; vous serez ainsi a même de faire fonctionner l'appareil correctement. Après avoir bien lu le mode e ADVERTISSEMENT: - Pioneer DVR-2920Q | Operating Instructions - Page 14
disponible, consulter un revendeur Pioneer agréé. SURCHARGE - la carte d'entretien et de support jointe.) AU SUJET DE LA DVD - vidéo, audio, etc. - et l'autre, le contenu non-DVD tel que le matériel audio numérique. La face audio non-DVD de ces disques n'est pas conforme aux spécifications CD - Pioneer DVR-2920Q | Operating Instructions - Page 15
Médias supportent requis pour la vitesse écriture DVD et CD spécifiques. La vitesse moyenne d'écriture peut diminuer quand des disques multiples sont écrits pendant la même session Pour effectuer une écriture sur DVD aux vitesse 12X ou 16X, utilises des disques désignes par Pioneer. Pour plus - Pioneer DVR-2920Q | Operating Instructions - Page 16
tiroir au moyen de l'orifice d'éjection. 2) Tiroir du Disque Ouvrir le tiroir de chargement en appuyant sur la touche d'éjection, puis placez un CD ou un DVD dans l'emplacement prévu avec l'étiquette tournée vers le haut. Appuyer sur la touche d'éjection ou sur la partie avant du tiroir pour charger - Pioneer DVR-2920Q | Operating Instructions - Page 17
INTERFACE 5) Entre CC Connecteur d'alimentation électrique ATA de série. Raccorder au câble d'alimentation ATA de série. 6) Interface ATA de série Connecteur ATA de série pour branchement au câble ATA de série. Il se peut qu'un fonctionnement adéquat et les performances souhaitées ne soient pas - Pioneer DVR-2920Q | Operating Instructions - Page 18
masquant de la fente de 5,25 pouces. 3) Introduire le lecteur dans la fente. 4) Si un ajustement est nécessaire, se reporter au manuel d'instruction de l'ordinateur. Utilisez des vis d'une longujeur égale ou inférieure à 5mm pour la fixation. L'utilisation de vis plus longues pourrait endommager - Pioneer DVR-2920Q | Operating Instructions - Page 19
la vitesse, suivent ces instructions : 1. Double-clic le dossier de DriveUtility.exe pour lancer le programme. La fenêtre de service d'entraînement apparaît. 2. Choisissez la commande du Pioneer DVR-216 du menu de baisse vers le bas. Le DVR-2920Q se compose d'une commande DVR-216 empaquetée avec le - Pioneer DVR-2920Q | Operating Instructions - Page 20
DÉPANNAGE Éjection manuelle de disque Si les échouer de plateau à s'ouvrir et tous autres méthodes ont été épuisés, employez la méthode ci-dessous pour ouvrir le plateau d'entraînement. 1) Arrêtez l'ordinateur. 2) Attendez 60 secondes au minimum pour permettre au disque de cesser la rotation. 3) Ins - Pioneer DVR-2920Q | Operating Instructions - Page 21
de vitesse angulaire constante 16.2 a 40X sur 16 transferts de blocs) Écriture de données (soutenu) DVD Moy. 27.7 Mo/s (Écriture 20X sur DVD-R) CD Moy. 6.14 Mo/s (Écriture 40X sur CD-R) [Temps d'accès é temps de recherche] Temps d'accès (Moyenne aléatoire) Temps de recherche (Moyenne aléatoire - Pioneer DVR-2920Q | Operating Instructions - Page 22
Enhorabuena por la adquisición de este producto Pioneer. Lea completamente este manual de instrucciones para aprender a operar correctamente el aparato. Después de haber terminado la lectura de las instrucciones, guarde el manual en un lugar seguro para poderlo consultar en el futuro. ADVERTENCIA: - Pioneer DVR-2920Q | Operating Instructions - Page 23
seguro del tipo de alimentación disponible, consulte a un distribuidor Pioneer autorizado. SOBRECARGA - NO sobrecargue las tomas de corriente ni los adrede a la especificación audio digital del CD, por lo tanto el contenido no puede ser replicado. El lado de DVD de los medios de DualDisc en este - Pioneer DVR-2920Q | Operating Instructions - Page 24
de escrituran discos DVD y CD. La velocidad media de la escritura puede disminuir cuando los discos múltiples se escriben durante la misma sesión Para poder efectuar la escritura en un DVD a las velocidades de 12X o de 1X, será necesario utilizar un disco designado par Pioneer. Para encontrar - Pioneer DVR-2920Q | Operating Instructions - Page 25
minuto hasta que el disco haya dejado de girar. 2) Bandeja del Disco Abra la bandeja del disco presionando el botón de expulsión, y ponga un disco CD o DVD en la ranura con la etiqueta arriba. Presione el botón de expulsión o empuje la pared frontal de la bandeja para introducir la bandeja con el - Pioneer DVR-2920Q | Operating Instructions - Page 26
INTERFAZ 5) Entrada de DC conectador ATA serial de la corriente eléctrica 6) Interfaz ATA serial conectador ATA serial La operación apropiada y el funcionamiento deseado no se pueden alcanzar, dependiendo de la versión del BIOS; ajustes de la computadora, o el tipo de interfaz ATA serial usado. Para - Pioneer DVR-2920Q | Operating Instructions - Page 27
de 5.25" donde se va colocar la impulsión (la ranura). 4) Inserte la unidad en la ranura. 5) Cuando se requiere la fijación, refiera por favor al manual de la instrucción que vino con su PC. Utilice por favor los tornillos con una longitud de 5 milímetros (3/16") o menos para el montaje. Usando - Pioneer DVR-2920Q | Operating Instructions - Page 28
.exe para poner en marcha el programa. La ventana para uso general de la impulsión aparece. 2. Elija la impulsión Pioneer DVR-216 del menú. El DVR-2920Q consiste de la impulsión DVR-216 con el programa de Roxio®. Por favor no haga caso de cualesquiera letra o número que puedan aparecer después del - Pioneer DVR-2920Q | Operating Instructions - Page 29
un mínimo de 60 segundos para permitir que el disco pare el hacer girar. 3) Inserte un clip de papel enderezado o el pequeño alambre en el manual en el agujero. 4) Presione suavemente pero firmemente hasta que la bandeja resalte por por lo menos a 5 mm to 10 mm. 5) Estire suavemente la bandeja hacia - Pioneer DVR-2920Q | Operating Instructions - Page 30
) Escritura de datos (sostenida) DVD Promedio de 27.7 Mbytes / seg. (DVD-R 20X) CD Promedio de 6.14 Mbytes / seg. (CD-R 40X) [Tiempo de acceso - 40˚ C a + 60˚ C 5% al 90% (sin condensación) [Accesorios] Manual de instrucciones ( x 1 ) Disco del software ( x 1 ) Nota: Especificaciones y - Pioneer DVR-2920Q | Operating Instructions - Page 31
(this page intentionally left blank) - Pioneer DVR-2920Q | Operating Instructions - Page 32
the Pioneer's subsidiaries (regional service headquarters) Pioneer Electronics of Canada, Inc. Industrial Products Division 300 Allstate Parkway, Markham, Ontario, L3R-0P2 Canada For software related issues, please contact: SONIC/ROXIO http://support.sonic.com/desktop/dms/ For DVR-2920Q Support
-
 1
1 -
 2
2 -
 3
3 -
 4
4 -
 5
5 -
 6
6 -
 7
7 -
8
-
9
-
10
-
11
-
12
-
13
-
14
-
15
-
16
-
17
-
18
-
19
-
20
-
21
-
22
-
23
-
24
-
25
-
26
-
27
-
28
-
29
-
30
-
31
-
32
 |
 |
