Pioneer GEX-FM903XM Operation Manual - Page 5
Basic Operation IP-BUS MODE, Before Using This Product IP-BUS MODE - instructions
 |
View all Pioneer GEX-FM903XM manuals
Add to My Manuals
Save this manual to your list of manuals |
Page 5 highlights
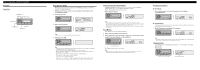
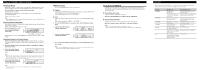
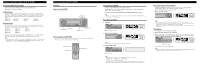
Before Using This Product (IP-BUS MODE) Operating with Different Head Units Operate this product (for XM reception) with the connected Head Unit. Head Units are divided into two groups: Head Unit Group 1 Head Unit Group 1 Head Units operate this product as an external unit (External). These Head Units can control two external units. When two external units are connected, the allocation of them to External Unit 1 or External Unit 2 is automatically set by these Head Units. DEH-P9300* DEH-P930* DEH-P7300 DEH-P730 DEH-P6300 DEH-P630 DEX-P9 FH-P4000 Head Unit Group 2 Head Unit Group 2 Head Units operate this product as an external unit (External). These Head Units can control only one external unit. When one of these Head Units is connected to this product, do not connect any other external units. DEH-P4300 DEH-P430 DEH-P43 DEH-P3300 DEH-P330 DEH-P33 KEH-P6010 KEH-P601 For illustration, instructions in this manual use the "DHE-P6300" as an example of Head Unit. The opration of the Head Unit for XM is identical for both groups 1 and 2. Note: • When using a remote controller, you can operate these Head Units marked with * in the same way as the "DEH-P6300". For details concerning operation with the Head Unit itself, refer to the "SOFT KEY Operation" section in the Head Unit's Operation Manual. Basic Operation (IP-BUS MODE) Key Finder Head Unit (e.g. DEH-P6300) 5/∞/2/3 buttons Buttons 1-6 SOURCE button FUNCTION button BAND button Remote Controller (e.g. DEH-P6300) You can operate in the same way with the Remote Controller supplied with the Head Unit. For details, refer to the Head Unit's Operation Manual. FUNCTION button BAND button 5/∞/2/3 buttons Switching Power ON/OFF Each press of the SOURCE button selects XM as follows. Built-in CD Player = TV = Tuner = DAB = Multi-CD Player = XM tuner (External Unit 1) = External Unit 2 = AUX = ... • To switch the sources OFF, hold down the SOURCE button for 1 second. Note: • When two external units are connected, the allocation of them to External Unit 1 or External Unit 2 is automatically set by the Head Unit. Basic Operation of XM 1. Select XM. EQ SOURCE DISP 1 2 3 4 5 6 Each press changes the Source ... 2. Select a desired Channel. SELECT SFEQ 3 4 5 6 E B Note: • For details, refer to "Selecting the Channel by Channel Number". 3. Turn the source OFF. EQ SOURCE DISP 1 2 3 4 5 6 Hold for 1 second Note: • Display changes as follows when you switch Channels or operate in other ways. Channel Number = Channel Name = Selected Display * * For details, refer to "Switching the Display". • It may take a few seconds before you can hear anything while this product acquires and processes the satellite signal when you switch power ON, change the source to XM Tuner, or select a Channel. Selecting the Channel by Channel Number When Channel Number Select mode is selected, you can select a desired Channel by Channel Number. (Refer to "Switching the Channel Select Mode".) Initially, Channel Number Select mode is selected. • Select a desired Channel. SELECT SFEQ 3 4 5 6 E B Note: • Channels that cannot currently be selected are skipped, and the next Channel is selected. • If you continue pressing the button for longer than 0.5 seconds, you can increase/decrease Channel Number by 10 to enable you to quickly jump to your desired Channel. • You can also select a Channel from a desired Channel Category. (Refer to "Switching the Channel Select Mode".) Preset Memory Preset Memory lets you store Channels in memory. 1. Select a desired Channel to store in memory. 2. When sound from a selected Channel is output, press a button from 1-6 for 2 seconds to store that Channel. (e.g. Press button 4.) EQ SOURCE DISP 1 2 3 4 5 6 Hold for 2 seconds The Channel is stored in the selected button. Note: • Memory/recall are for broadcasts. If you recall a memorized broadcast that has been moved to anoth- er Channel, the Channel to which the broadcast was moved is selected.
-
 1
1 -
 2
2 -
 3
3 -
 4
4 -
 5
5 -
 6
6
 |
 |