Pioneer TS-WX130DA Owners Manual
Pioneer TS-WX130DA Manual
 |
View all Pioneer TS-WX130DA manuals
Add to My Manuals
Save this manual to your list of manuals |
Pioneer TS-WX130DA manual content summary:
- Pioneer TS-WX130DA | Owners Manual - Page 1
TS-WX130DA ACTIVE SUBWOOFER HP OE GRAVES ACTIF SUBWOOFER ATTIVO SUBWOOFER ACTIVO SUBWOOFER ATIVO 160 OUTPUT/SORTIE WAMX. CASBY0EP CE HIE Be sure to read this instruction manual cas de problem. 3. L'equipement TS-WX130DA installe dans use a system remote control wire and connected to the - Pioneer TS-WX130DA | Owners Manual - Page 2
50 Hz 125 Hz TS-WX130DA / 10 100 For more infommtion, refer to your car stereo manual. • The internal PHASE control is set to ) • : „Li © PIONEER CORPORATION 2017 PIONEER CORPORATION 28-8, Honkomagome 2-chome, Bunkyo-ku, Tokyo 113-0021, JAPAN/JAPON PIONEER EUROPE NV Haven 1087, Keetberglaan
-
 1
1 -
 2
2
 |
 |
13scon
t-
TS-WX130DA
ACTIVE
SUBWOOFER
HP
OE
GRAVES
ACTIF
SUBWOOFER
ATTIVO
SUBWOOFER
ACTIVO
OUTPUT/SORTIE
160
WAMX.
SUBWOOFER
ATIVO
CASBY0EP
CE
HIE
Be
sure
to
read
this
instruction
manual
before
installing
this
speaker.
Vor
dem
Einbau
des
Lautsprecher,
verfehlen
Sie
nicht
diese
Vorschrift
zu
lesen.
Priere
de
lire
obligatoirement
ce
manuel
d'installation
avant
de
monter
le
haut-parleur.
Prima
di
installare
l'altoparlante
leggete
tassativamente
le
istruzioni.
&WARNING
1.
Before
starting
the
installation
make
sure
to
disconnect
the
vehicle's
negative
(-)
battery
power
cable.
This
will
prevent
possible
electrical
shock.
2.
When
wiring
this
unit
please
use
the
supplied
connecting
cords.
DO
NOT
remove
the
fuses.
The
protection
circuit
will
not
work
in
case
of
an
emergency.
3.
TS-VVX130DA
installed
in
the
passenger
compartment
should
be
securely
anchored
in
place.
4.
Before
drilling
any
mounting
holes
check
behind
where
you
want
to
drill
the
holes
to
make
sure
you
DO
NOT
drill
into
anything
such
as
the
gas
nes,
brake
lines
or
electrical
wiring.
5.
Do
not
install
the
TS-VVX130DA
anywhere
it
can
get
wet
6.
Install
the
TS-VVX130DA
in
a
location
with
good
ventilation.
7.
While
driving
keep
your
listening
volume
at
a
level
which
does
not
mask
important
outside
traffic
noises,
such
as
emergency
vehicles,
etc.
8.
High
sound
levels
may
cause
permanent
hearing
loss.
&WARNUNG
1.
Vor
dem
Beginn
der
installation
ist
sicherzustellen,
dad
das
negative
(-)
Batteriekabel
des
Fahrzeugs
abgetrennt
ist
Dadurch
wird
elekhischer
Schlag
vermieden.
2.
Zur
Verkabelung
dieses
Gerates
sollten
nur
die
mitgelieferten
Kabel
verwendet werden.
Sicherstellen,
dad
die
vor
Kurzschlug
schiitzen-
den
Abdeckungen
angebracht werden.
NICHT
die
Sicherungen
entfernen.
Der
Schutzschaltkreis
funktioniert sonst im
Notfall
nicht.
3.
Das
imlnnenraum
eines
Fahrzeugs
installierte
Gerat
TS-WX130DA
sollte
fest
angebracht
werden.
4.
Vor
dem
Bohren
von
offnungen
sollte
sichergestellt
werden,
dad
hinter
der
offnung
keine
Benzinleitung,,
Bremsleitungen
oder
elektrische
Verlcabelungen
vorhanden
sind.
5.
Das
Gerat
TS-WX130DA
nicht
an
Orten
installieren,
an
denen
es
feucht
werden
kann.
6.
Das
Gerat
TS-WX130DA
nur
an
einem
gut
beliitetem
Ort
installieren.
7.
Bei
der
Fahrt
sollte
der
Lautstarkepegel
so
niedrig
gehalten
werden,
dad
er
die
Verkehrsgerausche
nicht
fi
bertant
z.B.Notfallfahrzeuge
usw.
8.
Hohe
Lautstarkepegel
kannen
einen
permanenten
Harverlust
zur
Folge
haben.
&AVERTISSEMEN'T
1. Avant d'installer rappareil,
debranchez
le
cable
du
pale
moins
(-)
de
la batterie afin d'eviter
d'eventuelles
decharges
electriques.
2.
Lorsque
vous
brancherez
cett,e
unte, utilisez les
cordons
fournis.
N'ENLEVEZ
PAS
les
fusibles.
Sinon,
le circuit
de
protection
de
rappareil
ne pourra pas se
declencher
en cas
de
problem.
3.
L'equipement
TS-WX130DA
installe dans la
cabine
du passager
doit
etre bien
fi
xe.
4. Avant
de
percer quelque trou que
ce
soit,
verifiez
qu'aucun tuyau
de
gaz, qu'aucun circuit
de
freinage, qu'aucun fi
l
electrique ne se
trouve derriere le trou que vous souhaitez percer.
5.
Ninstallez pas le
TS-WX130DA
dans un endroit qui est humide ou qui pourrait
le
devenir.
6. Installez le
TS-WX130DA
dans un endroit
bien
ventile.
7.
Lorsque
vous
conduisez,
maintenez le niveau
d'ecoute
sonore
suffisamment bas
de
fawn
pouvoir
entendre les bruits exterieurs
de
la
circulation
tels que les sirenes des ambulances.
8.
Des
niveaux
sonores
trop
eleves
peuvent entrainer une degradation
definitive
du sisthme auditif.
&ATTENZIONE
1.
Prima
di
iniziare
la
installazione,
assicurarsi
di
soollegare
cavo
negativo
dell'alimentazione
della
batteria
(-)
del
veicolo.
Questa
precauzione
permette
di
evitare
delle
eventuali
scosse
elettriche.
2.
Quando
questa
unite
viene
collegata,
utilizzare
dei
cavi
per
collegamento
forniti.
Assicurarsi
di
attaccare
coperchio
di
protezione
contro
cortocircuiti
per
evitare
i
cortocircuiti.
NON
RIMUOVERE
i
fusibili.
Se
non
viene
presa
in
considerazione
questo
fatto,
circuit°
di
protezione
non
funzionera
nel
caso
di
una
emergenza.
3.
II
TS-WX130DA
installato
nel
compartimento
dei
passaggeri
dovrebbe
essere
fissato
sicuramente
in
posizione.
4.
Prima
di
eseguire
qualunque
for°
di
montaggio,
controllare
la
parte
di
dietro
dove
si
desidera
esaguire
la
foratura,
per
assicurarsi
che
non
ci
siano
elementi
come
tubi
di
benzine,
tubi
del
freno
oppure
cablaggio
elettrico.
5.
Non
installare
II
TS-VVX130DA
la
dove
put:
diventare
umido.
6.
Instal
lare
TS-WX130DA
in
un
posto
dove
c'e
una
buona
ventilazione.
7.
Mentre
si
guide
la
macchina,
mantenere
suo
proprio
volume
di
ascolto
al
livello
che
non
maschera
I
suoni
importanti
del
traffic°
dall'estemo,
come
per
esempio
ambulanze,
ecc.
8.
I
livelli
di
suono
alti
possono
causare
una
perdita
permanente
dell'udito.
&CAUTION
1.
This
device
is
for
12
volt
(-)
negative
ground.
Please
check
your
automobile
to
make
sure
it
is
this
type.
2.
When
routing
leads
and
cords,
secure
them
with
cable
retainers
and
electrician's
adhesive
tape
or
shrink
tubing
wherever
they
may
touch
sharp
edges.
Keep
all
wiring
away
from
hot
surfaces
or
heater
outlets
to
prevent
short
circuits.
3.
Refer
to
your
car
stereo's
operation
manual
as
well
when
installing
speakers
in
your
car.
4.
Correctly
set
the
input
level
switch
to
match
the
outputs
of
your
car
stereo.
If
this
is
not
correct,
you
may
experience
distortion
and
sound
level
may
not
increase.
5.
Do
not
leave
this
remote-control
in
direct
sunshine
or
at
a
hot
place
for
a
long
time.
Prolonged
exposure
may
cause
the
unit
to
deform,
change
in
color,
or
become
faulty.
Note:
If
low
frequency
noise
exists
in
head
unit,
noise
may
be
amplified
by
TS-WX130DA
&VORSICHT
1.
Dieses
Gerat
ist
ffir
Fahrzeuge
mit
12-Volt-Batterie
(Masse
an
Minuspol)
ausgelegt.
Ste
ll
en
Sie
bitte
sicher,
dad
1hr
Fahrzeug
von
diesem
Typ
ist.
2.
Drahte
und
Kabel
sind
mit
Kablhaltern
und
lsolierband
oder
lsolierschlauch
zu
schfitzen,
wenn
sie
scharfe
Kanten
berahren
kannen.
Fiihren
Sie
keine
kabel
an
Oberflachen
oder
Heizungsaffnungen
entlang,
urn
Kurzschitisse
zu
verhindem.
3.
Schlagen
Sie
beim
Einbau
der
Lautsprecher
in
1hr
Auto
auch
in der
Bedienungsanleitung
lhrer
Auto-Stereoanlage
nach.
4.
Bitte
den
Eingangspegel
passend
zum
Ausgang
des
Steuergerates
einstellen.
Bei
nicht
korrekter
Einste,lltmg
kannen
Starungen
auftreten.
5.
Diese
Fembedienung
nicht
langere
Zeit
Sonne
oder
groder
Hitze
aussetzen
da
sie
sich
sonst
verformen
oder
verfarben
kannte
oder
Funktions-
storungen
auftreten.
Hiweise:
Wenn
niederfrequente
Starungen
irn
Hauptgerat
vorhanden
sind,
Karmen
diese
durch das
Gerat
TS-VVX130DA
verstarkt
werden.
&ATI'ENTION
1.
Ce
dispositif
est destine
une masse negative (-)
de
12
volts.
Contraler rautomobile
pour
etre stir
qu'elle
est
de
ce
type.
2.
Lore
de
racheminement des
cables
et
cordons,
les
fi
xer
avec
des attaches et du ruban adhesif isolant ou les
placer
dans des tubes
lorsqu'ils peuvent toucher des
bords
affiles.
Eloigner
tout le
cablage
des surfaces
ou
sorties
de
chauffage
pour
eviter des
court-circuits.
3.
Se
reporter aussi au
mode
d'emploi
de
rauto-stereo
pour
installer des enceintes dans une voiture.
4.
Reglez
correctement
le niveau d'entree par rapport au niveau
de
l'autoradio. Si
vous
le faite pas
correctement,
vous
risquez
beaucoup
de
distorsion
et le niveau
sonore
peut ne pas augmenter.
5.
Ne
laissez pas la
telecommande
en plein
soleil
ou dans un endroit trop chaud pendant une
longue
periode.
Une
exposition
prolongee
peut
provoquer
une
deformation
de
celle-ci,
une
modification
de
la
couleur
ou
meme
une
defaillance.
Remarque:
Les
bruits
basse-frequence
de
la
amine
stereo
de
la
voiture
peuvent
parfois
etre
amplifies
par le
TS-WX130DA.
&PRECAUZIONE
1.
Questo
apparecchio
6
per
l'uso
a
12
V
(-)
massa
negative.
Controllare
che
la
propria
automobile
sia
di
questo
tipo.
2.
Quando
si
collocano
cavi
e
fill,
fissarli
con
fermacavi
e
nastro
da
elettricisti
o
tubature
restringibill
dove
possono
toccare
superfici
taglienti.
Tenere
tutti
fill
lontani
da
superfici
o
uscite
di
riscaldamento
per
evitare
oortocirculti.
3.
Fare
riferimento
anche
al
manuale
di
istruzioni
dell'autostereo
quando
si
installano
diffusori
nell'automobile.
4.
Impostare
correttamente
selettore
del
livello d'ingresso
in
modo
che
corrisponda
alle
uscite
dello
stereo
dell'auto.
Se
il
selettore
non
6
impostato
correttamente,
si
possono
verificare
distorsioni
e
Well°
del
suono
potrebbe
non
aumentare.
5.
Non
lasciare
telecomando
esposto
al
sole
o
in
un
luogo
caldo
per
molto
tempo.
L'esposizione
prolungata
pub
causare
deformazioni,
la
modifica
del
colore
o
errori
dell'unita.
Nota:
Se
del
rumore
di
frequenza
bassa
viene
osservato
nella unite
principale,
rumore
pu6
essere
amplificato
del
TS-WX130DA.
&PRECAUCION
1.
Este
aparato
es
para
el
uso
con
12
voltios
negativo
(-)
en
tierra.
Revise
su
automtwil
para
asegurarse
que
es
de
este
tipo.
2.
Cuando
haga
el
reparto
de
las
guias
y
los
cables,
asegarelos
con
fijadores
para
cables
y
cinta
adhesive
de
electricista
o
tuberfas
de
plastic°
contraido
dondequiera
que
estos
puedan
tocar
bordes
afliados.
Mantenga
todo
el
cableado
lejos
de
las
superficies
calientes
o
de
las
salidas
de
calefaccion
para
evitar
cortocircuitos.
3.
Asimismo,
tamblen
consulte
con
el
manual
de
operaciones
del
estereo
de
su
coche
cuando
instale
los
altavoces
en
el
coche.
4.
Configure
el
interruptor
del
nivel
de
entrada
para
que
corresponda
con
la
salida
del
autoradio.
SI
no
es
correcto,
podria
distorsionar
y
podria
no
incrementar
el
nivel
del
sonido.
5.
No
dejes
el
mando
a
distancia
bajo
la
luz
del
sol
directa
o
en
lugares
calientes
por
mucho
tiempo.
La
exposicion
prolongada
puede
causar
que
la
unidad
se
deforme,
camble
de
color,
o
falle.
Nota:
Si
esiste
ruido
de
baja
frecuencia
en
el
estereo
del
autom6vil,
el
ruido
puede
ser
amplificado
por
el
TS-WX130DA.
&PRECAUCAO
1.
Este
dispositivo
6
pam
um
terra
negativo
(-)
de
12
volts.
Veriffque
se
o
de
seu
carro
6
deste
tipo.
2.
Qunado
fazendo
a
li
gacao
de
fi
es
e
cabos,
fi
xe
os
mesmos
coin
fi
xadores
de
cabo
e
fi
ta
adesiva
eletrica
protegendo
os
mesmos
em
locais
onde
possam
tocar
em
bonias
cortantes.
Mantenha
toda
fi
acao
distante
de
superficies
quentes
ou
saidas
de
aquececlor
pam
evitar
curto-circuito.
3.
Refira-se
tambem
ao
manual
de
operacao
do
estereo
de
seu
carro
quando
da
instalacao
de
alto-falantes.
4.
Defma
corretamente
o
seletor
de
nivel
de
entrada
de
a.cordo
corn
as
saidas
do
sistema
de
audio
do
seu
automovel.
Se
nee
estiver
correto,
podera
sentir
distorcao
e
o
nivel
de
som
podera
nao
aumentar.
5.
Nao
deixe
o
control°
remoto
era
contact°
direto
com
o
sol
ou
num
lugar
quente
durante
longos
periodos
de
tempo.
A
exposicao
prolongada
podera
provocar
deformacoes
no
equipamento,
mudancas
de
cor
ou
avarias.
Obesarvac.io:
Caso
exista
urn
mid°
de
baixa
frequencia
na
unidade
do
cabecote,
este
rufdo
podera
ser
amplificado
pelo
TS-WX130DA.
&OCTOPOWHO
1.
Yorpocicrao
paccHmrano
Ha
miramme
12
B
c
sasemneHmem
ortentarenbnoro
mowrawra
(-)
6arapem.
nowanykcra,
y6eAwrecb
cot/flamer
nm
MATaHlIFI
B
aeromoomne
c
311,1M
rmnom.
2.
nom
npoeolece
ma6enek
Hy)KHO
oampennnrb
mx
cpmmcaropamm
06MEITIABaTb
moonsAmonnoil
neHrok
Be3A0,
Coe
OHM
MOryT
KEICaTbCIR
OCTplAX
yrrioe.
Bo
me6excaHme
KOpOTKOCO
3aMblKaHlin
HO
BOtlyCIGITb,
gro6Bi
wHypw
Haxomunrcb
B6.0113II
CIAllbH0
HarpeBaioutHxma
00B0pXHOCTeitt
mecr
ebixoAa
ropsHero
eo3AY)ca•
3.
nom
yeraHoeme
rpommoronopwrenn
B
accromo6mne
o6pautakrecb
rworce
K
pymoBoAcrey
no
0011b3OBOHNIO
OBTOMO6W1bH0A
crepeocmcremok.
4.
YCTBHOBLITO
yponenb
BXORHOCO
cmrHana
TBKIIM
o6paoom,
wro6bi
OH
coHerancs
c
BbIXOBHOR
MOLLIHOCTIHO
ayAmocmcrembr.
Ecnm
Ham-poi/ma
npomoraeAeHa
HEIBOpHO,
M03031-0
yen:numb
HCKOJKOHLIFI
oeyma,
a
003
Cp0MKOCT6
MONCEIT
OCTBT6CH
Ha
npewHem
ypoeHe.
5.
He
noAeeprailre
nynbr
/V
Anmrenbnomy
BO3BerICTBIII0
nprona
3ro
MOXOT
npmeecrm
K
Aetloopmatimm,
HAMBHOHYIKt
wsera
mnm
nonomme.
flpmmegaame:
BOC0p0H3BOAHRIbIll
EIBTOM061111bHbIM
pecmeepom
HH3KOHEICTOTHIAITI
wym
MO)KeT
yCHBHBEITI.CF1
ye-rpm-len:0m
TS-WX130DA.
Antes
de
instalar
el
altavoz
es
importante
que
lea
estas
instrucciones.
Lela
este manual
de instrugoes
antes de instalar
o
alto-falante.
06R3aTellbH0
npoLuiTaiiTe
3TO
pykoeogcreo
nepeil
noilkniogermenn
gruarauka.
1013tit*fitglEBAS.
.
I
.3.A.
&ADVERTENCIA
1.
Antes
de
comenzar
la
instalaci6n,
asegurese
de
desconectar
el
cable
del
terminal
negativo
(-)
de
la
baterfa.
Esto
evitara
posiblesgolpes
electrioos.
2.
Al
conecter
esta
unidad
use
los
cables
de
conexian
suministrados.
NO
QUITE
los
fusibles,
ya
que
en
tal
caso
el
circuito
de
protenccion
no
funcionara
en
caso
de
emergencia.
3.
El
TS-VVX130DA
instalado
en
el
compartimiento
de
los
pasajeros
ser
asegurado
apropiadamente
en
su
posician.
4.
Antes
de
perforar
cualquier
orificio
de
montaje,
verifique
la
perte
posterior
para
asegurarse
de
que
cuando
perfore
los
orificios
no
perfore
ningan
otro
componente
tal
como
lineas
de
gasoline,
lineas
de
freno
o
cables
electricos.
5.
No
intasle
el
TS-WX130DA
en
ninguna
parte
donde
se
pueda
mojar.
6.
Instale
el
TS-VVX130DA
en
una
posicion
con
buena
ventilacion.
7.
Mientras
conduce
mantenga
el
volumen
de
audicion
a
un
nivel
tal
que
no
evite
escuchar
importantes
ruidos
de
trafico
extern°,
tales
como
vehiculos
de
emergencia
u
otros.
8.
Altos
niveles
de
sonido
pueden
causar
parade
permanente
de
la
audici6n.
&ADVERTENCIA
1.
Antes
de
iniciar
a
instalacao,
assegurar-se
de
desconectar
o
cabo
de
energia
da
bateria
negative
(-)
do
veiculo.
Isto
evitara
possiveis
cheques
eletricos.
2.
Ao
conectar
esta
unidade,
favor
usar
os
cabos
de
conexao
fomecidos.
Nao
remover
os
fi
tsiveis.
0
circuit°
de
protein°
tido
funcionara
em
caso
de
emergencia.
3.
0
TS-WX130DA
instalado
no
compartimento
de
passageiros
deve
ester
segurainente
few
no
lugar.
4.
Antes
de
fazer
buracos
para
montagem,
verificar
ads
os
locals
onde
se
deseja
faze-los,
para
ter
certeza
de
que
linhas
de
gas,
linhas
de
freio
ou
fi
amento
eletrico
nao
sera°
perfurados.
5.
Nfto
instalar
o
TS-WX130DA
em
local
onde
possa
ser
mottled°.
6.
Instalar
o
TS-WX130DA
num
local
com
boa
ventelagao.
7.
Enquanto
dirige,
mantes
o
volume
de
escuta
num
nivel
que
nao
camufle
sons
importantes
do
ambiente
extern°,
como
de
veiculos
de
emergencia,
etc.
8.
Altos
niveis
de
som
podem
causar
perda
permanente
de
audicao.
,&DPEAYDPEX,CIEHME
1.
nepeA
ycraHoemoil
06F130TEMbH0
OTCOOBLIHIATb
OTplittaT0116Hbal
H
ma6enb
ammymynnropHok
6arapem
awromo6Hns.
hro
npeAoreparmr
00BpEDKAGHHFI
31113ICTplitiOCKIAM
TOKOM.
2.
Qom
ycraHoeme
yerpokcrea
npocb6a
mcnonbaoearb
mmeloutmecn
momnnercre
coeAmmarenbHbre
ma6erna.
He
cummarb
nnaemme
npeAoxpaHwrenm.
B
npormenom
cnyHae
B
aeapmi/Hok
cwryauma
cxema
oautwria
HO
6yaer
coa6arboarb.
3.
B
crirme
yCTBHOBICA
TS-WX130DA
B
canoHe
aeromoomnn
OH
BMCKEtH
6bITb
HaBEOKHO
saxpenneH.
4.
Repea
ceepnermem
oreepens)
npoeepwrb,
HOT
B
meere
npeanonaraemoro
oreepenis
anek-rponommaxii,
roy6
TOMO3HOH.
TOMMBHOH.
MICTOMbl.
5.
He
yeTEIHEIBMIBEITb
annapar
TS-WX130DA
B
MOCTEIX,
Me
OH
MCDKOT
noaeeprHyrben
BO3AOACTBIAIO
MEM/.
6.
YCTEIHOBIATb
yorpokcreo
TS-WX130DA
B
Mecre
c
AocraroHnok
BermansAmek.
7.
Bo
BpOMFI
embi
rpOMKOCTb
BOCKHEI
6bITb
Ha
ypoene,
npm
KOTOpOM
He
aarnywaiorcn
CHCHEMbl
PAEIWHH
CKOpOilnomotAm
T.B.
8.
room:elk
3ByK
MO)KOT
Bbl3BaTb
HOCTORHHyl0
001-epKt
Ctlyaa.
&NS'
1.
fElillWatail,
filEAVikRft*ft
(-) MINIMA Mtn.
1,2lItIffirWihAlltfttnetteXt.
2.
itan2l4liegV684,
MICIMEIVITX1146.
3.
TS-WXB0DARPIVI,41,IMM*09tA.
4.
SICVE*42VERflfollERIP4,
IN/ht,4ITO
WNW.
Xl*NAte.
5.
+014TS-WX130DAZVESIt4IIYJAZ
6.
PFTS-WX130DAZVEAMIUTIYA.
7.
WSW&
170410114A.b4.+*324ka0941,
3M0,014,
/II*Vhrkslz.
8.
A141710KWAttAtiftltitA0d'INg.
J:5"
-
.
e}I.5
.
.
.1/
-
•
li•L'‘.,)
a./••(•,31••,-.
Ts-vv)(130DA
-r
jUJI
I
04..31
,,,Sjal
-
.
TS-WX130DA
-
0
31-<.,.
TS-VVX130DA
-
1
.
Liy,
4i,J1
CI) ,t2
31
,1;.11
-
V
-
A
&at
1.
61212
tR4k#A
(-)
MO/EP Erl9ft*AMffte*I4ffl.
2.
SA464011009if#084,
tfiMiltittASIMI9jfilirISSM
aftflialltiMatrItifIll§SMIMMEOVV3K/IFIAIWIZ,
l?4#48133MRIEA
ffi*KROWELligt
rAtMAIM.
3.
fEA*PkI*St4Mig*.
Ne.F0460111A*AMV/StffehitltetIN*.
4.
IMIIIIMAA,MidehtElgaitEMNIAA*AMMIMIll.
3ELIAIMIWITAFINA.
VIVI#J1WkA.
5.
-131044MIRMNANWEPRYEAtillhit
.
ZIXfit0-ftVIRInan.
all
:
oximt.9144tElimeijumrli,
it.914TOE4ATS-Wx130DA
MYtk,
.
.
344,1
.
.
L,JS
.
.
.
jtJ.,
.
r
j1.1,1
LILL,'
ALI
Lila
cji5.4
•
jt4.1:+.1
clad.
.
ja...•
,4111
44:,4
A
d11:14
6;41
.1§
.3.)2341
0..111
A..2.."11,
j
_Al
f:i.1
.
0
:
.
c...;151
1
.TS-VVX130DA
....
as•
U.S.
and
Canadian
models
only
/
Nur
US-und
Kaneda-
Modelle
/
Modeles
americains et
canadiens
uniguement
Solo
modelli
statunitensiecanadesi
/
Selo
los
modelos
de
EE.UU.yCanadienses
/
Modelos
apenas
dos
EUA
e
Canada
TOnbICO
Anil
mogenek
CWA
N
IteNeAbl
/
file*INIMILtalill
I
Iii-
a:aliki
a-.64,-5/1
cApi-11
&WARNING
The Safety of Your
Ears
is in Your
Hands
Get
the
most
out
of
your
equipment
by
playing
it
at
a
safe
level
-
a
level
that
lets
the
sound
come
through
clearly
without
annoying
blaring
or
distortion
and,
most
importantly,
without
affecting
your
sensitive
hearing.
Sound
can
be
deceiving.
Over
time,
your
hearing
"comfort
level"
adapts
to
higher
volumes
of
sound,
so
what
sounds
"normal"
can
actually
be
loud
and
harmful
to
your
hearing.
Guard
against
this
by
setting
your
equipment
at
a
safe
level
BEFORE
your
hearing
adapts.
ESTABLISH
A
SAFE
LEVEL:
•
Set
your
volume
control
at
a
low
setting.
•
Slowly
increase
the
sound
until
you
can
hear
it
comfortably
and
clearly,
without
distortion.
•
Once
you
have
established
a
comfortable
sound
level,
set
the
dial
and
leave
it
there.
BE
SURE
TO
OBSERVE
THE
FOLLOWING
GUIDELINES:
•
Do
not
turn
up
the
volume
so
high
that
you
can't
hear
what's
around
you.
•
Use
caution
or
temporarily
discontinue
use
in
potentially
hazardous
situations.
•
Do
not
use
headphones
while
operating
a
motorized
vehicle
;
the
use
of
headphones
may
create
a
traffic
hazard
and
is
illegal
in
many
areas.
&
AVERTISSEMENT
La protection
de votre ouie est entre vos mains
Pour
assurer
le
rendement
optimal
de
votre
materiel
et
-
plus
important
encore
-
la
protection
de
votre
ouie,
reglez
le
volume
a
un
univeau
raisonnable.
Pour
ne
pas
alterer
votre
Bens
de
la
perception,
le
son
doit
etre
clair
mais
ne
produire
aucun
vacarme
et
etre
exempt
de
tout,e
dist,orsion.
Votre
mile
peut
vouzjouer
des
tours.
Avec
le
temps,
votre
systeme
auditif
peut
en
effet
s'adapter
a
des
volumes
superieurs,
et
ce
qui
vous
semble
un
(niveau
de
confort
normal)
pourrait
au
contraire
etre
excessif
et
contribuer
a
endommager
votre
mile
de
fag=
permanente.
Le
reglage
de
votre
materiel
a
un
volume
securitaire
AVANT
que
votre
mire
s'adapte
vous
permettra
de
mieux
vous
protegen
CHOISISSEZ UN VOLUME SECURrrAIRE:
•
Reglez
d'abord
le
volume
a
un
niveau
inferieur.
•
Montez
progressivement
le
volume
jusqu'a
un
niveau
d'ecoute
confortable
;
le
son
doit
etre
clair
et
exempt
de
distorsions.
•Une
fois
que
le
son
est
a
un
niveau
confortable,
ne
touchez
plus
au
bouton
du
volume.
N'OUBLIEZ PAS DE
RESPECTER
LES
DIRECTIVES
SMVANTES:
•Lorsque
vous
montez
le
volume,
assurez-vous
de
pouvoir
quand
meme
entendre
ce
qui
se
passe
autour
de
vous.
•Faites
tees
attention
ou
cessez
temporairement
l'utilisation
dans
les
situations
pouvant
Waverer
dangereuses.
•N'utilisez
pas
des
ecouteurs
ou
un
cazque
d'ecoute
lorsque
vous
operez
un
vehicule
motorise
;
une
telle
utilisation
peut
atter
des
dangers
sur
la
route
et
est
illegale
a
de
nombreux
endroits.
Register
your
product
at
/
Enreglstrez
votre
prodult
au
http:/AvvAv.ploneerelectronlcs.ca
U.S.
models only
/
Nur US-Modelle
/
Modeles americains imiguement
Solo modelli degli Stati Uniti
/
Solo modelos de
EE.UU.
/
Modelos
apenas
dos
EUA
TONbK0
WM
psonenm
CWA
/
sugmmaa
i
.L.,-;,„s.
,.
,vi
..
,:,...N44.11
This
device
complies
with
Part
15
of
the
FCC
Rules.
Operation
is
subject
to
the
follwing
two
conditions
:
(1)
this
device
may
not
cause
harmful
interference,
and
(2)
this
device
must
accept
any
interference
received,
including
interference
that
may
cause
undesired
operation.
Information to User
Alteration
or
modifications
carried
out
without
appropriate
authorization
may
invalidate
the
user'
s
right
to
operate
the
equipment.
Note
This
equipment
has
been
tested
and
found
to
comply
with
the
limits
for
a
Class
B
digital
device,
pursuant
to
Part
15
of
the
FCC
Rules.
These
limits
are
designed
to
provide
reasonable
protection
against
harmful
interference
in
a
residential
installation.
This
equipment
generates,
uses
and
can
radiate
radio
frequency
energy
and,
if
not
installed
and
used
in
accordance
with
the
instructions,
may
cause
harmful
interference
to
radio
communicalions.
However,
th
em
is
no
guarantee
that
interference
will
not
occur
in
a
particular
installation.
If
this
equipment
does
cause
harmful
interference
to
radio
or
television
reception,
which
can
be
determined
by
tuming
the
equipment
off
and
on,
the
user
is
encouraged
to
ny
to
correct
th
e
interference
by
one
or
mom
of
the
following
measures
:
•
Reorient
or
relocate
the
receiving
antenna
•
Increase
th
e
separation
between
the
equipment
and
receiver.
•
Connect
the
equipment
into
an
outlet
on
a
circuit
different
from
that
to
which
the
receiver
is
connected.
•
Consult
the
dealer
or
an
experienced
radio/TV
technician
for
help.
OFEATURES
1.
SHALLOW
AND
COMPACT
DESIGN
FOR
FLEXIBLE
INSTALLATION
2.
DYNAMIC
AND
CONTROLLED
BASS
OUTPUT
3.
2-MODE
SELECTABLE
BASS
CURVE
4.
COMPATIBLE
RCA
AND
SPEAKER
INPUT
FOR
SYSTEM
APPLICATION
VERSATILITY
OMERKMALE
1.
FLACHES
KOMPAKTDESIGN
FOR
MAXIMALE
EINBAUFLEXIBILITAT
2.
DYNAMISCHE
UND
KONTROLLIERTE
BASSVVIEDERGABE
3.
2
VERSCHIEDENE
BASSMODI
SCHALTBAR
4.
RCA-KOMPATIBLE
LAUTSPRECHEREINGABE
ERLAUBT
INTEGRATION
IN
VERSCHIEDENE
SYSTEME
IIICARACTERISTIQUES
1.
CONCEPTION
ULTRA-COMPACTE
POUR
UNE
INSTALLATION
SIMPLE
ET
DISCRETE
2.
BASSES
FREQUENCES
CONTROLEES
ET
DYNAMIQUES
3.
2
MODES
DE
REGLAGES
DE
BASSES
4.
ENTREE
COMPATIBLE
POUR
RCA
ET
HAUT-PARLEUR
AFIN
D'ASSURER
LA
VERSALITE
D'APPLICATION
DU
SYSTEME
OCARATTERISTICHES
1.
DESIGN
COMPATTO
PER
UN'INSTALLAZIONE
FLESSIBILE
2.
USCITA
DINAMICA
E
DEI
BASSI
CONTROLLATA
3.
2
CURVE
DEI
BASSI
SELEZIONABILI
4.
RCA
E
INGRESSO
ALTOPARLANTI
COMPATIBILI
PER
UNA
MIGLIORE
VERSATILITA
DI
APPLICAZIONE
DEL
SISTEMA
OCARACTERISTICAS
1.
DISEA0
COMPACTO
Y
SUPERFICIAL
PARA
UNA
INSTALACION
FLEXIBLE
2.
SALIDA
DEL
GRAVE
DINAMICA
Y
CONTROLADA
3.
2
MODOS
SELECCIONABLES
DE
CURVA
DE
GRAVES
4.
ENTRADAS
DE
RCA
Y
DE
ALATAVOZ
COMPATIBLES
PARA
LA
VERSATILIDAD
DE
APLICACION
DEL
SISTEMA
IIICARACTERISTICAS
1.
DESIGN
COMPACTO
E
SUPERFICIAL
PARA
UMA
INSTALACAO
FLEXfVEL
2.
EMISSAO
DINAMICA
E
CONTROLADA
DE
GRAVES
3.
2
MODOS
DE
SELEcA0
DA
CURVA
DE
GRAVES
4.
ENTRADAS
DE
RCA
E
DE
ALTO-FALANTE
COMPATIVEIS
PARA
VERSATILIDADE
DE
APLICACAO
DO
SISTEMA
00COSEHHOCTI1
1.
KOMRAKTHbli4
PA3MEP
KOPTIYCA
3KOHOMMM
RORE3H010
RPOCTPAHCTBA
2.
BO3MOXHOCTb
ITIPABBEHMR
YPOBHEM
BACA
3.
2
PEXMMA
ABTOMATMHECK014
HACTPOMK14
3KBATIAM3EPA
4.
YHMBEPCARbHblE
PA313EMbl
RCA
14
AKYCTMRECKME
BX0Abl
)111R
OBECREHHI4R
MAKCHMATIbHOM
COBMECTI4MOCTM
C
LIPYMM14
YCTPOCACTBAMM
1.
Ah4..SMIZRI1941LOCCI9Na
2.
1411&€I.r711?ftvg*kw
3.2frITOAr7lignamla
4.
iltiAAV
(RCA/
),
TIVEAMWUR9AtitSfli
aj.l•teo.koo"sliiirc,s6...
.H1jCa.-'
1...rar
I
RCA
d&.2
- I
>K
Information
Note
for
Customers
in
Russia
and
CIS
countries.
X
Information
l'attention des clients de Russie et des pays de la CEI.
>K
Nota
informative
per
i
consumatori
della
Russia
e
dei
paesi
del
CIS.
X
Nota
de
informagao
para
consumidores
da
Rassia
e paises
da
CEL
X
Minpopmatein
Ann
norpe6wrenera
B
Poccmm
m
CHI.
npsmemesse
:
B
COOTBOTCTBHH
co
crarbek
5
oamoHa
PoccmAcmok
WeAepatimm
( 0
32MIHT8
npaal
norpencrenell
)
H
nocrarronnerimem
npaewrenbcrea
POCCHACKOH
cDeAepateim
No720
or
16.06.97
momnaHtin
Pioneer
Europe
NV
oroaaptiaaer
nnegyinuiliA
cook
cripx6w
maAerwal,
ocOmAmanbno
nocraennembot
Ha
pc:can/cm/A
pbIHOK.
ABTOMO6HilbilaR
anewrpoHmma
:
6
BeT
ZLIEWINMAHME
YeTpOriCTBO
npereiasHaveHo
Ann
yeTEIHOBKH
PICKMO,IHTellbH0
B
rpancnoprHwe
cpeAcrest.
McnonbsocraHme
ero
B
apyrm
ye:Immix
Mester
nommen,'
K
BO3HHKHOBOHIII0
01.1MEI,
Hexpernao,
nopaxernso
snewroppmexem
TOKOM
II
K
Apyrmm
renecHwm
noepexcAeHmsm.
npm
BO3HRKHOBRHRR
npo6nem
nee
HenonaaKaa
B
pa6ore
3T0f0
meAenmn
CBMICHTeCb
C
TOprOBbIM
npeAcreemrenem
momnaHmm-npomaeoitmrerin
HIM
C
6.mokaiumm
cepmAcrumss
nyitKrons
PIONEER.
Awry
1131-0TOBBOHMFI
o6opyarmarme
MONCHO
onpeAenerrb
no
Homepy
naprmm,
KOTOplACI
coAetnewr
mintopmaAwo
0
HeAene
m
roAe
npomeeoAcrea.
(Pyccmerk)
Awry
N3r0T0B11eHNS
o6opyaomusin
MCOKHO
onpeaanwrb
no
cepaHomy
Homepy,
KOTOplal
col:lepton
HmOopmaumo
o
meesue
N
1-0,4e
npomseoAcrea.
(Pyccmini)
Cep/I/Hurl
HOMep
(Pycommil)
12
wupp
1
wirpp
1
cenlop
xell-
2
Amcpp
-0.-
-41
6
wicpp
-411-
2
ceupp
-10.-
D
E
L
P1
P2
%.
I
T
gam
H310TOBileHHFR
o6opymearmn
P1
roo
N3rOTOBneHile
roil
2001
2002
2003
2004
2005
2006
2007
2008
2009
2010
CIIMBOnbi
A
B
C
D
E
F
G
H
I
J
fcw
2011
2012
2013
2014
2015
2016
2017
2018
2019
2020
CIIMBOnbi
K
L
M
N
0
P
Q
R
S
T
P2
-
MecnA
ll3COTOBBOHYM
Mealy
1
2
3
4
5
6
7
8
9
10
11
12
CHMBOIlbl
A
B
C
D
E
F
G
H
I
J
K
L
KOPDOPALIIII1
DAWOHHP
28-8,
Xorocomaromo
2-Home,
ByHme-my,
TOKHO
113-0021,
RHOHHIR
Hanoprep 000
"DHOHEP
PYC"
105064,
POCCHR,
r.
Mocmea,
HI1301161
Cycanbribril
nepeynom,
Aom
5,
crpoenme
19
Ten.
:
+7(495)956-89-01
CAETIAHO
B
KMTAE
OCONNECTIONS
IIIVERRINDUNGEN
OCONNEXIONS
OCONNESSIONI
OCONEXIONES
OCONEXOES
erlOAKIIIOLIEHME
,L,)l.,,o."--111/
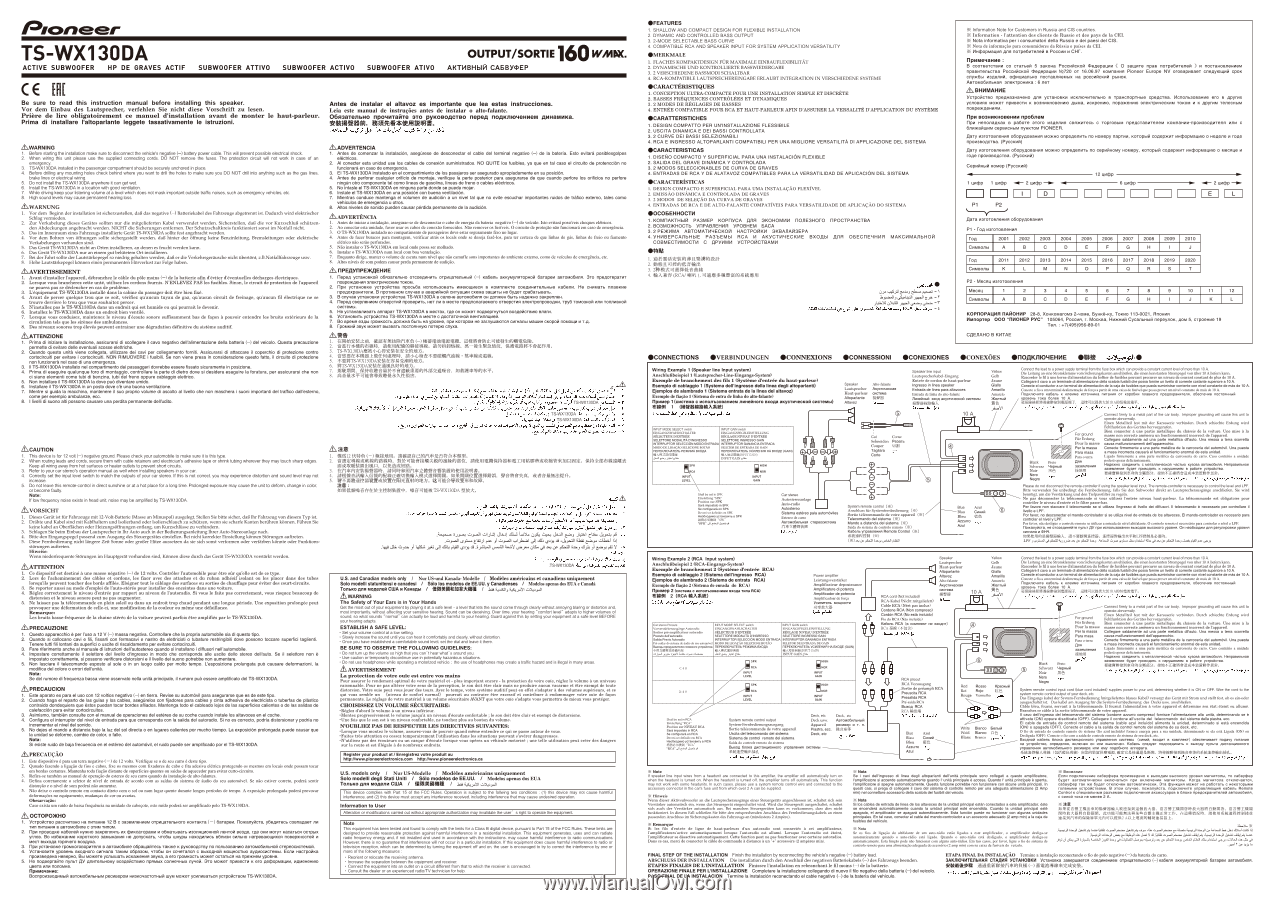
Wiring
Example
1
(Speaker
line
Input
system)
Anschlabeispiel
1
(Lautsprecher-Line-Eingangs-System)
Exempla
de
branchement
des
Ms
1
(Systeme
d'entree
du
haut-parleur)
Esemplo
di
cablaggio
1
(Systeme
dell'ingresso
della
linea
degli
altoparlanti)
Ejemplos
de
alambrado
1
(Sistema
entrata
de
la
lines
del
altavoz)
Exemplo
de
Hap%
1
(Sistems
de
entra
de
lines
do
alto-falante)
Rommep
1
(CRCTOPA8
C
NCROirb3OBIRINOM
nmaeguoro
exoaa
aKyCTIVIRCK0r1
CNCTeMbl)
*NM
1
(lattilklOIRAME)
(
)1
Jt.t.
INPUT
MODE
SELECT
swith
INPUT
GAIN
switch
SINGANGSWAHLSCHALTER
ONGANGSPEGELEINSTELLUNG
SELECTEUR
D'ENTREE
REGLAGE
NIVEAUD'ENTRRE
SELETTORE
MODALITA
[INGRESS°
SELETTORE
INGRESS°
GAIN
INTERRUPTOR
SELECCI6N
MODO
ENTRADA
INTERRUPTOR
GANANCIA
ENTRADA
MODO
DE
uciAgAo
SIMMONS
ROTA°
SELETOR
DBENTRADA
DE
GAIN
GEPEKIIKTEATERb
PIDIGIMA
BXCECLA
GEPEKIIIORATEnb
ICH/THAR
HA
BROBE
(GAIN)
MANAAIIINN
leAffiCNNONPINGAN
dasli
0-kr
JAI
ct,
INPUT
GAIN
cll.
SPK
ID
HIGH
RCA
MINOR
INPU
INPUT
LEVEL
GAIN
Shall
be
set
in
SPK
Einstellung
Position
sur
SPK
sari
Imposteto
In
SPK
Se
conflgurara
en
SPK
Demi
sor
defmido
om
SPK
MOOMMAKMO
3CTEMOMM.
SPK
lattaBtAtaal
"sex"
.3PIC"
Speaker
Lautsprecher
Haut-parleur
Altoparlante
Altavoz
•Ge
8-U-C)
Car
stereo
Autostereoanlage
Auto-radio
Autostereo
Sistema
were°
pals
automeviles
Estereo
de
carro
AmoraoSsinezan
c-repeocac-rena
M*AISNISI*
Alto-falante
Akycnoteckan
mamma
MVO
Cut
Sehneiden
Couper
Tagliara
Cods
COMIC
PB3aTb
VIN
Speaker
ine
input
Lautsprecherkabel-Eingang
Entree
de
cordon
de
haut-parleur
Ingress°
in
linea
speaker
Entrada
de
linea
para
altavoces
Entrada
de
&ha
do
atto-falante
IlmegHbig
BXEdI
EMyCTLILIBCKOR
CLICTSMbi
seesese.A.
10
A
Yellow
Gelb
Jaune
Giallo
Amarillo
Amami°
Xerrrbig
Connect
the
lead
to
a
power
supply
terminal
from
the
fuse
box
which
can
provide
a
constant
current
level
of
more
than
10
A
Die
Leitung
an
eine
Stromiclemme
vom
Sicherungskasten
anschliden
die
einen
konstanten
Strompegel
von
Ober
10
A
liefem
kann.
Raccorder
le
fi
l
me
borne
d'alimentation
du
bottler
de
foibles
pouvant
procurer
un
niveau
de
courant
constant
de
plus
de
10
A.
Coliegare
cavo
a
un
terminals
di
alimentazione
della
scatola
fusibili
che
posse
fomire
un
livello
di
correme
costante
superiors
a
1
0
A.
Conecte
el
conductor
a
un terminal
de
alimentacian
de
la
caja
de
fusibles
que
puede
suministrar
corriente
con
nivel
constante
de
ads
de
10
A.
Conecte
o
fi
o
a
um
terminal
&ohmage&
de
force
a
partir
de
uma
caixa
de
fusfvel
que
posse
prover
um
nivel
constant°
de
mais
de
10
A.
110BKIIKBINTe
K8.68.1113
K
KIMIMMB
PICTOLIHYMB.
nkrawn
Or
kopo6km
nilEIBKOr0
npeaoxpakurrenn,
o6ecnegma
BOCTOPHHIA
yposenb
TOKEI
6onee
10
A.
ti
tattOMPANtliftkfiltEMT,
114IWPAtlaid10Afti2latitt*.
.
L5all
.1,11
Connect
fi
rmly
to
a
metal
part
of
the
car
body.
Improper
grounding
will
cause
this
unit
to
operate
abnormally.
Einen
Metallteil
fest
mit
der
Karosserie
verbinden.
Durch
schiechte
Erdung
wird
Fehlfunktion
des
Gerates
hervorgerufen.
Bien
connecte,r
a
une
part&
metallique
du
chassis
de
la
voiture.
Une
mise
a
la
masse
non
correct°
amenera
un
fonctionnement
incorrect
de
l'appareil.
Collegare saldamente
ad
una
parte
metallica
dll'auto.
Una
mesas
a
terra
scorretta
cause
malfunzionamenti
dell'apparecchio.
Conecte
fi
rmemente
a
una
parte
metalica
de
la
carrocerfa
del
autom6vil.
Una
puesta
a
masa
incorrecta
causara
el
funcionamiento
anormal
de
esta
unidad.
Ligado
fumemente
a
uma
parte
metfilica
da
carrosseria
do
cam,.
Caso
contirio
a
unidaie
podera
operar
deficientemente.
HEIBB/KHO
COBEPAHLITIo
C
meTarunNeckoit
LIEICTMO
Icymea
amomoCtina.
Henpaeimbrioe
sasemnekke
6yaer
BONBOBITTb
K
kapywermam
B
pabom
yeTpoaarea.
OftlirePlikfll*BIZAWS3r.
MitTOllffkrEat*MgaffiAlt,
•
•
VI
J.-.
4
System
remote
control
(A0
Anschluss
fur
Systemfembedienung
()a)
Sortie
telecommande
de
votre
apparel]
(
)
Telecomando
del
sistema
(X)
Mando
a
distancia
del
sistema
(X)
Saida
do
sistema
controlo
remote
081)
Kabeno
ynpaanesann
Remote
Control
(X)
*PkArEMBI
(NO
(x)a.,,:,
rival
5
,-=\N
Blue
Asut
Blau
CHHHII
Bleu
E•Lt
Azzurro
Azul
6
Black
Schwa.
Noir
Nero
Negro
Preto
t-lepHbig
For
ground
Far
&dung
Pour
la
masse
Per
la
massa
Para
masa
Para
o
terra
Ann
3838MIN3HVIFI
*Aril
Please
do
not
disconnect
the
remote-controller
if
using
the
speaker
level
input
The
remote-controller
is
necessary
to
control
the
level
and
LPF.
Bitte
verwenden
Sie
unbedingt
die
Fernbedienung,
falls
Sie
den
Subwoofer
direkt
an
Lautsprecherausgarige
anschliegen.
Sie
wird
benotigt,
um
die
Verstarkung
und
den
Tiefpassfilter
regekt.
Ne
pas
&connecter
la
telecommande
si
VOILE,
utilises
l'entree
niveau
haut-parleur.
La
telecommande
eat
obligatoire
pour
contriMer
le
niveau
d'entree
et
le
fi
ltre
passe-bas.
Per
favore
non
slaccare
telecomando
se
si
utilizza
!Ingress°
di
livello
del
&Fuson.
telecomando
66
necessario
per
conlrollare
Hyena
e
LPF.
Por
favor,
no
desconectar
el
mando-controlador
si
se
utilize
nivel
de
entrada
de
los
afiavoces.
El
mando-controla.dor
es
necesano
para
coMrolar
el
nivel
y
LPF.
Por
favor,
nao
desligueocontrolo
remoto
se
utiliser
a
entrada
de
nfvel
altifalante.
0
controlo
remoto
6
necessario
para
controlar
o
nivel
e
LPF.
floscanyacTa,
MB
crrcoeakkaare
nynor
AY
spa
acnonwoeasett
IMAM:MOB
eucoeoro
ypoess.
Os
seo6xcamm
perynepomm
ypoess
CIOMELBa
CDHLI.
ffil*MIliDAtilMfififaX,
1AMfata**RILPFMNIA6Mill
oe
rival
sa.,
eivalsa.‘„,
Wiring
Example
2
(RCA
Input
system)
Anschlabeispiel
2
(ECA-Eingangs-System)
Example
de
branchement
2
(Systeme
d'entree
RCA)
Esemplo
dl
cablagglo
2
(Slstema
dell'Ingresso
RCA)
Ejemplos
de
alambrado
2
(Sistema
de
entrata
RCA)
Exemplo
de
flack
2
(Sista=
de
enrada
do
RCA)
Dparsep
2
(cmcmme
c
mcnomaomassem
mous
nine
RcA)
vim
2
(RCA
SIAMIE)
Power
amplifier
Leistungsverstarker
Amplificateur
depouissance
Amplfficatore
di
potenza
Amplfficador
de
potencia
Amplificadoar
forge
YOMITTEUlb
MOWHOCIM
VANiag
Car
stereo
Preouta
INPUT
MODE
SELECT
sod&
INPUT
GAIN
switch
VorvenstarkerausgAnge
Autoradio
EINGANGSWAHLSCHALTER
EINGANGSPRGELEINSTELLUNG
Sorties
pre-amplificateur
autoradio
EIBLECTEURD'ENTREE
REGLAGENIVEAUDENTREE
Preoute
delPeutoredlo
SELETTORE
MODALRA
D'INGRESSO
SELETTORE
INGRESS°
GAIN
Sande
Presto
&Parodic
INTERRUPTOR
SELECCIoN
MODO
ENTRADA
INTERRUPTOR
GANANCIA
ENTRADA
Prd-seldas
do
sistoma
do
Audio
do
sou
automovol
MODO
DBLIGAC.A0
SELECIONI3
ROTA°
SELELTOR
DBENTRADA
DB
GAIN
Swope.
npesyciinmenn
ronomoro
mimic-roe
REPEKRIOHATEllb
PDIGIMA
550,LIA
FIEPEIGIIONATEllb
YCIABEHIAR
HA
excifiE
(GAIN)
*fillitatafkflalailika
MIASSAMISSEINI
aliAllt46911IONPOr
GADO
cd_,L,...11,,,,,,,,),..V1...M.,c.,
........
d-",
&L../
JP.'
ciEf-
INPUT
GAIN
cis.
SPK
-
HIGH
<
4V
RCA
I
NOR
INPUT
INPUT
LEVEL
GAIN
SPK
*HIGH
2
4V
RCA
_
NOR
INPUT
INPUT
LEVEL
GAIN
Shall
be
set
in
RCA
Endellung
"RCA"
Position
sur
NIVEAU
RCA
Seth
Imposteto
In
RCA
Ss
configured,
en
RCA
DevmamadefithdoemRCA
HBOCOMMIMOMBHOMMB
RCA
EINISZiALPINI
"KA"
Tex'
t..4.01
Lli.pro
Deck,
etc
System
remote
control
output
Deck
usw.
System-Fembedienungsausgang
Apparel]
Sortie
telecommande
de
votre
appareil
Piastre,
ecc.
U)A%,
Uscita
del
telecomando
del
sistema
Deck,
etc
Sistema
de
control
remota
del
sistema
Safda
do
controle
remoto
do
sistema
BbIXOO
611001
OMCTEMLAMOHH010
ynpaenemin
CLICTBMbl
OtitlE41Nneilffifi
RCA
cord
(Not
included)
RCA-Kabel
(Nicht
mitgeliefert)
Cable
RCA
(Nest
pas
inclus)
Cordone
RCA
(Non
compreso)
Cord6n
RCA
(No
este
incluido)
Fio
do
RCA
(Nao
inclufdo)
Ka6enb
RCA
06
komnnerr
HG
exoarrr)
RCA
etta
(NA)
(
)
RCA,
J.,5
-0-
-0,
Deck,
etc
ABTOM06101bHblA
pecsisep
M
T.
n.
RCA
preout
RCA
Vorausgang
Sortie
de
preampli
RCA
Preuscita
RCA
Presalida
RCA
Pre-safda
RCA
BEZEDEI
RCA
RCA
RCA
Y
Speaker
Lautsprecher
Haut-parleur
Altoparlante
Altavoz
Alto-falante
Akyc-rwreckan
ClICTOMEt
tOgeg
10
A
Yellow
Gelb
Jaune
Giallo
Amarillo
Amaral°
Xerrradi
Connect
the
lead
to
a
power
supply
terminal
from
the
fuse
box
which
can
provide
a
constant
current
level
of
more
than
10
A
Die
Leitung
an
eine
Stromidemme
vom
Sicherungskasten
anschlieSen,
die
einen
konstanten
Strompegel
von
fi
ber
10
A
liefem
kann.
Raccorder
le
fi
l
a
une
borne
d'alimentation
du
bottler
de
&Shies
pouvant
procurer
un
niveau
de
courant
constant
de
plus
de
10
A.
Collegare
cam
a
un
terminals
di
aHmentazione
della
scatola
fusibili
che
possa
bake
un
livello
di
corrente
costante
superiore
a
10
A.
Conecte
el
conductor
a
un
terminal
de
alimentacion
de
la
caja
de
fusibles
que
puede
suministrar
corriente
con
nivel
constants
de
mits
de
10
A.
Conecte
o
fi
o
a
um
terminal
dealimentaclo
de
force
a
partir
de
uma
caixa
de
fusfve1
que
poses
prover
um
nivel
constant°
de
mais
de
10
A.
110.11KBIOLINTG
Ka6Billa
K
KIIBLIMe
NCTOWINKB.
narakan
OT
kopo6km
nnaakoro
npeaoxpakaTenn,
o6ecneLem
nocroakkbdi
Imormab
Toka
gonee
10
A.
ttfieMIENFOltegfrkfltalnT,
iffitffigtirliltX•10
Af0M11ffifttslk,
.
)51,
,.z.,11;
eta-U!
c.,1+
j).
T
=>
c>
6
Red
Rosso
KpaaHma
Rot
Rojo
VIA
Rouge
Vermelho
Blue
Am]
Blau
CIIHNA
Bleu
ltffi
Azul
White
Bianco
Senbia
Weig
Blanco
ti
Blanc
Branco
I
Black
Schwarz
Noir
Nero
Negro
Preto
LlepHba's
For
ground
Erdung
Pour
la
masae
Per
la
manse
Para
masa
Para
o
terra
Arm
3a3GMBBHMII
/ME
Connect
fi
rmly
to
a
metal
part
of
the
car
body.
Improper
grounding
will
cause
this
unit
to
operate
abnormally.
Einen
Metallteil
fest
mit
der
Karosserie
verbinden.
porch
schiechte
Erdung
wird
Fehlfunktion
des
Gerates
hervorgerufen.
Bien
connecter
a
une
partie
metallique
du
chassis
de
Ls
voiture.
Une
mise
a
Ls
masse
non
correcte
amenera
un
fonctionnernent
incorrect
de
l'appareil.
Collegare
saldamente
ad
una
parte
metallica
dll'auto.
Una
messa
a
terra
scorretta
causa
malfunzionamenti
dell'apparecchio.
Canada
fi
rmemente
a
una
parte
metalica
de
la
carrocerta
del
automovil.
Una
puesta
a
masa
incorrecta
causara
el
funcionamiento
anormal
de
esta
unidad.
Ligado
firmemente
a
uma
parte
metalica
da
carnmseria
do
camo.
Caso
contrado
a
unidade
node.
operar
deficientemente.
HEILLIMKHO
COGEILIHIETb
C
ME,TEUIRIBISCKOrl
LIFICTbK3
kyamsa
HEMpaBltribl108
3E13,3MBEIHHEI
6WIEIT
K
sappoessnm
B
Nome
Krpolicrea.
RiENVIIMIN*Of
11/6+MEM/Rifikt*HRBIA'R.,
System
remote
control
input
cord
(blue
cord
included)
supplies
power
to
your
unit,
determining
whether
it
is
ON
or
OFF.
Wire
the
cord
to
the
system
remote
control
output
of
your
deck,
etc.
Das
Eingangs
kabel
der
System-Fembedienung
(mitgeliefertes
blaues
Kabel)
versorgt
das
Gerat
mit
Strom
und
stellt
fest,
ob
es
ein-oder
ausgeschaltet
ist.
Das
babel
am
Ausgang
far
die
System-Fembedienung
des
Decks
taw.
anschlieBen.
Cable
bleu,
fourth,
servant
a
la
telecommande.
fournit
l'
alimentation
a
votre
appareil
et
determine
son
etat:eteint
ou
allume.
Branches
ce
cable
a
la
sortie
telecommande
de
votre
appareiL
cavo
dell'ingresso
del
telecomando
del
sislema
(cordons
azzurro
compreso)
fomisce
l'alimentazione
alla
unite,
determinando
6
attivata
(ON)
oppure
disattivata
(OFF).
Collegare
cordone
all'uscita
del
telecomando
del
sistema
della
piastre.
ecc.
El
cable
de
entrada
de
control
remote
del
sistema
(cable
azul
incluido)
alimenta
la
unidad,
determinado
si
esti
encendida
(ON)
o
apagada
(OFF).
Conecte
el
cable
a
la
salida
de
control
remota
del
sistema
de
su
deck,
etc.
0
fi
o
de
entrada
do
controle
remoto
do
sistema
(fio
asul
inclufdo)
fornece
musk
para
a
ma
unidade,
determinando
se
ela
esta
Ligada
(ON)
ou
Desligada
(OFF).
Conecteofio
com
a
Beide
de
control°
remoto
do
sistema
de
seu
deck,
etc.
BxoaHog
ka6enb
6noka
ALICTBHLOICHHOM
ynpaenetnen
cHcrembi
(mmHg,
BROW'
B
komnnekr)
ofecneHtmaer
noaaqy
mimosa
Ha
prpoacreo,
onpeaenns,
BKIIIONBH
OH
LIM
BbIKIIK,H8H.
Kabenb
answer
noacomerwra
K
Buxom
nynaTa
ALICTBHMLIOHHORI
ynpaenemin
aeromo6HribHoro
pecHeepa
HRH
emy
noao6Horo
annapara.
Qamatomo
ff
th
eA9R(Ethatile,
riffT'Lkll/Miltrat688.
PS*011040ffilliit
aM(IVOMSEEtillit141,,,
61j
eU.,11
4,1
j,5
X
Note
f
speaker
line
input
wires
from
a
headunit
am
connected
to
this
amplifier,
the
amplifier
will
automatically
turn
on
when
the
headunit
is
turned
on.
VVhen
the
headunit
is
tumed
off,
the
amplifier
turns
off
automatically.
This
function
may
not
work
with
some
headunits.
in
such
cases,
please
use
a
system
remote
control
wire
and
connected
to
the
accessory
connector
in
the
car's
fuse
unit
from
which
Over
2
A
can
be
supplied.
Hinweis
Wenn
dieser
Alctivsubwoofer
an
die
Lautsprecherausganp
eines
Steuergerats
angeschlossen
ist,
schaltet
skh
mein
Verstarker
automatisch
ein,
wemx
das
Steuergerat
eingesdmItet
wird.
Wird
des
Steuergerat
ausgeschaltet,
schaltet
sich
auch
der
Verstarker
automatisch
aus.
Bei
manchen
Steuergeraten
kann
es
vorkommen,
dass
dies
nicht
funktioniert.
In
diesem
Fall
sdilieSen
Sie
bilk
den
entsprechenden
Anschluss
des
Fembedienungskabels
an
einen
passenden
Anschluss
im
Sicherungskasten
des
Fahrseugs
an
(mindestens
2
Ampere).
Remarque
Si
les
fits
d'entree
de
ligne
de
haut-parleurs
d'un
autoraclio
sont
connectes
a
cet
amplificateur,
l'amplificateurs'active
automatiquement
lorsque
l'autoradio
est
allume.
Lorsque
l'autoradio
est
eteint,
l'amplificateur
se
desactive
automatiquement.
Cette
fonction
peut
ne
pas
fonctMnner
avec
certaina
autoradios.
Dans
ce
cas,
merci
de
connecter
le
cable
de
commande
a
distance
a
un"+"
accessoire
(2
amperes
min).
X
Note
Se
cavi
dell'ingresso
di
linea
degli
altoparlanti
dell'unita
principals
sono
collegati
a
questo
amplificatore,
l'amplificatore
si
accende
automaticamente
quando
unita
principale
6
accesa.
Quando
unite
principale
spenta,
ramplificatore
si
spegne
automaticamente.
Questa
funzione
potrebbe
non
funzionare
con
alcune
mita
principali.
In
questi
casi,
si
prega
di
collegare
cavo
del
sistema
di
contralto
remoto
per
una
adeguata
alimentazione
(2
Amp
min)
nel
connettore
accessorio
della
scatola
dei
lusibili
del
veicolo.
FIE
Note
Si
los
cables
de
entrada
de
lima
de
los
altavoces
de
la
unidad
principal
estan
conectados
a
este
ampltlicador,
6ste
se
encendera
automaticamente
cuando
la
unidad
principal
este
encendida.
Cuando
la
unidad
principal
este
apagada,
el
amplificador
se
apagare
automaticamente.
Esta
funcien
puede
no
funcionar
con
algunas
unidades
principales.
En
tal
caw,
conectar
el
cable
del
mando-controlador
a
un
accesorio
adecuado
(2
amp
min)
a
la
caja
de
fusibles
del
vehiculo.
X
Note
se
os
fi
bs
de
li
gagao
do
altifalante
de
um
auto-radio
estao
ligados
a
este
amplificador,
o
amplificador
desliga-se
automaticamente
quando
o
auto-radio
esti
Quando
o
auto-radio
esta
desligado,
o
amplificador
desliga-se
automaiicamente.
Esta
funcao
pode
nao
funcionar
com
alguns
auto-radios.
Ern
tais
cases,
por
favor,
ligue
o
fi
e
do
sistema
de
controlo
remoto
para
uma
alimentagao
adequada
do
acesserio
(2
amp
min)
com
na
caLra
de
fusiveis
do
veleta°.
FINAL
STEP
OF
THE
INSTALLATION
Finish
the
installation
by
reconnecting
the
vehicle's
negative
(-)
battery
lead.
ABSCHLUSS
DER
INSTALLATION
Die
installation
durch
den
Anschlu8
des
negativen
Batteriekabels
(-)
des
Fahrzeugs
beenden.
ETAPES
FINALES
DE
LINSTALLATION
Finissez
rinstallation en
rebranchant
le
fi
l
moins
(-)
de
la
batterie.
OPERAZIONE
FINALE
PER
L'INSTALLAZIONE
Completare
la
installazione
collegando
di
nuovo
II
filo
negativo
della
batteria
(-)
del
veicolo.
PASO
FINAL
DE
LA
INSTALACION
Termine
la
instalacion
reconectando
el
cable
negativo
(-)
de
la
bateria
del
vehiculo.
BHPIMEIHIII3
ECIII1
noAknoLlerme
ca6ar:pepa
npoliseexterro
K
BbIXO,UEIM
BMCOKOITI
yposHn
MEUHISTOTIbl,
TO
cathsyqmp
6y2BT
EIBTOMELTITIEICKH
BKIII0LiaTbCII
nos
BKRIOLIEIHRLI
KOI-Ela
Mar
NIETO/la
OTIGIIOLISEITCR,
cathayrpep
TEO<
/KG
6yEIBT
CITKRIOLIGH
aBTOMBITIMMICKM.
3T3.
cpyakumn
MONO3T
103
p8.60TEITO
C
FIBKOTOOMMN
fOBBHIAMM
yorpoacreama.
B
3TOM
cnyHee,
noatanyacra,
BOAKIBOLIMTB
ynpaanmoutual
Ka6Bina
Remote
Control
K
cnermanbkrzam
paxbemem
nOaKnamemin
akceccyapoe
6noke
npeaoxpakineneg
awromo6ann,
c
CHBOR
TOKEL
He
meHee
2
A.
#£
Pfl
AZ
a
di*
agla
aaMMAAlieftWalieticaa.
2
1610N0f*JitMalff
OfiRI
Of.
re
PR
,1010
MA
On.
iitV3IiMiglittftXX
iNINE/itifr.
tEANIMITM.
INVOAMUMRIMAk
Afniri*WARVIR7-tpkNiAte42
LVteritArthA4leig
h.
es,
,fie
La.v.,,lic,lot...31.1,6.
LI:,
caS
1:5)
486,6112,31
Jo=
rs,
La°
06.4,211,1,11,
/c..6fLv1I
‘,14
La.
ETAPA
FINAL
DA
INSTALACAO
Termine
a
instalagao
reconectando
o
fi
o
do
polo
nezativo
(-)
dabateria
do
carro.
3AKIROLIIITERbHAR
YCTAHOBKil
YcraHowee
saeepwaeren coeamemiem
armarenbsoro
(-)
Ka6enn
awymynnropHoA
6arapem
awromo6mnn.
313iit*SPVeM9014E (-)*MM*105ICAAIZR.
(-)