Pioneer VSX-72TXV Owner's Manual - Page 15
Digital Out1
 |
View all Pioneer VSX-72TXV manuals
Add to My Manuals
Save this manual to your list of manuals |
Page 15 highlights
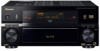
Connecting your equipment 03 Connecting digital audio sources This receiver has both digital inputs and outputs, allowing you to connect digital audio components for playback and for making digital recordings. Most digital components also have analog connections. See Connecting analog audio sources on the following page if you want to connect these too. VSX-74TXVi MULTI-ROOM &SOURCE /REC SEL OUT1 ROOM3(ZONE3) OUT2 MULTI-ROOM & SOURCE IN ROOM2(ZONE2) OUT FM UNBAL 75Ω MONITOR OUT S400 USB IR AUDIO 12 V TRIGGER IN (AUDIO) 1 2 IN1 IN1 (DC OUT 12V TOTAL 50mA MAX) (SAT) S400 ROOM2 MULTI-ROOM & SOURCE IN2 (DVR/ VCR 1) IN3 (DVR/ VCR 2) (ZONE2) HDMI IN1 IN1 Y MONITOR OUT IN2 OUT IN1(DVD/LD) Y IN2(TV) 1-2 ASSIGNABLE IN4 PB PB (CD-R) 1-4 IN2 ASSIGNA- BLE PR PR IN1 1-2 (DVD/ LD) IN2 IN3 Y Y IN2 OUT (CD) ANTENNA AUDIO PHONO AM LOOP MULTI-ROOM & SOURCE IN R ROOM2(ZONE2) L CD OUT IN DVD/ LD IN TV IN SAT IN VIDEO1/ GAME1 IN OUT DVR/ VCR 1 IN OUT CD-R/ TAPE IN R FR FL SUB W. SURROUND R IN XM DIGITAL PB PB PR PR OUT DVR/ VCR 2 IN ASSIGNABLE 1-3 S -VIDEO VIDEO COMPONENT VIDEO VIDEO R L AUDIO R SURROU B M OUT IN CONTROL 1 Connect an optical-type1 digital audio output on your digital component to the DIGITAL 4 (CD-R) input. Use an optical cable for the connection. 2 For recording equipment, connect one of the optical-type DIGITAL outputs to a digital input on the recorder. Use an optical cable to connect to the DIGITAL OUT1 or (VSX-74TXVi only) OUT2 (OUT1 is shown in the illustration).2 About the WMA9 Pro decoder This unit has an on-board Windows Media® Audio 9 Professional3 (WMA9 Pro) decoder, so it is possible to playback WMA9 Pro-encoded audio using a coaxial or optical digital connection when connected to a WMA9 Pro-compatible player. However, the connected PC, DVD player, set-top box, etc. must be able to output WMA9 Pro format audio signals through a coaxial or optical digital output. 1 OPTICAL COAXIAL DIGITAL OUT OPTICAL 2 DIGITAL IN CD-R, MD, DAT, etc. Note 1 • If your digital component only has a coaxial digital output, you can connect it to one of the coaxial inputs on this receiver using a coaxial cable. When you set up the receiver you'll need to tell the receiver which input you connected the component to (see also The Input Setup menu on page 61). • The digital outputs from other components can be connected to any spare digital audio inputs on this receiver. You can assign them when setting up the receiver (see also The Input Setup menu on page 61). 2 • You must switch ZONE 3 ON in Using the multi-room controls on page 56 to hear audio from the DIGITAL OUT1. In order to record some digital sources, you must make analog connections as explained in Connecting analog audio sources below. 3 • Microsoft, Windows Media®, and the Windows logo are trademarks, or registered trademarks of Microsoft Corporation in the United States and/or other countries. • With WMA9 Pro, sound problems may occur depending on your computer system. Note that WMA9 Pro 96kHz sources will be downsampled to 48kHz. 15 En
-
 1
1 -
2
-
3
-
4
-
5
-
6
-
7
-
8
-
9
-
 10
10 -
 11
11 -
 12
12 -
 13
13 -
 14
14 -
 15
15 -
 16
16 -
 17
17 -
 18
18 -
 19
19 -
 20
20 -
21
-
22
-
23
-
24
-
25
-
26
-
27
-
28
-
29
-
30
-
31
-
32
-
33
-
34
-
35
-
36
-
37
-
38
-
39
-
40
-
41
-
42
-
43
-
44
-
45
-
46
-
47
-
48
-
49
-
50
-
51
-
52
-
53
-
54
-
55
-
56
-
57
-
58
-
59
-
60
-
61
-
62
-
63
-
64
-
65
-
66
-
67
-
68
-
69
-
70
-
71
-
72
-
73
-
74
-
75
-
76
-
77
-
78
-
79
-
80
-
81
-
82
-
83
-
84
-
85
-
86
-
87
-
88
 |
 |
