Pioneer VSX-72TXV Owner's Manual - Page 22
MULTI ROOM & SOURCE / REC SEL controls - remote control
 |
View all Pioneer VSX-72TXV manuals
Add to My Manuals
Save this manual to your list of manuals |
Page 22 highlights
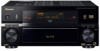
04 Controls and displays 9 HDMI indicator Blinks when connecting an HDMI-equipped component; lights when the component is connected (page 48). 10 i.LINK indicator (VSX-74TXVi only) Lights when an i.LINK-Audio-equipped component is selected (page 49). DIGITAL VIDEO CONVERSION indicator (VSX-72TXV only) Lights when digital video conversion is enabled (page 64). 11 Listening mode buttons HOME THX - Press to select a Home THX listening mode (page 27). STANDARD SURROUND - Press for Standard decoding and to switch between the various 2Pro Logic IIx and Neo:6 options (page 26). ADVANCED SURROUND - Use to switch between the various surround modes (page 27). 12 MASTER VOLUME dial 13 Front panel controls To access the front panel controls, push gently on the lower third portion of the panel with your finger. 21 SBch PROCESSING Selects the surround back channel mode (page 29) or virtual surround back mode (page 29). 22 STEREO Switches to stereo playback (page 28). 23 PHONES jack Use to connect headphones. When the headphones are connected, there is no sound output from the speakers. 24 SETUP Press to access the System Setup menu (see page 32). 25 (TUNE/ST +/-) /ENTER Use the arrow buttons when setting up your surround sound system (see page 32). Use the TUNE +/- buttons to find radio frequencies and use ST +/- to find preset stations (page 31). 26 RETURN Press to confirm and exit the current menu screen. 27 MCACC SETUP MIC jack Use to connect the supplied microphone. 28 VIDEO/GAME 2 INPUT See Connecting a component to the front panel inputs on page 16. STANDBY/ON 14 SPEAKERS Use to change the speaker system (page 53). 15 AV PARAMETER Use to access the AV options (page 64). Operating range of remote control unit The remote control may not work properly if: • There are obstacles between the remote control and the receiver's remote sensor. • Direct sunlight or fluorescent light is shining onto the remote sensor. • The receiver is located near a device that is emitting infrared rays. • The receiver is operated simultaneously with another infrared remote control unit. 16 TUNER EDIT Use with / to memorize and name stations for recall (page 31). 17 BAND Switches between AM and FM radio bands (page 30). 18 MULTI ROOM & SOURCE / REC SEL controls If you've made multi-room connections (see Multi-room listening on page 55) use these controls to control the sub room from the main room (see Using the multi-room controls on page 56). You will also need to use the REC SEL controls when recording a source (see Making an audio or a video recording on page 65). STANDBY/ON 30 30 7m (23 ft.) AUDIO/VIDEO MULTI-CHANNEL RECEIVER 19 VIDEO SELECT Press repeatedly to select the video source (page 66). 20 SIGNAL SELECT Use to select an input signal (page 28). 22 En
-
 1
1 -
2
-
3
-
4
-
5
-
6
-
7
-
8
-
9
-
10
-
11
-
12
-
13
-
14
-
15
-
16
-
 17
17 -
 18
18 -
 19
19 -
 20
20 -
 21
21 -
 22
22 -
 23
23 -
 24
24 -
 25
25 -
 26
26 -
 27
27 -
28
-
29
-
30
-
31
-
32
-
33
-
34
-
35
-
36
-
37
-
38
-
39
-
40
-
41
-
42
-
43
-
44
-
45
-
46
-
47
-
48
-
49
-
50
-
51
-
52
-
53
-
54
-
55
-
56
-
57
-
58
-
59
-
60
-
61
-
62
-
63
-
64
-
65
-
66
-
67
-
68
-
69
-
70
-
71
-
72
-
73
-
74
-
75
-
76
-
77
-
78
-
79
-
80
-
81
-
82
-
83
-
84
-
85
-
86
-
87
-
88
 |
 |
