Plantronics CS351N User Guide - Page 11
you should replace the battery. Call Plantronics at 800 544-4660 ext. 5538 to order one. Once - instructions
 |
View all Plantronics CS351N manuals
Add to My Manuals
Save this manual to your list of manuals |
Page 11 highlights
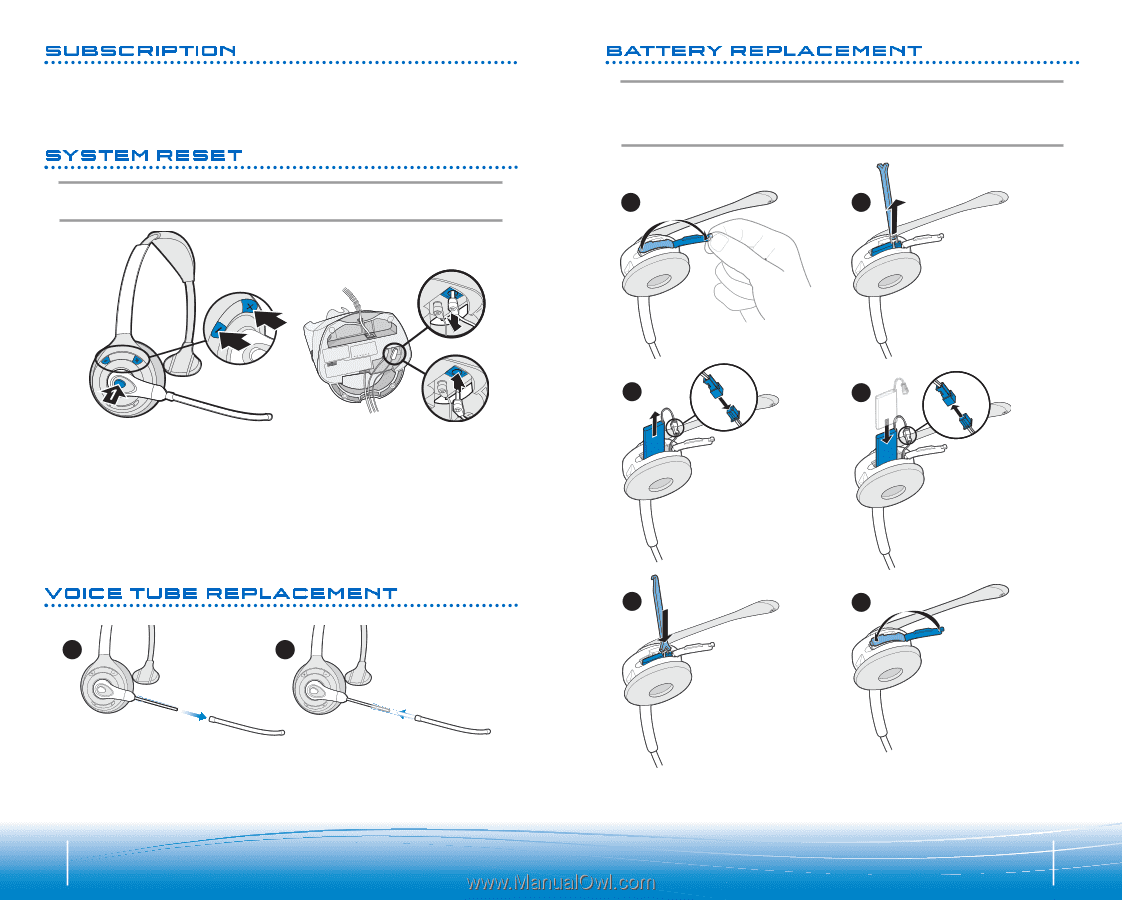
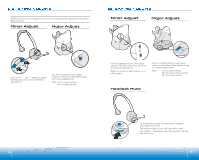
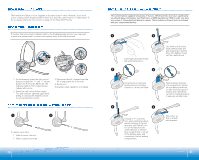
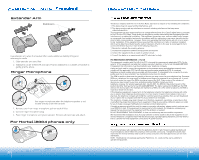
SUBSCRIPTION The headset and base unit are supplied subscribed to each other. However, if you wish to use a replacement headset with the base unit, then the units must be re-subscribed. To do so, please follow the instructions on page 10 for Multi-Shift Pairing. SYSTEM RESET To recover from some fault conditions (refer to the Troubleshooting Section), you may need to perform a system reset. To perform the system reset, follow this procedure: 1 1 AND 3 4 4 1. Simultaneously press the call control button and both the "+" and "-" volume buttons for 5 seconds. When the talk indicator light on the headset blinks, release all buttons. 2. Press the call control button again. The talk indicator light will again blink briefly to indicate the headset is back to normal operation mode. 3. Disconnect the AC charger from the AC charging jack for 5 seconds. 4. Reconnect. The system reset operation is complete. VOICE TUBE REPLACEMENT 1 2 To replace voice tube: 1. Slide old voice tube out. 2. Slide in spare voice tube. 20 BATTERY REPLACEMENT The custom battery supplied should last 2-3 years. When talk time decreases significantly, you should replace the battery. Call Plantronics at (800) 544-4660 ext. 5538 to order one. Once you receive it, follow directions below to replace. The tool shown in Steps 2 and 5 is included with your replacement battery. 1 2 Use fingernail to lift off and flip open battery door. 3 4 Use hook end of tool to hook battery wires and pull toward open battery door until battery moves out from behind post. Once battery is removed, gently disconnect battery connector; do not pull hard. 5 6 Using the "Y" end of the tool, press the battery backwards and away from battery door until the left corner of the battery tucks under the post in the battery compartment. Tuck all of the battery wires and connectors into the battery compartment. Before replacing battery into compartment, please be sure battery wires are on side closest to opened battery door; the battery cannot be installed properly if wires are on other side. Close door so that it is flush with headset. 21
-
 1
1 -
2
-
3
-
4
-
5
-
 6
6 -
 7
7 -
 8
8 -
 9
9 -
 10
10 -
 11
11 -
 12
12
 |
 |