Plantronics H41N User Guide - Page 6
Volume Adjustment/mute Switch, Clothing Clip, Fitting With Glasses, Quick Disconnect™ - m12
 |
View all Plantronics H41N manuals
Add to My Manuals
Save this manual to your list of manuals |
Page 6 highlights
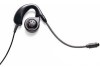
DIAGRAM KEY GB VOLUME ADJUSTMENT/MUTE SWITCH Fig. 6 If you are using an M12 or E10 adapter there is a variable volume control. Start with setting 4, then increase or decrease the setting until you reach a comfortable listening volume. You can prevent a caller from hearing your voice by pressing the mute switch on the adapter. Voice contact can be retrieved by pressing the switch again. If you use an adapter please refer to the adapter user guide. If you do not have an adapter these features will be controlled by your telephone system. Please refer to the appropriate user guide. CLOTHING CLIP Fig. 7 The clothing clip keeps the headset properly positioned by supporting the weight of the cord. Attach the clothing clip comfortably at chest height, making sure there is enough slack to allow for head movement. FITTING WITH GLASSES Fig. 8 If you are wearing glasses you can use the glasses clip to help make the headset feel more stable. Slip the clip onto your glasses and attach the headset to the clip. If you are wearing thinner metal frames, use the middle tab to help hold the clip in place. Then you can attach the headset. QUICK DISCONNECT™ Fig. 9 Some headsets are fitted with a Quick Disconnect connector. Before you use your headset, join the adapter cable and the Quick Disconnect together. When you separate the Quick Disconnect, you put the ongoing conversation 'on hold' without removing the headset. To do this, grasp the Quick Disconnect as shown and pull straight apart. To resume the call, reconnect the two halves. 4
-
 1
1 -
 2
2 -
 3
3 -
 4
4 -
 5
5 -
 6
6 -
 7
7 -
 8
8 -
 9
9 -
 10
10 -
 11
11 -
 12
12 -
13
-
14
-
15
-
16
-
17
-
18
-
19
-
20
-
21
-
22
-
23
-
24
-
25
-
26
-
27
-
28
-
29
-
30
-
31
-
32
-
33
-
34
-
35
-
36
-
37
-
38
-
39
-
40
-
41
-
42
-
43
-
44
 |
 |
