Plantronics MX10 User Guide - Page 6
set telephone/amplifier, connect - headset amplifier
 |
UPC - 017229007048
View all Plantronics MX10 manuals
Add to My Manuals
Save this manual to your list of manuals |
Page 6 highlights
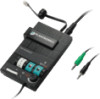
Switcher.biling.ii-25 11/4/98 7:58 PM Page 4 INSTALLATION STEPS 4 S T E P set telephone/amplifier Compatibility Switch 34 5 6 12 3 4 5 6 -+ 34 5 6 1. Put on headset. 2. Lift the phone's handset off the cradle and place it on your desk. 3. If you don't hear a dial tone, adjust the Telephone/Amplifier Compatibility Switch as indicated below: 1. Remove the Telephone Compatibility Switch Access Door by placing two fingers or thumbs on the raised bumps and pushing down. 2. Remove the flat, plastic screwdriver from the bottom of the amplifier by sliding it through the braces holding it in place. 3. Make sure the amplifier is in the default settings, and your telephone handset is off of its cradle. 12 3 4 5 6 -+ 34 5 6 4. Using the screwdriver, slide the Compatibility Switch until you hear a clear dial tone. Experimenting with various switch settings will not harm the amplifier or your telephone. 4 english INSTALLATION STEPS 5 S T E P connect to an audio device 1. Plug the single-jack end of the Audio Device Cable (mini-DIN) into the external audio device jack on the rear panel of the amplifier. 2. Plug the twin jack end of the Audio Device Cable into the audio device, matching the icons. english MIC Line Out SPKR 5
-
 1
1 -
 2
2 -
 3
3 -
 4
4 -
 5
5 -
 6
6 -
 7
7 -
 8
8 -
 9
9 -
 10
10 -
 11
11 -
 12
12 -
13
-
14
-
15
-
16
-
17
-
18
-
19
-
20
-
21
-
22
-
23
-
24
-
25
-
26
-
27
-
28
-
29
-
30
-
31
-
32
 |
 |
