Plantronics S12 User Guide - Page 1
Plantronics S12 Manual
 |
UPC - 017229116719
View all Plantronics S12 manuals
Add to My Manuals
Save this manual to your list of manuals |
Page 1 highlights
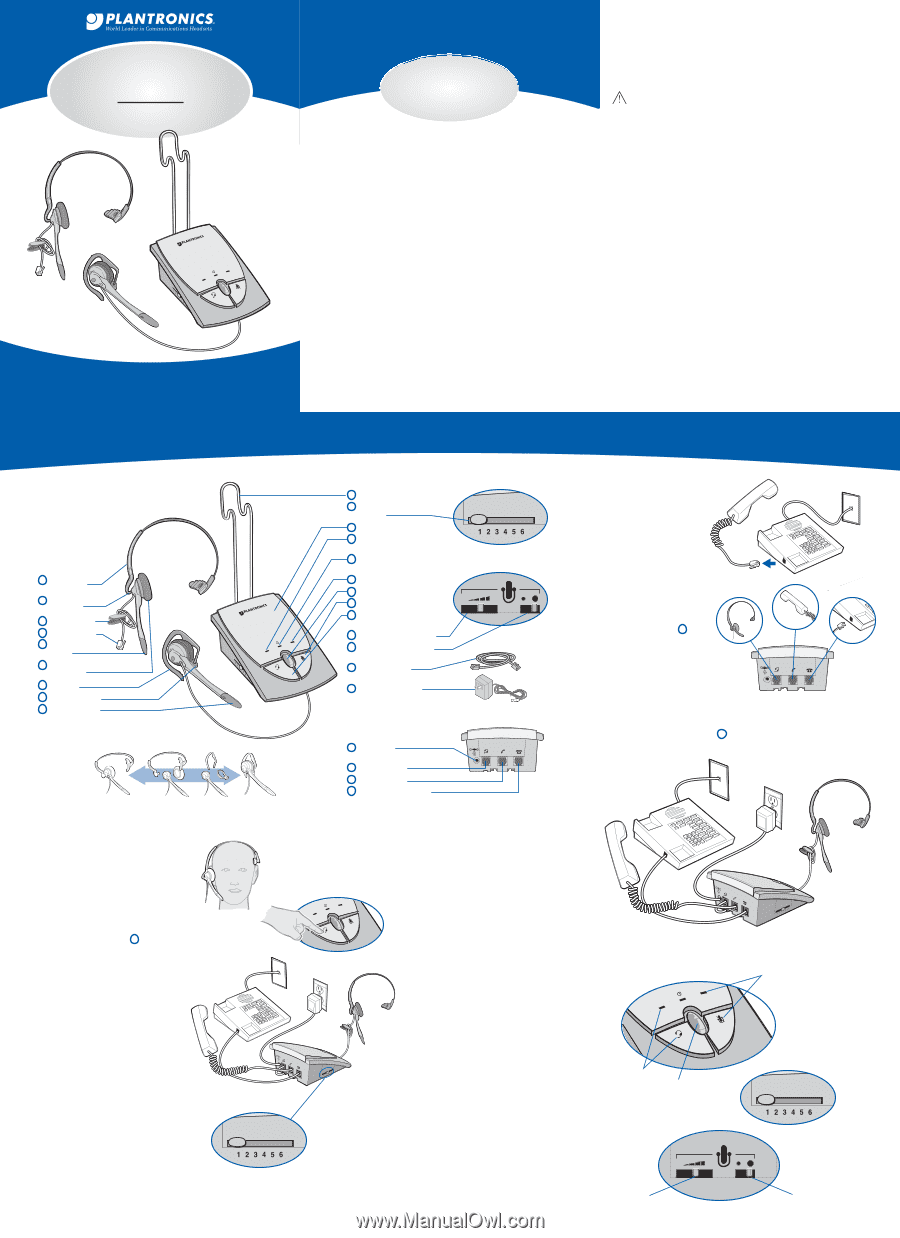
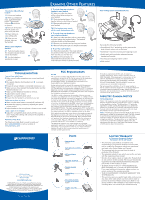
TELEPHONE HEADSET SYSTEM S12 QUICK START USER GUIDE WELCOME The S12 Telephone Headset System is designed to add a headset to an existing telephone. The S12 System provides precise levels of listening and talking comfort and crystal clear voice quality. The S12 System is not designed to work on telephones that have the dial pad in the handset or on cordless telephones. This user guide provides the following steps to quickly set up and use your headset system. 1. Identify the Components 2. Attach to Telephone 3. Set Amplifier Compatibility Switch 4. Make a Test Call The other side has more details: s Examine other features s Troubleshooting s Technical Support Center Information s FCC Information s Parts and Accessories s Warranty and Service IMPORTANT SAFETY INFORMATION Read and follow all instructions and warnings prior to using the product. When using your telephone equipment, these instructions and warnings should be followed to reduce the risk of fire, electric shock, injury to persons, and damage to property. WARNINGS For your comfort, health, and safety, do not exceed moderate listening levels. Use only the Listed AC power adapter supplied by Plantronics. Unplug this product from the wall outlet before cleaning. Do not use liquid cleaners or aerosol cleaners. Avoid contact with liquids. Do not locate this product near water, for example, near a bath-tub or sink, in a wet basement, or near a swimming pool. This product should never be placed near or over a radiator or heat register. This product should not be placed in a built-in installation unless proper ventilation is provided. Do not allow anything to rest on the power cord. Do not locate this product near operating machinery or in areas where the power cord is likely to be damaged by furniture or foot traffic. Discontinue use of product and contact Plantronics if the product overheats, has a damaged cord or plug, has been dropped or damaged, or if the product has been dropped in water. Do not overload outlets and extension cords as this can result in the risk of fire or electric shock. Never disassemble or push objects of any kind into this product as this may short out parts that could result in a fire or electric shock. Use caution when installing or modifying telephone lines. Do not use the telephone equipment to report a gas leak in the vicinity of the leak. S12 QUICK START GUIDE 1Identify the Components Over-the-Head 1 Adjustable Headband 2 Headset Assembly 3 Clothing Clip 4 Headset Plug 5 Microphone Boom 6 Ear Cushion Assembly 7 Earloop 8 Pivot Ball Ring 9 Firefly® In-Use Indicator Over-the-Ear Over-the-Head............converts to............Over-the-Ear 3Set Amplifier Compatibility Slide Switch 3.1 Put on headset and press the 3.1 headset button. The headset indicator 13 should be on (green). 3.2 Lift the telephone's handset off the cradle and place it on your desk. 3.2 3.3 If you hear a clear dial tone, you can proceed to Step 4. 3.4 If you don't hear a dial tone, adjust the compatibility slide switch following this process: 1. Slide the compatibility slide switch until you hear a clear dial tone. There may be multiple settings with a dial tone. Select the one that sounds most like the handset of your phone. Experimenting with various switch settings will not harm the amplifier or your telephone. 10 Headset Holder 11 Compatibility Slide Switch 12 S12 Amplifier 13 Headset Indicator (Green) 14 Power Indicator (Green) 15 Mute Indicator (Red) 16 Listen Volume Control 17 Mute Button 18 Headset/Handset Button 19 Speak Volume Control 20 Speak Volume Master (Hi, Low) Switch 21 Cord (Phone to Amplifier) 22 AC Power Adapter 23 AC Power Adapter Jack 24 Headset Jack 25 Handset Jack 26 Telephone Base Jack Left Side View Right Side View Back View 2 Attach Amplifier to Telephone 2.1 Unplug your telephone handset cord from the telephone base. 2.1 2.2 Plug your telephone handset cord into the S12 amplifier handset jack. 2.3 Connect the cord 21 between the telephone base jack on the S12 amplifier and your telephone base. 2.4 2.2 2.3 2.4 Plug the headset plug into the headset jack. 2.5 Route the headset cord through the cable management channel on the bottom of the amplifier (not shown). 2.6 Snap in the headset holder 10 (not shown). 2.7 Plug the AC power adapter into the AC power adapter jack and plug into a standard AC wall output. 2.7 4 Make a Test Call 4.1 Verify that the mute button is off. The mute indicator should not be illuminated 4.2 Remove the phone handset from the cradle and place on your desk. 4.1 1. If you do not hear a dial tone in the headset, press the headset button. The headset indicator is on. 4.3 Use your telephone keypad to call a friend or colleague. 4.4 Adjust the listen volume using the listen volume control. 4.5 If your friend cannot hear you, or you hear a buzz or hum, try changing the 4.21 4.4 compatibility slide switch. 3.4 4.5 4.6 Adjust how loud you sound to the other party by adjusting the speak volume control. 4.7 If you sound too loud, move the speak volume master switch to its lower setting and adjust the speak volume control. 4.8 After completing the call, return the handset to its cradle. 4.6 4.7
-
 1
1 -
 2
2
 |
 |