Polaroid TLA-01901C User Guide - Page 13
Product Features, Product Notes - lcd hdtv
 |
UPC - 826219010179
View all Polaroid TLA-01901C manuals
Add to My Manuals
Save this manual to your list of manuals |
Page 13 highlights
Product Features: „ BUILT-IN HD Tuner: Receive the ATSC Signal, without additional ATSC receiver. „ HDMI: Capable of receiving the high definition digital signal in 480p, 720p, 1080i, etc; „ HDTV Monitor: Enables you to receive the 1080i, 720p, 480p and 480i digital TV formats. By using the component IN jacks, you can connect a set-top box or DVD to enjoy the improved audio/video quality offered by these programs. „ EPG Display: Show information of the electronic program guide. „ Dolby AC-3 decoder „ V-Chip Function V-Chip technology allows parents to block unsuitable programming for younger viewers. „ CCD Function Allow you to select from the closed caption mode (for programs that are broadcast with closed caption). „ MTS Sound System Enjoy stereo, bilingual and mono programs. „ Timer function Automatically shuts off at certain preset time, and enters into the standby mode. „ Auto Off if no signal input In TV mode, the LCD TV will automatically power off within 15 minutes and enters into Standby Mode if there is no signal input. „ Multi-Language On-Screen Display menu Graphical user interface makes the menu operation more user-friendly. Product Notes: 1. The outdoor antenna should be properly installed according to its installation guide. 2. The antenna cable should not be tied to the power cord. 3. Please keep the packaging for future use when moving to a new location. 4. Connect the audio and video cables to the corresponding audio and video ports on the TV and the external device. 5. If you want going back to the TV mode in AV mode, please press the digit button to view the corresponding channel. 6. When connecting PC or HDMI cable, make sure to connect to the proper connector. Do not force the cable into the wrong input because this may cause damage to the cable or input. When using a PC (VGA) cable, use the screws from the cable to securely attach to the connector. Slowly tighten in a clockwise direction. Do not over-tighten. 7. Some remote control button functions may not be available. 12
-
 1
1 -
2
-
3
-
4
-
5
-
6
-
7
-
 8
8 -
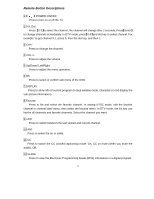 9
9 -
 10
10 -
 11
11 -
 12
12 -
 13
13 -
 14
14 -
 15
15 -
 16
16 -
 17
17 -
 18
18 -
19
-
20
-
21
-
22
-
23
-
24
-
25
 |
 |
