Polk Audio Atrium8 Atrium Series - English - Page 4
Mounting Options Safety First, Painting The Cabinet, Bracket Knobs & Bracket, Painting - atrium8sdi
 |
View all Polk Audio Atrium8 manuals
Add to My Manuals
Save this manual to your list of manuals |
Page 4 highlights
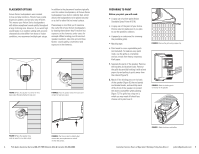
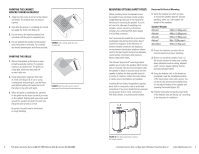
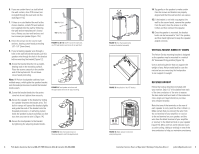
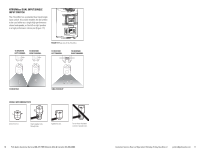
PAINTING THE CABINET, BRACKET KNOBS & BRACKET 1. Apply two thin coats of primer to the cabinet and knobs. The bracket does not require a primer. 2. Only after the primer is completely dry should you apply the finish color [figure 8]. 3. Do not remove the masking material (not included) until the paint is completely dry. 4. Do not reattach the speaker to the bracket until the bracket is mounted. Try to handle any freshly painted parts as little as possible. FIGURE 8: After priming, apply thin coats of finish color. PAINTING THE GRILLE 1. Atrium loudspeaker grilles have an even, protective powder coating. This powder coating is an ideal primer. The grille has a logo pod, which you may mask off or paint right over. 2. Using spray paint, spray two thin coats of finish color [figure 9]. If you're using a compressor and spray gun, use the finest, most diffuse setting. Be careful not to fill the holes in the grille with paint. 3. When the paint is completely dry, carefully fit the grille into its recess so that it just rests on the cabinet. Starting with one corner, work around the speaker and push the grille into the grille notch a little at a time. Be gentle; the grille may be easily bent by rough handling. FIGURE 9: Paint the grille. Use thin coats of spray paint. Do not block grille holes with paint. 6 Polk Audio Customer Service 800-377-7655 (Outside USA & Canada: 410-358-3600) MOUNTING OPTIONS (SAFETY FIRST) When installing Atrium loudspeakers note the weight of your particular model and the weight bearing tolerance of the material to which you're mounting the speaker. If you're not sure of a safe way of mounting your speakers, please consult a professional installer, your authorized Polk Audio dealer or a building contractor. You'll maximize the useful life of your Atrium loudspeakers by placing them where they'll receive less exposure to the elements. If extreme weather conditions are expected, we recommend storing your speakers indoors. Look for the best overall compromise between sound quality, convenience and exposure. Never compromise safety. The Atrium's Speed-Lock™ mounting bracket enables you to mount the speaker either horizontally or vertically. The Speed-Lock bracket holds the speaker in place so you can easily aim the speaker to deliver the best possible sound in a variety of situations. Follow the steps below to safely secure the brackets and speakers. Installing Atrium Series loudspeakers requires basic skills in using tools such as a drill and screwdriver. If you are in doubt that you possess the necessary skills or tools, consult your Polk Audio dealer, or a professional installer. Horizontal & Vertical Mounting 1. Verify the material on which you plan to mount the speakers (plaster, drywall, paneling, stone, etc.) can support the weight of the speakers: Speaker Weights Atrium4 Atrium5 Atrium6 Atrium7 Atrium8SDI 3.6lbs / 1.63kg each 4.6lbs / 2.09kg each 5.4lbs / 2.45kg each 8lbs / 3.63kg each 9.7lbs / 4.4kg each 2. Ensure the locations you select do not conceal electrical wiring or plumbing. 3. Before you install the speaker, hold it in the chosen location to make sure it safely clears obstacles such as ceiling, adjacent walls, corners, beams, lighting fixtures and door/window frames. 4. Using the keyhole slots in the bracket as a template, mark the installation location of the two keyhole slots with a pencil. You can do this by removing the bracket knobs on the top and bottom of the speaker and removing the bracket [figure 10]. 5. Position the bracket so that the small ends of the keyhole slots are facing "up" according to the direction of installation. FIGURE 10: Turn the bracket knobs to remove the bracket assembly. Customer Service Hours of Operation: Monday-Friday, 9AM-6PM EST [email protected] 7
-
 1
1 -
 2
2 -
 3
3 -
 4
4 -
 5
5 -
 6
6 -
 7
7 -
 8
8 -
 9
9 -
 10
10 -
11
-
12
-
13
-
14
-
15
-
16
-
17
-
18
-
19
-
20
-
21
-
22
-
23
-
24
-
25
-
26
-
27
 |
 |
