Polk Audio CSW155 CSW100 Owner's Manual - Page 6
CSW100, CSW155 - subwoofer
 |
View all Polk Audio CSW155 manuals
Add to My Manuals
Save this manual to your list of manuals |
Page 6 highlights
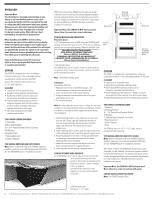
ENGLISH Important Note: You should have a thorough understanding of and adhere to all local building and fire codes. Also, you should be familiar with the area behind the wall or ceiling into which you plan to install your speaker. Always use wire that meets appropriate building and fire codes. Use at least 14 gauge wire or heavier for the best sound quality. (Note: Wiring is best performed by an experienced professional.) When installing your CSW In-wall/in-ceiling subwoofer, be aware of the weight of your particular model (see specification page for the weight of your model) and the sturdiness of the material into which you are installing the speaker. Be aware of any concealed studs, electrical wiring or plumbing in the wall or ceiling into which you are installing the subwoofer. SPEX Cards configure the SWA500 for the particular model subwoofer you are installing. The card pre-programs equalization and overload protection. The card also has power control circuitry designed specifically to the subwoofer's requirements for extra reliability (see SWA500 instruction manual for installation instructions). Important Note: The CSW100 IS NOT moisture-proof. Never allow it to come into contact with water. CSW100 INSTALLATION PROCEDURE Protective Cover A 1/2" thick protective cover of MDF covers the CSW100 grille opening. This protective cover (3 1/4" x 13") is also the template you will use to cut the grille opening. Affixed to the MDF cover If you doubt that you possess the necessary skills or tools, consult your Polk Audio dealer or a professional installer. CSW100 The CSW100 is designed for in-floor, in-ceiling or in-furniture placement. It fits comfortably between standard joists and the narrower QuietFloor® spacing. Once installed, all you see is a tiny 2" x 12" grille (optional). FEATURES • Long-throw 10-inch subwoofer driver. • Klippel Distortion Analyzer optimized driver. • Rigidly braced MDF enclosure construction for resonance- and rattle-free performance. • Patented High Velocity Compression Drive® bandpass alignment with slot bass venting- produces a gutsy, driving bass that other similarly sized built-ins can't equal. • Mounting hardware and anti-rattle isolation pads included. THE CSW100 CARTON INCLUDES: 1 Subwoofer 4 Mounting Brackets 16-3/4" Particle Board Panhead Screws 16 Washers 3 Isolation Pads 1 Registration Card 1 Owner's Manual THE SWA500 AMPLIFIER AND SPEX CARDS Note: When installing the Polk Audio SWA500 matching amplifier, make sure you install the appropriate SPEX Card. See the SWA500 Manual for installation procedure. is the following label: The CSW100 uses a 2" x 12" grille. Polk offers such a grille as an accessory. If you choose to use another grille, use one that doesn't resonate and caulk it. Note: The CSW100 weighs 33 lbs. Installation To install the CSW100: 1. Taking the dimensions of the CSW enclosure, mark off the dimensions of the enclosure and then the center line dimensions of the woofer opening. 2. Using the protective cover/template, mark off the grille opening you wish to cut. 3. Cut the grille opening. CSW155 The CSW155 is designed for in-wall placement, either preconstruction or retrofit. It fits comfortably between 16" OC studs. FEATURES • Long-throw 10" subwoofer driver. • Klippel Distortion Analyzer optimized driver. • Rigidly braced MDF enclosure construction for resonance- and rattle-free performance. • Direct Radiating Slot Port enclosure-produces a gutsy, driving bass that other similarly sized built-ins can't equal. • Mounting hardware and anti-rattle isolation pads included. Note: Hold the subwoofer into the floor or ceiling. You will need to support a 33 pound subwoofer during the installation, so have a co-worker or mechanical device support the woofer during final installation. 4. Attach mounting brackets to the subwoofer at each corner. (Use the 3/4" screws supplied) Tighten both brackets on one side of the subwoofer until the brackets seat flush against the subwoofer. The other brackets should remain loose. 5. Attach additional anti-resonance pads (included) to any sides of the subwoofer that will mount flush against support beams. 6. Place the subwoofer in the floor or ceiling space flush with the beam face, then attach the brackets to the beam, tightening them down completely. 7. Extend the two loose brackets that attach to the other beam and tighten them flush against the beam. 8. Insert the grille into the opening; caulk and secure it. CSW100 SPEAKER WIRE HOOKUPS The CSW100 has one (1) set of input terminals. Connect the red (+ positive terminal) of the subwoofer to the positive (+) terminal on the amplifier or receiver. Connect the black to the (-) negative terminal) on the subwoofer to the negative (-) terminal on the amplifier or receiver. THE CSW155 CARTON INCLUDES: 1 Subwoofer 4 Mounting Brackets 16-3/4" Particle Board Panhead Screws 16 Washers 11 Isolation Pads (6 installed, 5 included) 1 Registration Card 1 Owner's Manual 1 Grille The CSW155 uses a 15 1/2" x 17 1/2" grille, which is included with the subwoofer. THE SWA500 AMPLIFIER AND SPEX CARDS Note: When installing the Polk Audio SWA500 matching amplifier, make sure you install the appropriate SPEX Card. See the SWA500 Manual for installation procedure. SPEX Cards configure the SWA500 for the particular model subwoofer you are installing. The card pre-programs equalization and overload protection. The card also has power control circuitry designed specifically to the subwoofer's requirements for extra reliability (see SWA500 instruction manual for installation instructions). Important Note: The CSW155 is NOT moisture-proof. Never allow it to come into contact with water. CSW155 INSTALLATION PROCEDURE Note: The CSW155 weighs 36 lbs. CSW100 shown with Polk Audio 2" x 12" grille. 6 Polk Audio Customer Service: 1-800-377-7655 (Outside US & Canada: 410-358-3600) Monday-Friday, 9:00 AM-6:00 PM EST, [email protected]
-
 1
1 -
 2
2 -
 3
3 -
 4
4 -
 5
5 -
 6
6 -
 7
7 -
 8
8 -
 9
9 -
 10
10 -
 11
11 -
 12
12 -
13
-
14
-
15
-
16
-
17
-
18
-
19
-
20
-
21
-
22
-
23
-
24
-
25
-
26
-
27
-
28
 |
 |
