Polk Audio I-Sonic Digital Audio System I-Sonic Digital Audio System Owner's M - Page 7
Back Panel, Hookups, Quick Set-Up - black
 |
View all Polk Audio I-Sonic Digital Audio System manuals
Add to My Manuals
Save this manual to your list of manuals |
Page 7 highlights
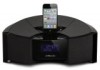
FM ANTENNA AM ANTENNA AUX INPUT SERVICE PORT 24V DC, 2.09A Back Panel Hookups 1. External FM Antenna 2. External AM Antenna (Black Is Ground) 3. Aux Input (3.5 mm) 4. Power Quick Set-Up 1. Connect The Power Connect the power supply to an electrical outlet. Connect the output of the power supply to the I-Sonic. 2. Connect The Antennas Connect the FM antenna Connect the AM antenna-black is ground. 3. Set The Time Press and release the "TIME SET" button on the top of the console. Use the adjust buttons ( ) to choose 12HR or 24HR clock type. Press and release the "TIME SET" button. Use the adjust buttons ( ) to set the hour. Press and release "TIME SET" button. Use the adjust buttons ( ) to set the minute. Press and release "TIME SET" button. Use the adjust buttons ( ) to select AM or PM. Press and release the "TIME SET" button. The clock is now set. Customer Service Hours of Operation Monday-Friday, 9AM-5:30 PM EST [email protected] I-Sonic: Setting Up Your I-Sonic 7
-
 1
1 -
 2
2 -
 3
3 -
 4
4 -
 5
5 -
 6
6 -
 7
7 -
 8
8 -
 9
9 -
 10
10 -
 11
11 -
 12
12 -
13
-
14
-
15
-
16
-
17
-
18
-
19
-
20
-
21
-
22
-
23
-
24
-
25
-
26
-
27
-
28
-
29
-
30
-
31
-
32
-
33
-
34
-
35
-
36
-
37
-
38
-
39
-
40
-
41
-
42
-
43
-
44
-
45
-
46
-
47
-
48
-
49
-
50
-
51
-
52
-
53
-
54
-
55
-
56
-
57
-
58
 |
 |
