Polk Audio RC55i DIY In-Ceiling and In-Wall Installation Guide - Page 14
This is most likely to, happen if you are using a power driver. Set your power driver's, torque - pair
 |
View all Polk Audio RC55i manuals
Add to My Manuals
Save this manual to your list of manuals |
Page 14 highlights
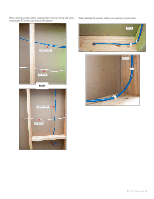
For additional acoustic performance install some insulation into the wall cavity (be sure to place the same amount behind each speaker). Now install the speaker into the wall and tighten up the dog-clamps with your screwdriver. Be careful not to over tighten the speaker-the dry wall or sheet rock could dimple, or break. This is most likely to happen if you are using a power driver. Set your power driver's torque setting to "1" to help avoid over-tightening screws. Strip your speaker cables back about 3/4", and insert the pair into the input on the back of the speaker: (note* Reminder-for an easier installation if you leave a generous cable lead to work with). View of rotating cam after installation from inside the wall. D I Y C I T u t o r i a l 14
-
 1
1 -
2
-
3
-
4
-
5
-
6
-
7
-
8
-
 9
9 -
 10
10 -
 11
11 -
 12
12 -
 13
13 -
 14
14 -
 15
15 -
 16
16
 |
 |
